Fundamentals of Accounting | Accounting Basics

What is accounting?

To understand the fundamentals of accounting, you must comprehend the definition of accounting.

Accounting is consolidating the financial transactions of a company using a systematic approach. It involves recording, analyzing, reporting, and retrieving financial transactions when required. Accounting is mandatory for legal reasons, taxes, and to understand business health. Accounting ensures that every business transaction is accounted for and if you need to pull out information about any expense you can do so with ease.  Accounting can be divided into two parts; financial accounting and management accounting.

Financial accounting deals with the proper presentation of the transactions in the form of financial statements such as income statements which are shared with people outside the business. Management accounting is a form of accounting whereby the management department receives financial information so they can take vital business decisions to ensure efficient business continuity. Management accounting is part of the internal process as it is used for improving the overall business. It includes information such as the budget.

Key objectives of accounting

The three key objectives of accounting are as follows.

  • Record keeping

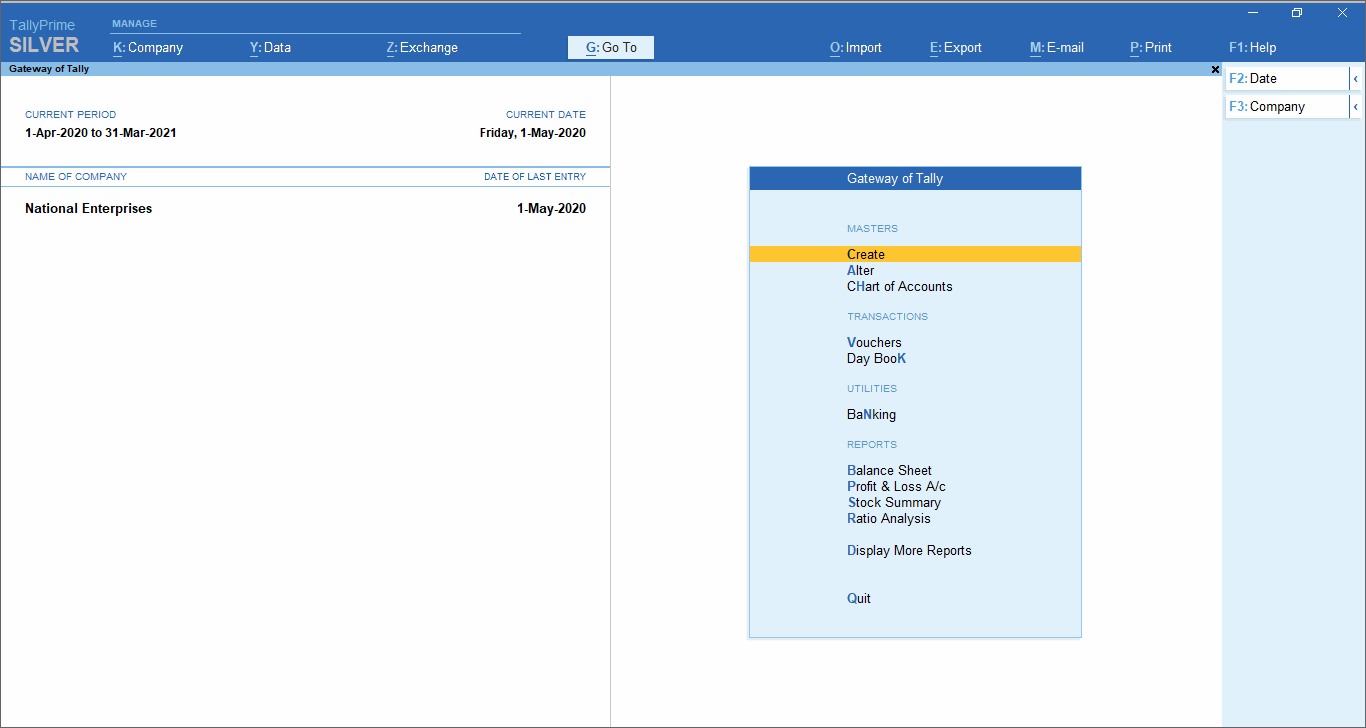
The fundamentals of accounting include record keeping which is the primary function of accounting. A business must use standard forms of storing and retaining information so it can be retrieved when the need for it arises. Thorough and accurate storage of records is essential for all transaction-related purposes. A software package such as TallyPrime can be utilized to store every transaction that takes place.

  • Reporting

Financial reporting is a key accounting objective after record keeping. Accounting enables businesses to record and report their financial status at the end of a particular period. It involves putting together transaction details and reports that are necessary to make sense of a certain aspect of a business during a specific time period. Financial statements are results of aggregating financial information of a business and these are useful tools for reporting the financial parts of a business.

  • Analysis

The reports which are based on the business records are analyzed in accounting. When business health needs to be determined then the business reports are analyzed. Analysis in accounting enables accountants to find out ways to improve business efficiency, upgrade processes, and to see where unnecessary expenses are being made. Analysis of financial reporting allows your business to run without problems as it ensures no discrepancies are found.

TallyPrime

Accounting solutions to help you manage your business just the way you want.

Accounting process and steps

The accounting process is one of the fundamentals of accounting. Also known as an accounting cycle, it follows a transaction from the moment it was recorded to when a report is made using various transactions that occurred in a particular period of time. Businesses can use single-entry accounting or double-entry accounting. Firms use accounting software packages such as TallyPrime to automate the accounting process. The benefits include saving time, effort, and money for storage, analysis, and retrieval purposes. Companies can fully automate their accounting or they can leave some aspects to be manually handled.

Steps of the accounting process

There are 8 steps in the accounting process. This is a framework and it can vary from company to company as each company has an individual model that it works with.

  • Step 1: Transaction identification

You need to identify your business transactions first. Every unique transaction needs to be recorded so that it is reflected correctly. All expenses such as costs to acquire, repair, and upgrade need to be accounted for. Additionally, every sale record must be stored so it all sales transactions are in one place.

  • Step 2: Journal creation

This step involves recording each transaction in a journal. You can choose between two types of accounting; cash accounting and accrual accounting. The difference is when the transactions are recorded and stored. Cash accounting is recorded the moment the cash is paid or received. Accrual accounting is when transactions are recorded as they occur.

  • Step 3: General ledger posting

After the entry in the journal, the transaction details need to be reflected in the general ledger. The general ledger allows the categorization of transactions because they are saved according to different accounts. That is, transactions of the same account are recorded in one place and so on. This allows easy monitoring according to particular accounts.

  • Step 4: Trial balance

In this step, the trial balance is calculated. Ideally, the debits must be equal to credits for every account. The trial balance throws light on the balances which have not been adjusted yet in every account. When an unadjusted trial balance is found, it is analyzed in the next step of the accounting cycle

  • Step 5: Worksheet analysis

Adjustment of the various transaction entries is done in this step of the accounting process. First, you need to create a worksheet and make sure that the credits and debits are equal to each other. In the case of accrual accounting, there is an additional step here which is to adjust the entries for revenue and expense matching purposes.

  • Step 6: Journal entries adjustment

This is the stage in the accounting cycle where adjustments need to be made. Once the adjustments have been done, the trial balance is prepared again to ensure that the debits are equal to the credits. Only then can you move on to the next step.

  • Step 7: Financial statements

This step involves the financial statements that are generated after all the entries have been adjusted in the journal. In the majority of the cases, the major financial statements will include the cash flow statement, income statement, and balance sheet. These uncover the truth behind how the business is doing financially and how much profits it is earning.

  • Step 8: Closing

The last step of the accounting cycle is when the books are closed. This holds for the temporary accounts as they are shifted to permanent accounts. For example, the profit and loss statement is transferred to the retained earnings accounts and so on. The closing occurs at the end of the reporting period. After this, the cycle starts again.

Key accounting reports

The critical accounting reports are as follows.

  • Balance sheet

The balance sheet contains information about the total liabilities, assets, and stockholder equity. It gives information about the company’s resources and how these sources are being financed. A balance sheet can help you make better business decisions.

  • Profit and loss statement

The profit and loss statement is also known as P&L and income statement. It shows the revenues and expenses of a business over a period of time. A business is going in the right direction when the profits exceed its losses.

  • Statement of cash flows

This report summarizes the cash that is received or paid. It doesn’t reflect the non-cash transactions that take place such as purchases made on the basis of credit. It contains three parts; investing, operating, and financing. It gives information about cash generation.

How accounting software helps businesses

An accounting software tool can take the complexity out of accounting. Whether the business is small, growing, or enterprise-level, every business needs an accounting software package. TallyPrime is the best example of accounting software that handles everything. All you need to do is record the bills and invoices. TallyPrime will automate the rest. It minimizes human errors, automates management of books of accounts, generates informative customized reports and financial statements, and makes tax returns easy. Additionally, it improves inventory management, ensures tax compliance, streamlines business processes, aids in business forecasting, and accurately generates financial statements. This ensures you know how your business is doing at every step of the way.

Some of the key features of TallyPrime:

  • Record and bookkeeping
  • Invoicing and billing
  • Pre-defined chart of accounts
  • Accounts receivable and payable management
  • Wide range of accounting and financial reports
  • Multi-currency support
  • Sales and Purchase Management
  • Online business reports
  • Inventory Management
  • Taxation support

Get Familiar with TallyPrime

Interactions in TallyPrime follow patterns that help you accomplish tasks with minimal learning. Understand these patterns so that you can try any feature.

Once you install TallyPrime, activate the license, and create a Company, you can start recording your business transactions. To make use of the flexibility of TallyPrime, and enhance your productivity, take a quick look at the interaction experiences and understand the patterns.

Home screen that you see when opening TallyPrime includes the top menu, Go To/Switch To buttons, Gateway of Tally, and buttons on the right hand side. These options aid in finding and opening different ledgers, vouchers and reports that help you accomplish your business tasks. There are multiple ways in which you can reach the desired destination. You can choose the ways you prefer.

Navigation across TallyPrime widely uses Enter key and Escape key. While there are different ways in which you can reach a destination, pressing Enter will take you to the next level of information, and Escape will take you back to the previous level, until you reach Gateway of Tally. The same Escape key will also let you close TallyPrime, with a confirmation. Similarly, you can use different key combinations to achieve what you want. In fact, you can navigate and control TallyPrime completely using a keyboard.

Data entry for recording different types of transactions are made similar to enhance learning, and retention of knowledge. Master creation is made simple by using similar actions wherever possible, and multiple ways to reach the create options.

Reports are presented in a hierarchical manner for easy analysis. While TallyPrime provides a large number of reports, reading and understanding the reports are simplified with similar interactions. When you open a report, summary data is provided for the most relevant report period. From there you can change the report period, presentation format, and so on, up to the value that forms the basis of the report. Consistent interactions make it easier for you to navigate, and memorise the steps.

Sharing data in printed formats, or in electronic file formats through e-mail or export is another facility available by default. You can share individual vouchers, or reports, as well as in bulk, with just a few key presses. Sending payslips to your employees, or reminder letters to your parties are equally simple.

Easy setup enables you to start using TallyPrime for recording your business transactions in a couple of minutes. While there are many features available out-of-the-box, you can decide to start with the minimal set, right away. You can start using the other features as and when you come across a business need. You can explore and use many features as your business grows and diversifies. This facility helps you to start simple, and gradually add more features as needed. Many features can be switched on and switched off as you want. Alternatively, you can start using all the features in the beginning, if needed.

Set up for personal preferences is another flexibility that you get to in order to use the application comfortably. Such configurations can be done independently for every installation of TallyPrime using F12 Configurations. Different types of ledgers and vouchers can have different configurations. In a similar way you can set your preferences for reports, printing, and other data communication options.

Home Screen

When you open TallyPrime, you can see a home screen with different items – a top menu bar with pull down options, the details of the Companies that are open, the Gateway of Tally menu, and a button bar on the right-hand side of the screen.

Gateway of Tally

Top Menu has options to manage your Companies, TallyPrime application, users in your Companies, and your data storage & sharing. This menu and child items in the menu are accessible from any screen in TallyPrime. Help menu has options to launch TallyHelp and to upgrade your application to a newer release of the product. Availability of a newer release is indicated with a red dot notification on the menu name Help. Other options under the Help menu include What’s New,  TallyShop for buying add-ons, Troubleshooting to repair your application and data in case there are issues, Settings to configure your application, TDL & Add-On to manage your extensions/customisations, and an About report that shows the details of your TallyPrime installation and its environment.

Shortcuts form an easy way to interact with TallyPrime. Shortcut/hotkey to access each option in the top menu is shown in bold capital letter that is underlined, or F1. When the shortcut has a single underline, you can just press Alt and the letter key to access the corresponding option. Shortcuts without underline work with the single key press. When you access any of the menu items, a list of options grouped under the menu item opens, and you can access each using the corresponding shortcut or mouse. For example, Alt+K > C will open Company Creation screen.

Tip: You can use just the keyboard to interact with TallyPrime if you prefer so. You can also comfortably use mouse. This is possible on all screens in TallyPrime.

Go To option on the top menu helps you to quickly access any report or feature that you want to use. Any screen that you access using Go To will open on top of the current screen, and closing the screen will take you back to the screen that was open earlier. You can use Alt+G to access Go To. The option Switch To is placed with Go To as a toggle to help you move from the current screen to any other screen. You can use Ctrl+G to access Switch To.


How to Download, Install and Activate TallyPrime

You can start using the TallyPrime features in a matter of minutes. All you need to do is download the setup file, install TallyPrime, and activate the license.

If you are a new user, create a company, and start recording your transactions. You can create all ledgers needed to maintain your accounts while recording transactions. In case you want to try TallyPrime before buying it, or you are a student, you can use the Educational version.

If you are using an earlier version of Tally, upgrade to TallyPrime, and continue your business as usual.


Download and Install TallyPrime

You can download the application setup from Tally Solutions website. After downloading the setup files, install the application on your computer. Installation steps remain the same regardless of the TallyPrime edition you have purchased.

You can install TallyPrime on any computer with 64-bit edition of Microsoft Windows 7 or later.

  1. Download the setup files.
    1. Go to https://tallysolutions.com/download/.
    2. Click Download.
    3. Select the folder where you want to save the setup.exe file.
    4. Click Save.
  2. Install TallyPrime.
    1. Double-click setup.exe.
    2. Double-click Install New.
      Install new TallyPrime
    3. Configure Application Path, if needed.
      By default, the application will be installed at C:\Program Files\TallyPrime.

      • Click Configure.
      • Double-click Application Path.
      • Click … and change the path as needed.
        Note: If you are already using Tally.ERP 9, it is recommended that you install TallyPrime in a different folder. This will allow you to use both the products simultaneously, if needed.

        List of configurations for installation of TallyPrime

      • Close the List of Configurations window.
    4. Click Install.
      The application gets installed, and the following window opens.
    5. Click Start TallyPrime to launch TallyPrime.

You can activate the license and start using TallyPrime.

New Users – Activate License

If you have purchased a single user Silver License, you can activate the license on one computer. If you have a multiuser Gold License, you need to activate the license on one computer on the LAN, and configure all other installations using the same license.

Activate New License

  1. Start your TallyPrime. The Welcome to TallyPrime screen appears.
    Activate TallyPrime license
  2. Click Activate New License.
  3. If you have a Single-Site license, enter your Serial Number, Activation Key, and Administrator e-mail ID.Activate TallyPrime license
    Note: The e-mail ID provided here will be linked to your account, and used for all future communication and licensing activities.
  4. Press Enter to proceed. The Unlock License screen appears.
    Unlock TallyPrime license
  5. Enter the Unlock Key sent to your e-mail ID.
    Note: If you have not received the unlock key, press F2 (Get Unlock Key).
  6. Press Enter to unlock your license.
    After your license is unlocked, the following message appears.

After activating the license, you can create your first Company and start using TallyPrime for business transactions.

Depending on the size and scale of your business, you can have different setups.

Try it for free | Educational version

If you want to try TallyPrime before you buy, or just want to learn how to use the product, you can use the Educational version for free. You can try all features in the product, just with the restriction that voucher dates are limited to 1, 2 and 31.

  1. Start your TallyPrime. The Welcome to TallyPrime screen appears.
  2. Click Try It For Free.
    Use Educational mode

You can start using TallyPrime in Educational mode. The window title will be in dark green colour and will show EDU under the product name.