TallyPrime
TallyPrime Release 4.0
TallyPrime and TallyPrime Edit Log Release 4.0 bring great delight and joy to you with the following:
- The facility to share your business articles such as vouchers and reports through WhatsApp in a jiffy
- A simple way to import the masters and transactions maintained in the MS Excel format
- The state-of-art Dashboard that gives you a quick glimpse of your business health
Furthermore, the product improvements in the modules such as GST and Payment Request coupled with the facility to print previous and current balances in the Invoice and other enhancements make your experience with TallyPrime all the fruitful.
Highlights – TallyPrime and TallyPrime Edit Log Release 4.0
TallyPrime Release 4.0 comes with new and exciting features that will make your experience even more delightful.
- TallyPrime with WhatsApp for Business
- Import Data from MS Excel
- Graphical Dashboard
Instant Sharing of Business Details | TallyPrime with WhatsApp for Business
Considering the importance of seamless and efficient communication between businesses and their stakeholders, TallyPrime Release 4.0 brings to you the power of instant communication via WhatsApp for Business. This helps you take advantage of the technology advancements and experience enhancements in communication that rule the market.
Businesses can send documents directly from TallyPrime to one or more parties or stakeholders in a single click. Consider that you just closed your books for the quarter. You can send digitally signed financial statements to your investors and key stakeholders on WhatsApp. Similarly, you can send invoices and reminder letters to your parties via WhatsApp and get responses from them via WhatsApp. This will help in managing the cash flow better as the communications are instant.
If your business is in India, your domestic parties also get the flexibility to click the payment URLs in invoices and reminder letters sent via WhatsApp to make instant payments.
WhatsApp is now seamlessly integrated with TallyPrime. You can sign up with WhatsApp for Business from TallyPrime, and send documents to one or many parties or stakeholders at one go. While TallyPrime retains the facility to send documents through e-mail, no more worries about when the receiver would see any mail and act on it.
Easy Migration from Any Software to TallyPrime | Import Data from MS Excel
Manual data entry for high volume data is a nightmare for any business. Manual entry is time-consuming and error-prone. To address this, TallyPrime Release 4.0 provides seamless import from MS Excel. This is in addition to the existing option to import XML files.
As you might have experienced, many software products allow export of data to Excel. This enables you to get data in Excel workbooks, and import to TallyPrime.
What’s in store:
- Effortlessly import masters and transactions from Excel.
- Use any of the default templates/sample Excel files.
- Take data curated in any Excel workbook and map it to fields in TallyPrime, regardless of the format or order.
- Identify errors that occurred during import from the logs created while importing.
Visual Tool to Form Financial Insights | Graphical Dashboard
You can use Dashboards in TallyPrime for analysing business information using intuitive formats. Apart from the Sales and Purchase dashboards provided by default, you can create different dashboards. Based on your needs, you can include different reports as separate tiles, configure each tile as needed to cater to diverse requirements, and interact with each tile. Whether you’re a business owner, finance manager, or consultant, Dashboard empowers you to make data-driven decisions that fuel growth and success. You can use the graphs/charts in different tiles to monitor your cash flow, track revenue trends, analyse expense patterns, and gain a comprehensive view of your financial position and ledger balances for periods of your choice.
Dashboard in TallyPrime offers flexibility to:
- Add tiles or hide tiles, configure each tile independently, include or exclude data points, and so on.
- Restrict access to dashboards, based on user rights. If specific users have restricted access to certain tiles, such tiles will not form part of a dashboard for those users.
- Create different dashboards for different purposes, organise tiles as per your preferences, and save the views.
- Load a dashboard as the home screen when you open a Company.
- Print, export, and share with stakeholders by e-mail or WhatsApp.
Click here for release notes
Click here for download
TallyPrime Release 2.0
Release Notes – What’s New in TallyPrime
You can count on us for a delightful journey with TallyPrime as we work to enhance the product with new features and fix issues, which will make your experience even simpler and more seamless.
Highlights – TallyPrime Release 2.0
Connected experience for e-Way Bill
With the connected experience for e-Way Bill, TallyPrime enables you to –
- Generate e-Way Bill online at the time of voucher creation.
- Generate multiple e-Way Bills online at one shot.
- Cancel e-Way Bill, update Part B & Transporter ID, and extend validity for transactions in bulk.
- Print e-Way Bill for invoices with e-Way Bill number and QR Code as per the government’s requirements.
- Track the status of e-Way Bills using the e-Way Bill report and e-Way Bill Register.
- Get the latest e-Way Bill information and status from the e-Way Bill system to a transaction using e-Way Bill report and e-Way Bill Register.
As a result, you need not juggle between TallyPrime and the e-Way Bill system for various e-Way Bill activities, as everything can be done from within the product.
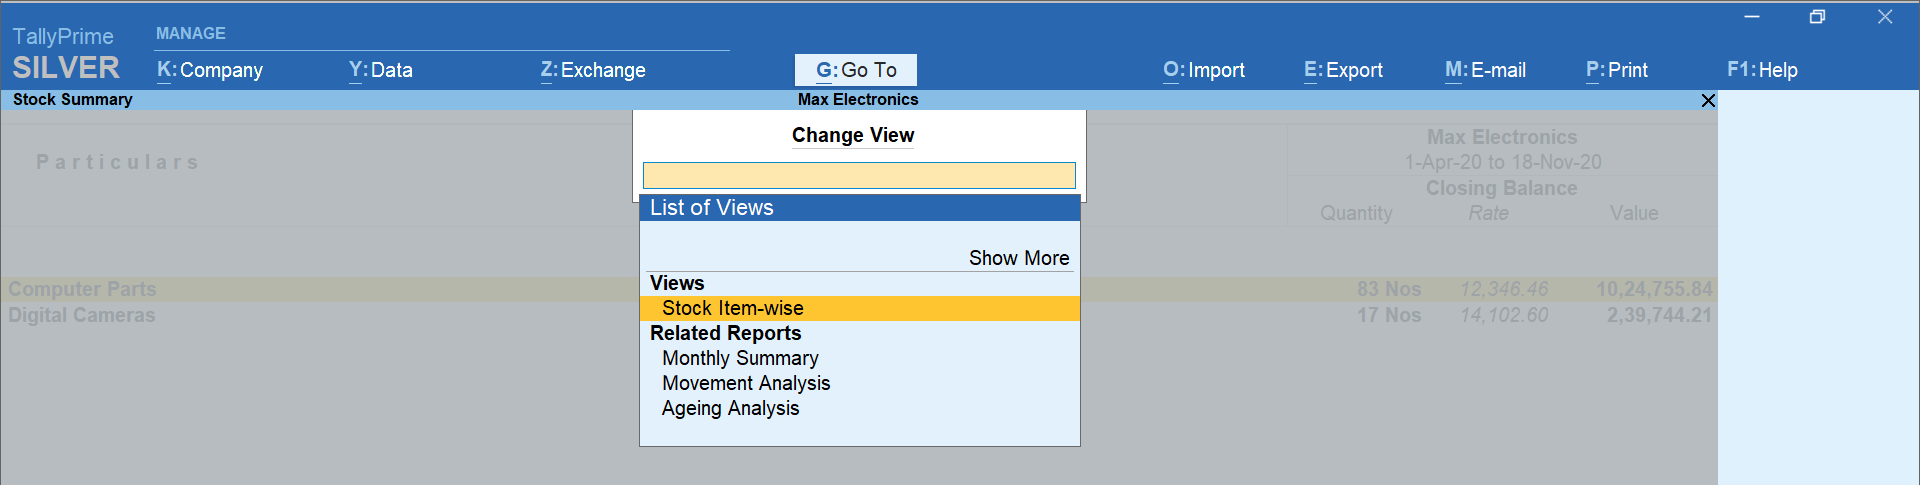
Save View for reports
The Save View feature will delight you with a personalized experience for viewing reports in TallyPrime.
You can now:
- Save a preferred view for a report with your desired configurations.
- Save a view for a report for a specific period.
- Save a view for a report opened for a particular master such as Party ledger, Stock Item, and others.
- Save views, as per your requirement, for:
- All companies on a particular computer
- A specific company
- Set a saved view as the default view.
Henceforth, the report will always open as per the configurations applied in the saved view. - Change the default view, whenever needed.
- Delete a saved view or all the views from all companies or a specific company, as needed.
- Restrict users from saving views for reports or deleting views saved in a specific company.
Saving your preferred views saves a great deal of time as you need not apply the configurations time and again.
Online GSTIN/UIN and HSN/SAC validation
TallyPrime is here with a quick and simple process to validate:
- GSTIN/UIN information for single and multiple Parties.
- HSN/SAC information for single and multiple Stock Items.
As a result, you get to know if the information entered in your books is authentic and update it, if needed.
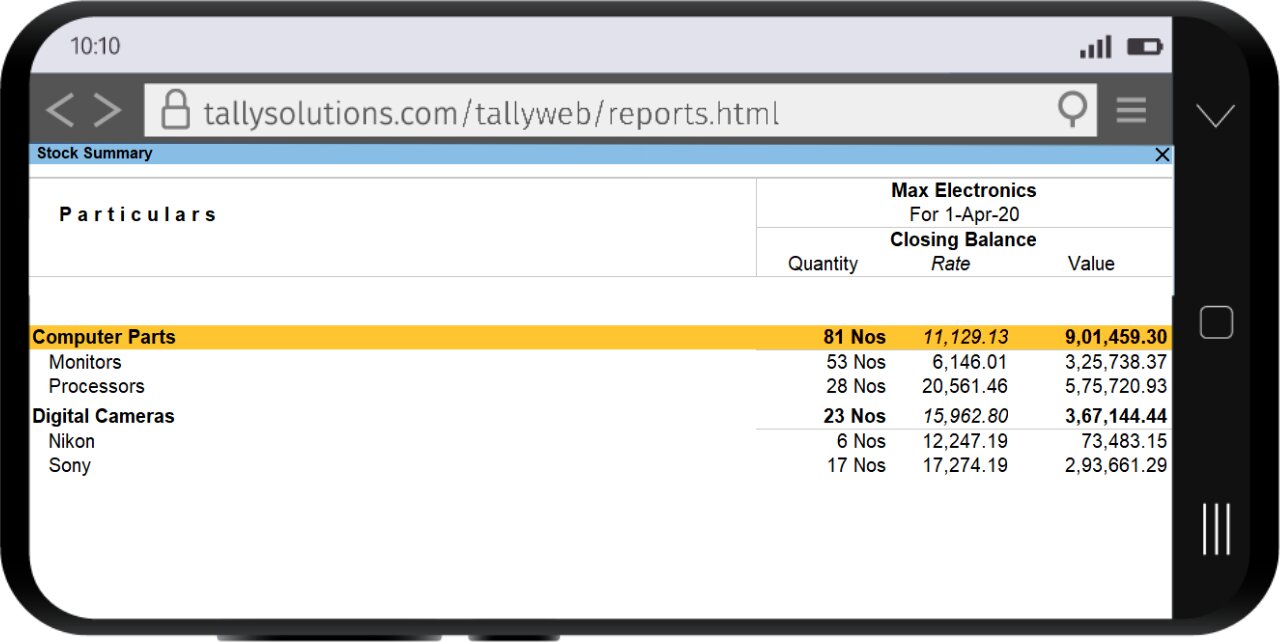
TallyPrime Reports in browsers
Mobile-responsive design
The all-new mobile-responsive design provides you with an intuitive experience right from company selection to downloading a voucher.
Additionally, you can now enjoy the benefits of the following features:
Quick access to change date in Day Book
You can now view Day Book for the previous and next dates by tapping on the left and right arrow keys, respectively.
Scale Factor in selected reports
You can now apply Scale Factor in a report to view the values in hundreds, lakhs, and so on.
Introduction of Show Details
You can now view additional information in selected reports by tapping on Show Details.
Simpler way to change period
You now have a better experience in changing the period of reports in browsers.
File Name of Report downloaded from browser
The file name of the report downloaded from the browser will now have an underscore, which will separate the date and timestamp for easy identification of the date and time of the download.
Furthermore, if the hour, minute, or second is in single digit, it will be preceded by 0.
e-Payments in TallyPrime
TallyPrime’s easy-to-use e-payment feature is now extended to RazorpayX Bank and Axis Bank.
Product Improvements – TallyPrime Release 2.0
File your GSTR-1 returns with HSN Summary as per the latest change
As per the latest amendments, in Table 12 of GSTR-1 (HSN Summary) the column Total Value is replaced with the column Rate of Tax. This release of TallyPrime enables you to file your returns with this change.
Party details in exported Ledger Group Outstandings
When you exported the Ledger Group Outstandings report to an MS Excel file, the details of some Parties were missing.
This issue is resolved.
Voucher Register with Verification Status
In the Voucher Register under Verification of Vouchers, the transactions did not appear for the selected Verification Status.
This issue is resolved.
e-Mailing Ledger and Group Outstandings
When you sent Ledger and Group Outstandings to parties via e-mail, the parties that did not have any outstanding amount received a blank report.
This issue is resolved.
GST calculation in sales transactions
When you recorded a sales transaction using Voucher Class, TallyPrime rounded off the tax value with three decimals to two decimals. Consequently, the calculated tax amount was lesser by 1 paisa.
This issue is resolved.
Terms of Delivery in Sales Invoice
Only the first line was visible in Terms of Delivery when you altered a Sales Invoice and provided the Order No.
This issue is resolved.
Performance enhancements in navigation
The performance enhancements in navigation will make your experience with TallyPrime all the more delightful. It will take fewer seconds to:
- Navigate to Credit Note voucher from Gateway of Tally
- Switch between Voucher Types
- Display the List of Ledgers
- Change Buyer Name
- Accept the Supplier Details screen
TCS transactions and reports
The TDL storage error appeared in the TCS transactions and reports, when Use TCS Allocations was enabled in the sales transaction.
This issue is resolved.
Error while uploading Delivery Note on the e-Way Bill system
An error appeared while uploading a Delivery Note on the e-Way Bill system. This happened when you had selected Others as Sub Type while recording the Delivery Note.
This issue is resolved.
Change of ledger in a columnar report
The report details were not getting refreshed when you changed the ledger in a columnar report.
This issue is resolved.
e-Way Bill Number in Multi-Voucher Printing
In multi-voucher printing, the last e-Way Bill number was printed in all the invoices.
This issue is fixed.
TCS Debit Note not linked to TCS Receipt voucher
TCS Debit Notes were not getting linked to TCS Receipt vouchers.
This issue is resolved.
TRN in Sales invoice printed in Arabic
The TRN did not appear when you printed a sales invoice in Arabic.
This issue is resolved.
e-Way Bill number in altered invoice
The e-Way Bill number did not appear in the print when the invoice was altered.
Click here for release notes
Click here for download
Banking in TallyPrime
One of the most crucial and useful features that TallyPrime offers businesses, is its banking capability. Bank-related activities are performed almost on a daily basis by business owners. And so the need to automate and facilitate smooth maintenance of records and processes that are fundamental to effective recording of accounting transactions for timely payments, is extremely significant.
How does TallyPrime help business owners manage their banking activities?
The banking feature in TallyPrime, enables business owners to perform a host of bank-related activities, including payments to parties, bank reconciliation, and cheque management. Usage of this feature enhances and simplifies the banking experience significantly by saving time, reducing errors, improving productivity, and scaling up traceability.
It provides amazing banking capabilities for running your company. You can use its e-payments capability to make timely payments to your parties, manage cheques, reconcile bank statements, and others. TallyPrime’s banking feature supports the following major areas of your business operations.
Banking utilities in TallyPrime
As a business owner, if you use a specific bank to manage your transactions wrt receiving and making payments, TallyPrime offers you a host of utilities including:
- Auto bank reconciliation
- Cheque management
- E-payments
- Deposit Slip
How to create bank ledger in TallyPrime?
Bank ledgers contain crucial information about a bank that you use to make or receive payments. You can provide information such as Bank name, Account no., IFS code, and address while creating bank ledgers.
Simply go to Gateway of Tally > Create > type or select Ledger and press Enter.
OR
Alt+G (Go To) > Create Master > type or select Ledger and press Enter.
Fill in the required details such as;
- Name of the bank
- Bank Accounts (Saving Account (Bank Account), Over Draft account ( Bank OD), Cash Credit account (Bank OCC))
- Account details – Account holder’s name, A/C number, IFSC, Branch, etc.
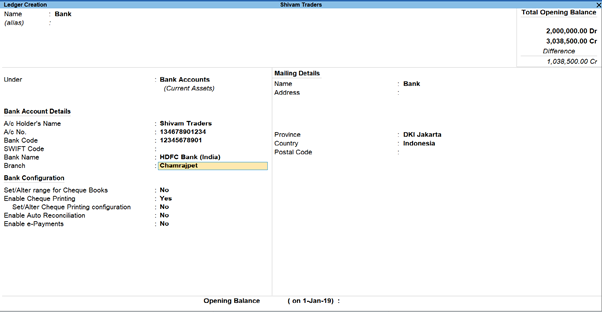
Once you have configured all the details, you can seamlessly perform the required actions based on the preset details you’ve entered for that bank’s ledger.
Auto Bank reconciliation
Reconciling company’s bank books with the banker’s statement is a regular task of accounting. Thus, TallyPrime offers you bank reconciliation capability, which explains the difference between the bank balance shown in an organization’s bank statement, as supplied by the bank, and the corresponding amount shown in the organization’s own [accounting] records at a particular point of time. With TallyPrime, you can:
- Check correctness of reconciliation
- Recover reconciliation of any date
- Auto Bank Reconciliation
- Reconcile manually
TallyPrime’s auto bank reconciliation enables users to reconcile bank statements with a long list of transactions, in the most simplified manner. All you got to do is simply import the bank statements, and the reconciliation will happen, automatically. Yes, it is that simple!
You need to enable the option provided for auto bank reconciliation in the bank ledger to reconcile the transactions made with that bank.
Learn how to do auto bank reconciliation in TallyPrime:
Cheque management
With TallyPrime, you can manage a host of pre-defined cheque formats, multiple cheque books and powerful cheque register, manage your banking needs effortlessly. You can maintain record of all payment made using cheques or if you have received payments through cheques from your parties. In TallyPrime, you can configure the cheques based on the type of cheque book you use in your business. Configure the cheques as your need and get them printed to suit your business needs.
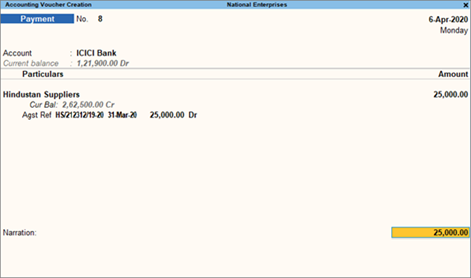
In order to print a self cheque in TallyPrime, cheque printing has to be configured. Then you have to pass a contra entry by entering Self as the Favouring Name in the Bank Allocation screen.
- Gateway of Tally > Vouchers > press F4 (Contra). Credit the bank account
- Enter the amount in the Credit column
- Press Enter to go to the Bank Allocations screen
- Press F12(Configure) > set Show favouring name as Yes, to enter Self as the Favouring name.
The Bank Allocations screen appears as shown below:
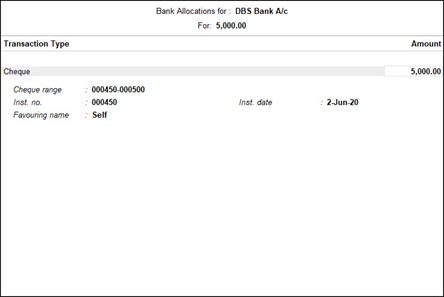
- Press Ctrl+A to accept and return to the Accounting Voucher Creation screen
- Debit the cash account. The Accounting Voucher Creation screen appears as shown below:
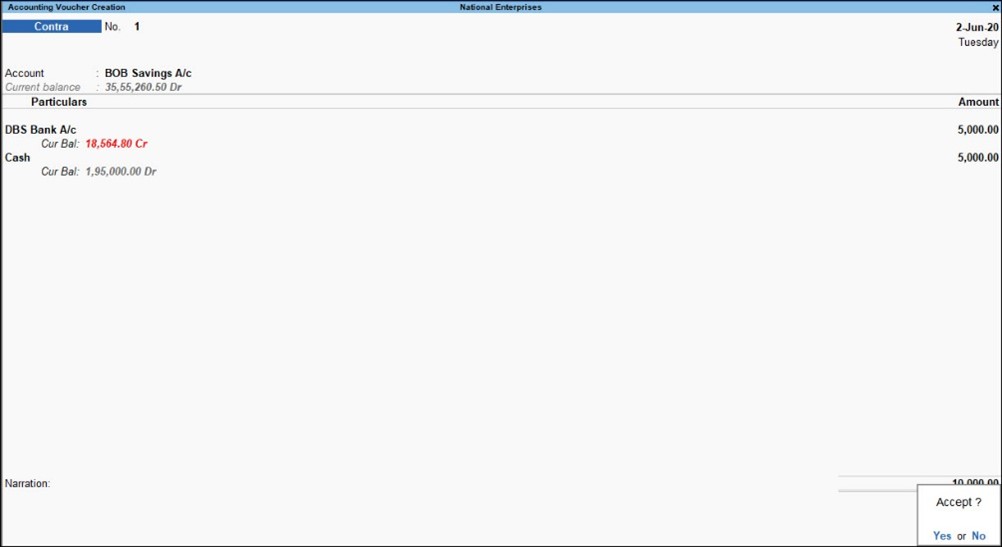
- Press Enter to go to the Cheque Printing screen and Press P (Print) to print the self-cheque.
Post-dated cheque management
Post-dated cheque as the name suggests is the one that the recipient enchases on a future date. Accounting books usually enter such transactions only once the payment is made.
TallyPrime facilitates smooth management of post-dated cheques and the underlying transactions:
- You can mark an entry as post-dated and specify the date on which the cheque was received/issued
- The transaction will automatically affect the accounting books on the date of the post-dated cheque
- You can obtain a comprehensive summary of all transactions involving post-dated cheques, using the Post-dated Summary report
- You can include post-dated transactions in other accounting reports such as Ledger Vouchers, Group Summary, Outstanding reports, and so on.
Check how to handle cheque management:
Cheque Printing in TallyPrime
This option provided in the Banking menu enables you to print the pending, already printed or the required cheques continuously from a single screen. You can also update the cheque details and have track of cheques to be printed, of a selected or all banks.
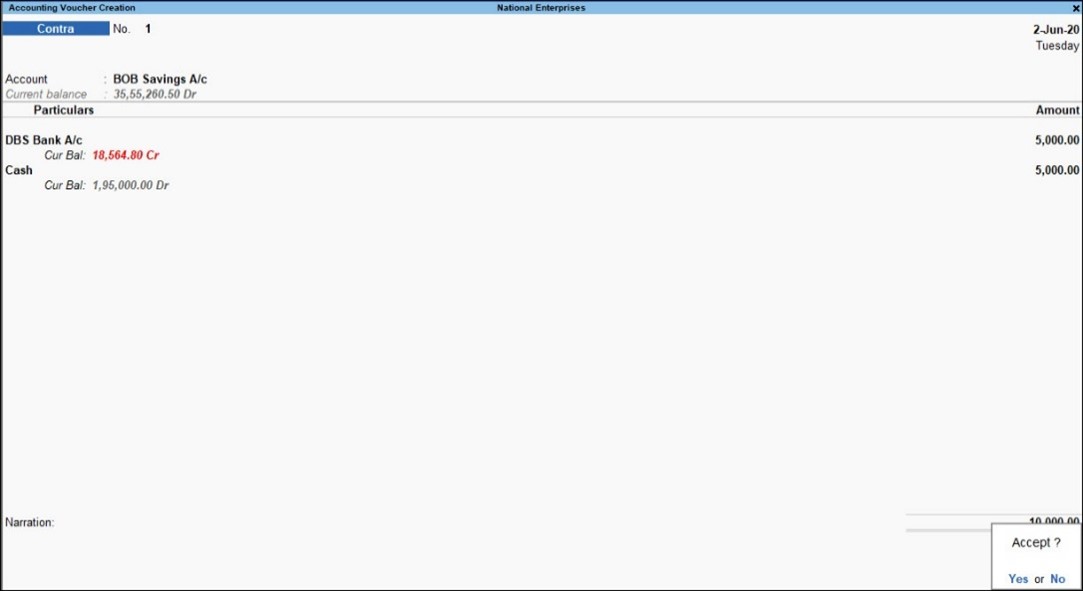
In order to print a self cheque in TallyPrime, cheque printing has to be configured. Then you have to pass a contra entry by entering Self as the Favouring Name in the Bank Allocation screen.
- Gateway of Tally > Vouchers > press F4 (Contra)
OR
Alt+G (Go To) > Create Voucher > press F4 (Contra).
- Credit the bank account
- Enter the amount in the Credit column
- Press Enter to go to the Bank Allocations screen
- Press F12 (Configure) > set Show favouring name as Yes, to enter Self as the Favouring name

- Press Ctrl+A to accept and return to the Accounting Voucher Creation screen
- Debit the cash account. The Accounting Voucher Creation screen appears as shown below:
E-payments
This feature is a unique capability that syncs your bank master, party master and voucher entry into a common platform intimating the payment transaction to the bank. With e-payments, you can
- Easily record transactions using the electronic mode of fund transfer, including e-Fund Transfer, e-Cheque, and e-Demand Draft/PO
- Identify any incomplete information or mismatch in beneficiary details
- You can send completed payment transactions to the bank, with accurate bank details, either during voucher creation or from an intuitive e-Payments report under Banking
- You can also export either single or multiple transactions at a time, so you will not have to repeat the process of export. In case of DBS (India), you can also open the bank portal directly from the e-Payments report and authorise any pending transactions
- View and track the status of your e-payment transactions using the e-Payments report
Getting started with e-payments is easy! All you have to do is, contact your bank to enable bulk upload and then enable e-payments in TallyPrime. In fact, recording an e-payment transaction in TallyPrime is also as easy as recording any other transaction. Simply open a payment voucher, select the party and the bank ledgers, and complete the payment transaction. What’s more, you can make e-payments to your parties or the employees on your company’s payroll using the same simple steps.
Once your e-payment transactions are recorded, the payment instructions are ready to be uploaded to the bank portal. Before uploading, the e-Payments report in TallyPrime will help you in checking the transactions to ensure that the details are complete and error-free. If there are any errors, then you can drill down to the relevant section and update the details.
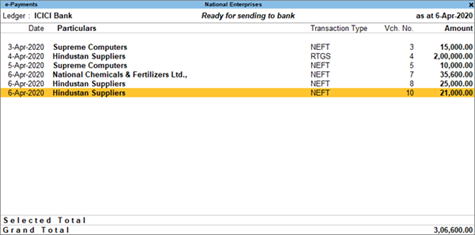
You can view and track the status of your e-payment transactions and identify any incomplete information or mismatch in beneficiary details. You can view the e-payments that are sent (or ready to be sent) to the bank. You can also view the bank balance as per the company’s books and compare it with the balance as per the bank.
Gateway of Tally > Banking > e-Payments > press Enter
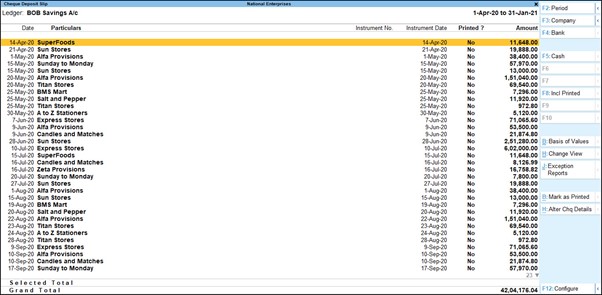
Deposit Slip
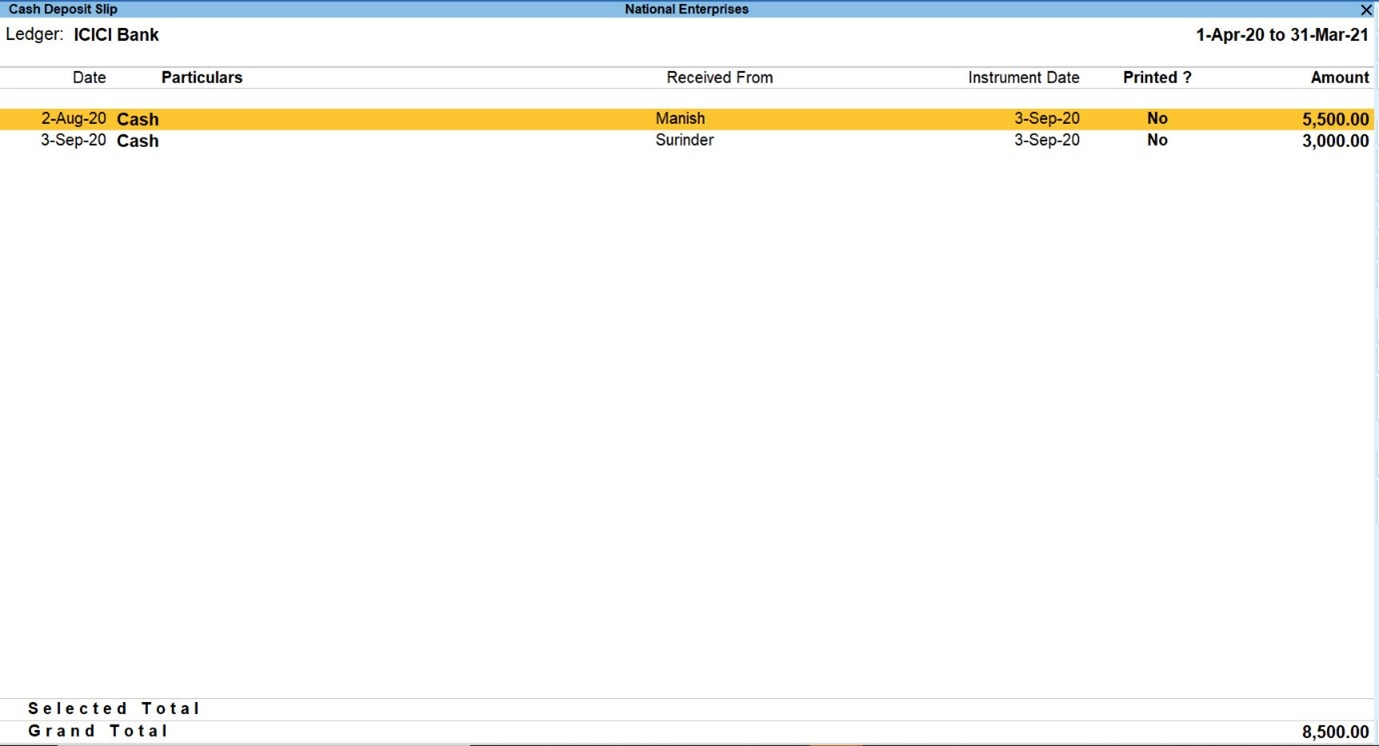
Any cash which is received by your business, must be deposited in the bank with relevant Cash Deposit Slip attached. You can generate as well as print the cash deposit slip for depositing cash into a bank on any particular date and period.
The Cash Deposit Slip option in the Banking menu is used to generate cash deposit slips, bank-wise. It has all the relevant information which once configured, need not be re-entered:
- Account Number
- Account Holder Name
- Bank Name
- Branch Name (information is fetched automatically from Bank ledger)
- Company’s Telephone Number
- Cash Denomination
To view cash deposit slip report:
- Gateway of Tally > Banking > Deposit Slip
OR
Alt+G (Go To) > type or select Cash Deposit Slip and press Enter.
- Select the required Bank account from the list for whose transaction you want to print Cash Deposit Slip and press Enter
Similarly, you can also generate and print cheque deposit slips for payments received through cheque or demand draft which need to be deposited into the bank.
To View Cheque Deposit Slip
- Gateway of Tally > Banking > Deposit Slip
OR
Alternatively, Alt+G (Go To) > type or select Cheque Deposit Slip and press Enter.
- Select the required Bank account from the list for whose transaction you want to print Cheque Deposit Slip and press Enter
How to Set GST Details in TallyPrime GST Software
Generate e-Way bill Instantly Using TallyPrime
Electronic waybill, popularly known as an e-Way bill is a document that needs to be generated for consignment involving the movement of goods beyond the notified value. Most states have a threshold value of 50,000 and a higher threshold value in a few states.
e-Way bill is not a new concept. It has been in place for a few years now and in fact, even before GST with different names. We all know it is a process that requires the supplier/transporter to generate an e-way bill from the portal before transporting or shipping the goods. Once the e-way bill is generated, a unique number is generated for a specific consignment along with an e-way bill document and the supplier can choose to capture it on the invoice.
Today, most businesses generate e-way bills by mentioning the invoice details on the portal either using offline tools (JSON) or direct entry on the portal. While it is a mandatory need, but the effort and time that goes into generating the e-way bills, make the entire process of invoicing to shipping a cumbersome one. Guess, this is a common difficulty that you must have already felt irrespective of how big or small is your business.
To alleviate the difficulty in the current way of generating the e-way bill and to make the entire process simple and seamless, the latest release of TallyPrime comes with an inbuilt connected e-way bill solution that generates e-way bill instantly.
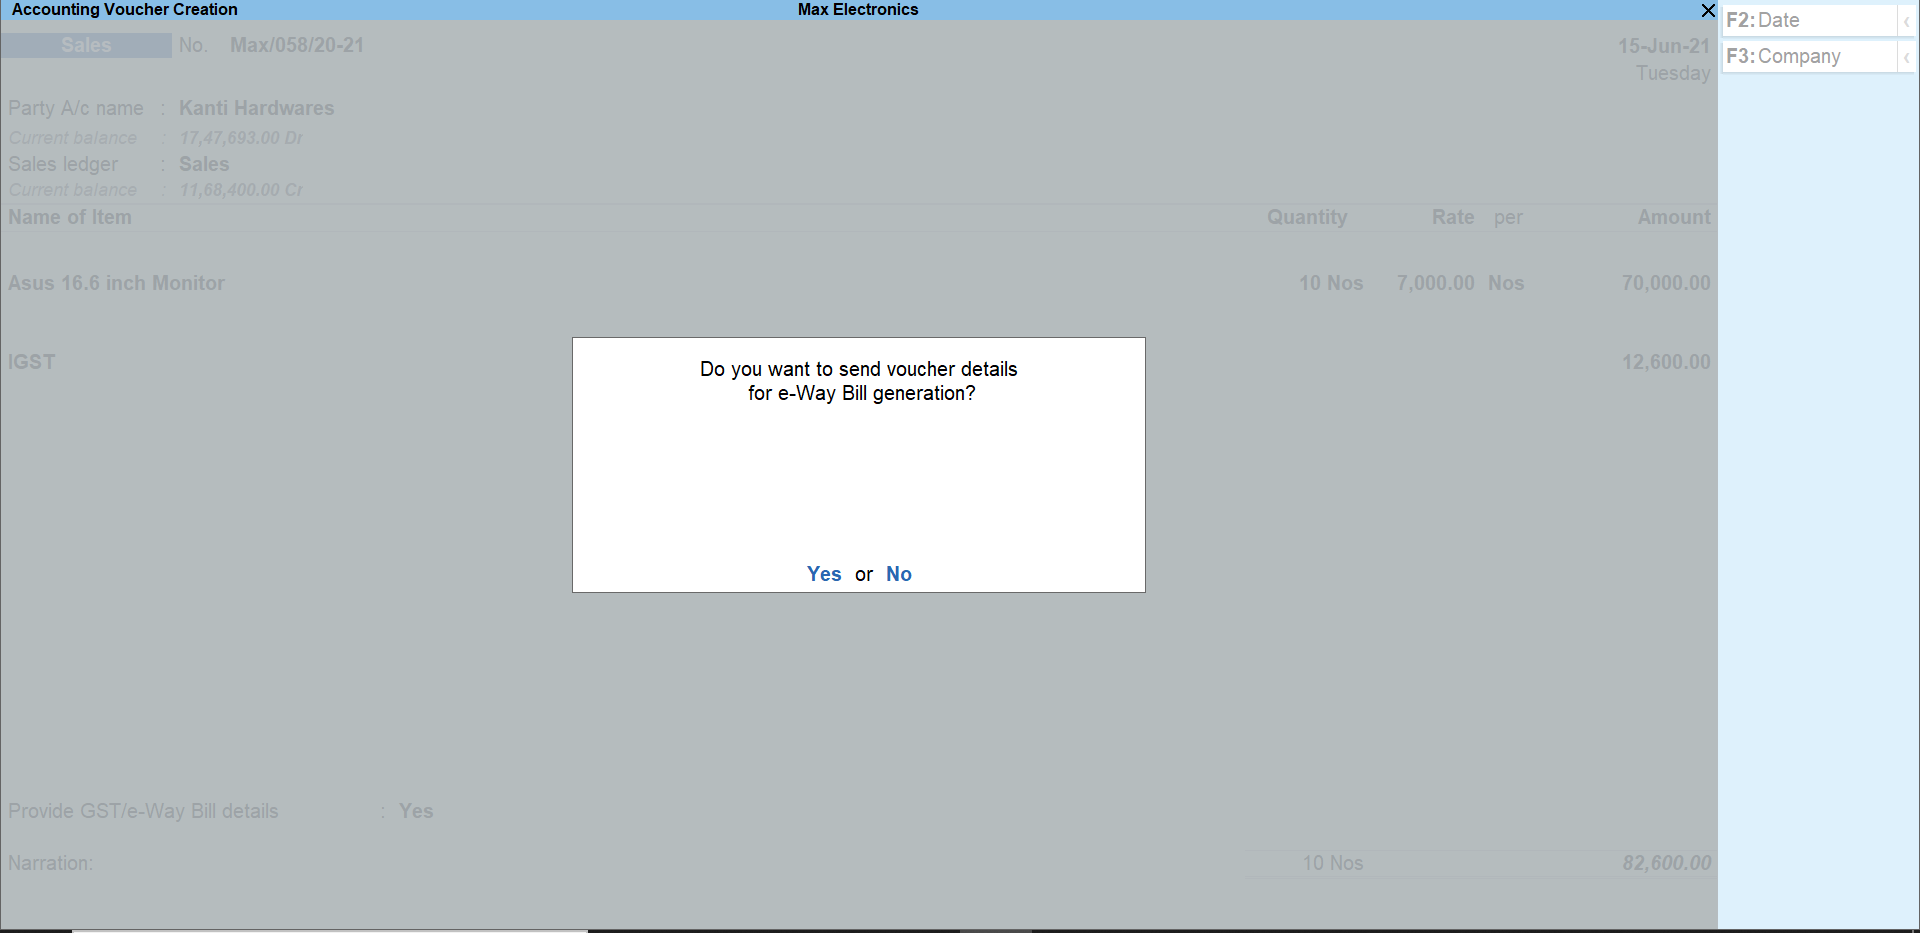
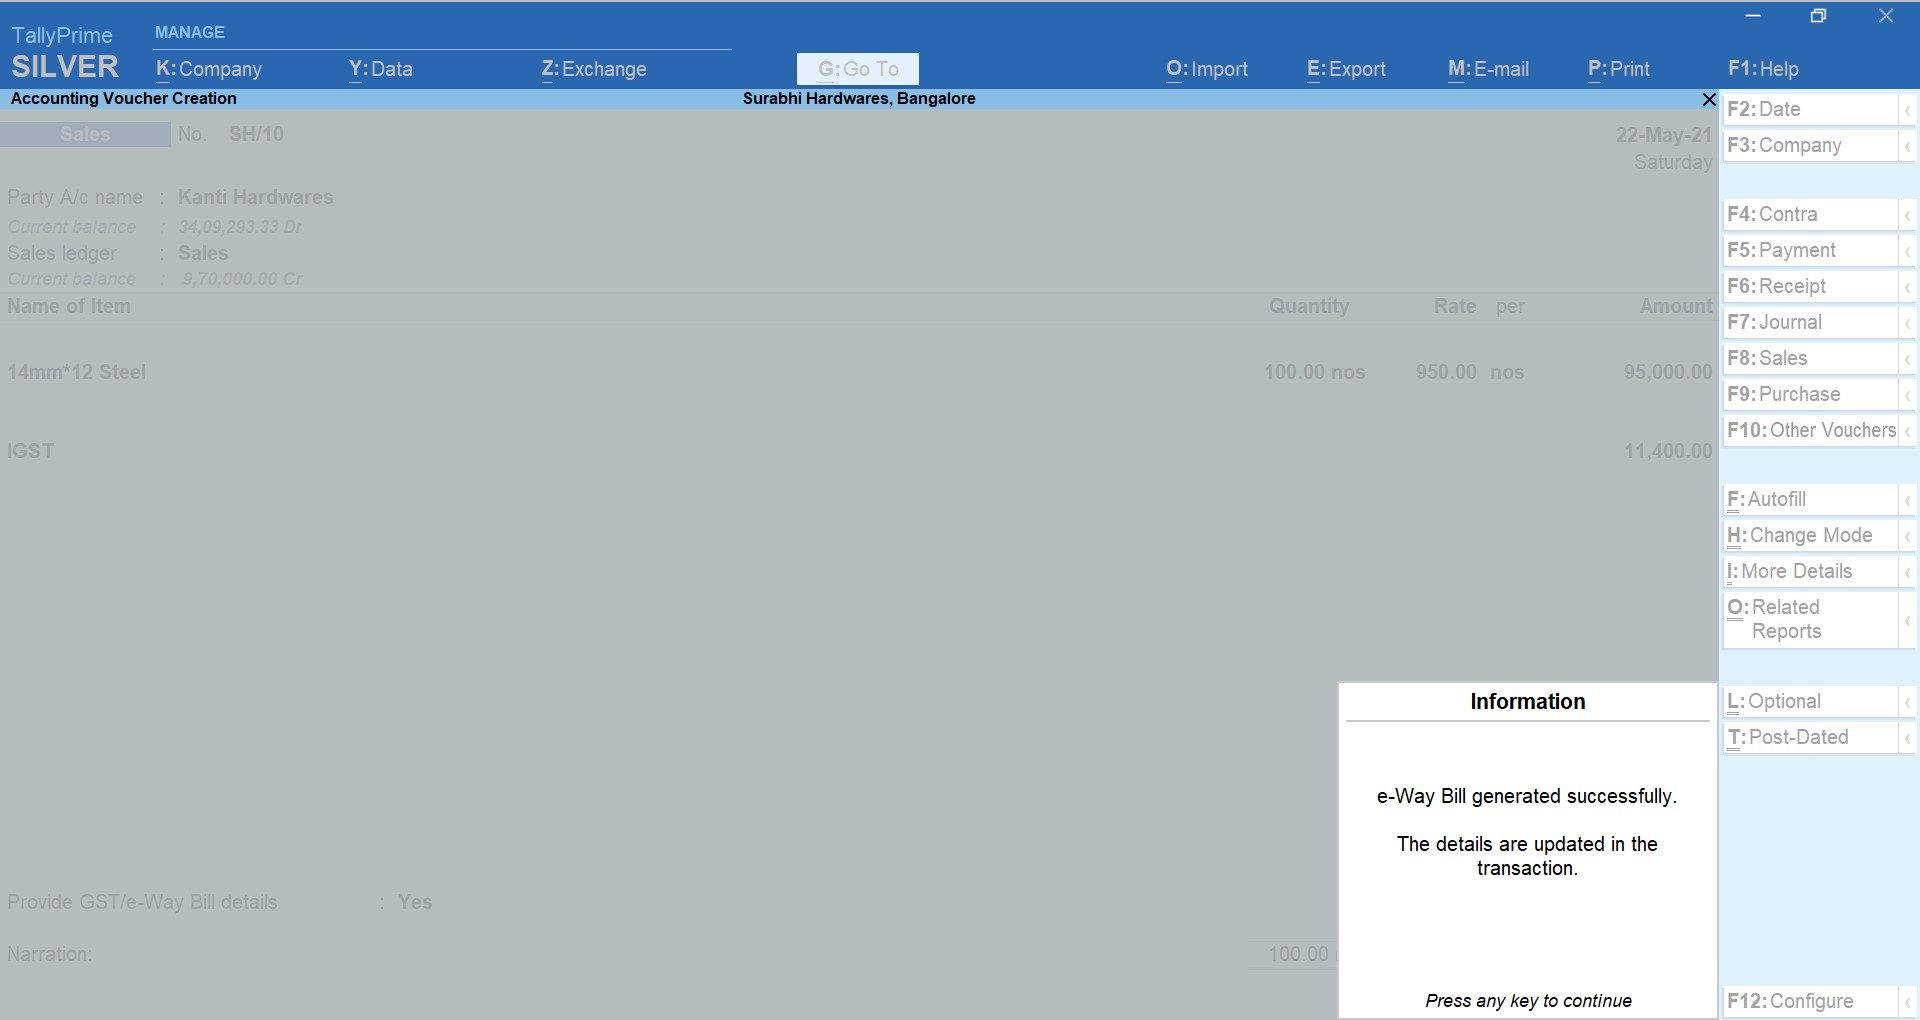
Yes, you read it right! You just need to record an invoice and the e-way bill be generated automatically.
Using TallyPrime’s online connected e-way bill solution, you can instantly generate e-way bills. All you need to do is just record an invoice in your usual way, and TallyPrime will automatically generate an e-way bill and capture the e-way bill number on the invoice.
Tally being one of the recognised ISO certified GSP (GST Suvidha Provider), TallyPrime directly integrates with the e-way portal to seamlessly generate e-way bills for you. It is so simple that you will certainly feel that generating an e-way bill is just the same as invoicing.
Online connected e-way bill features in TallyPrime
Tally’s fully connected e-way bill solution is simple, seamless with zero manual work. Take a look at some of the key features of a connected e-way bill solution.
Generate e-way bill instantly.
Given the compliance need of e-way bills in the process of invoicing and shipment, you no longer need to look at invoicing and e-way bill generation separately. Using TallyPrime, you seamlessly generate an e-way bill online by just recording the invoice. TallyPrime’s full connected solution absorbs the complexity by directly sending the details in prescribed format to the portal and fetches e-way bill details automatically.
Cancel, Extend and update e-way bill online
In some situations, the invoices for which e-way bill is already generated requires to be cancelled. It could be for various reasons such as data entry mistake/order cancelled etc. Also, in an exceptional circumstance like natural calamity, trans-shipment delay, accident, break-down etc. you may want to extend the validity of the e-way bill. No matter what situations you encounter, using TallyPrime, you can cancel, extend ad update e-way bills online without the need to manually perform these actions from the portal.

Also, for some reason, if you have generated an e-way bill either manually or using any of the available modes (outside TallyPrime), you can auto-fetch such details and capture the e-way bill number on the invoice. Thus, keeping your books up to date.
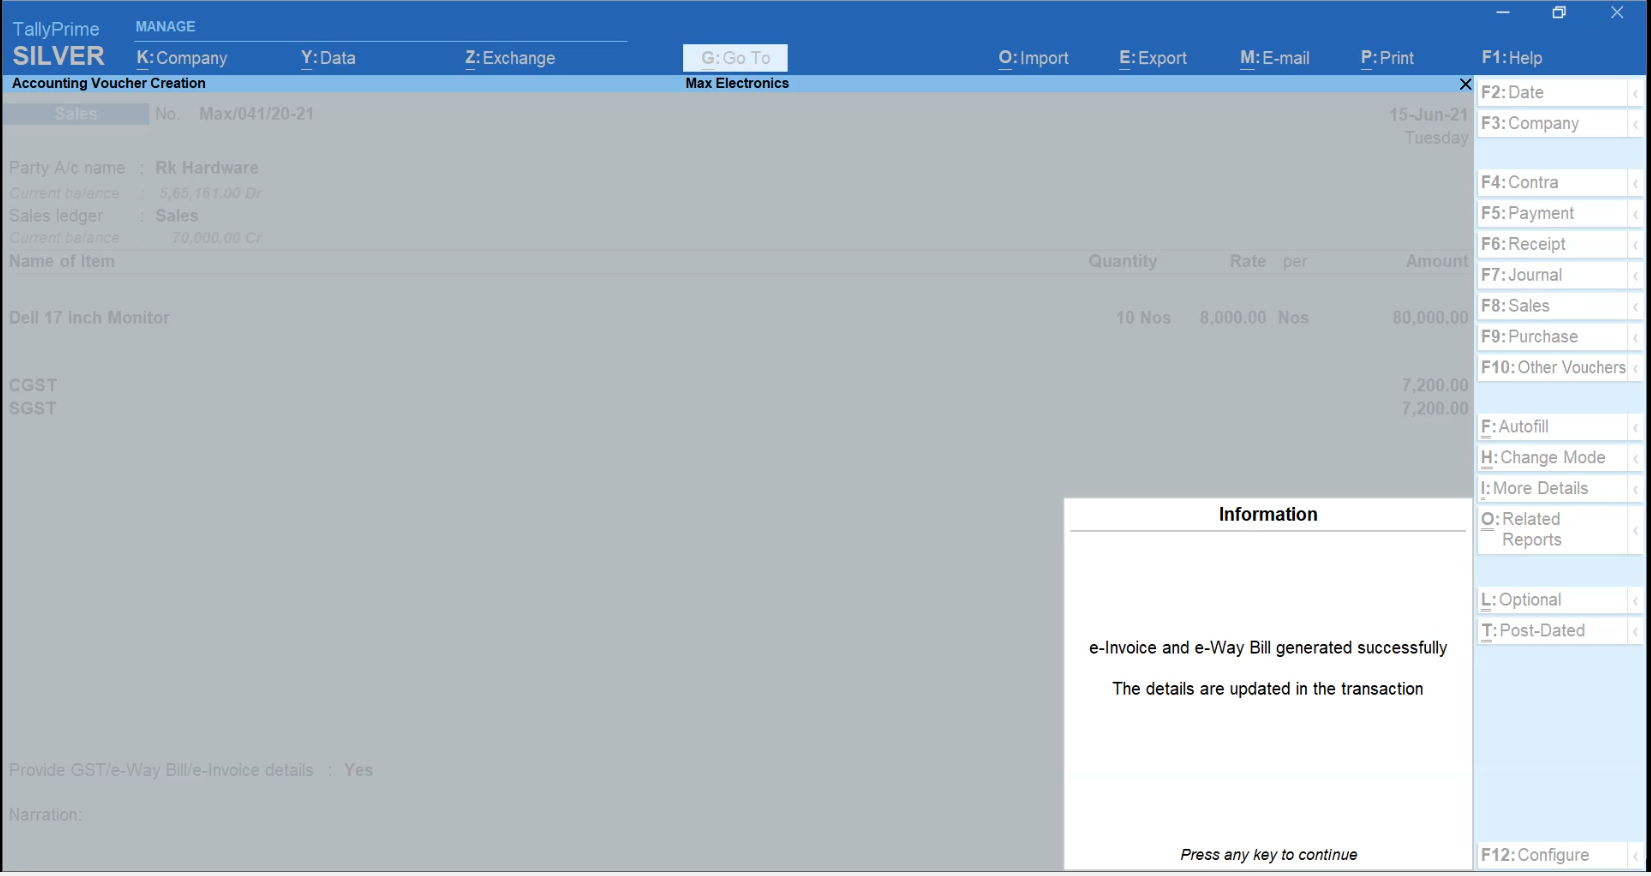
Flexibility to generate EWB online along with e-Invoice or separately.
By design, the e-invoice system (IRP) integrates with GSTN and e-way bill system. As a result, one can generate an e-invoice along with e-way bill as well. Using TallyPrime’s connected e-way bill solution, you get even more flexibility to do so. You can choose to generate an e-way bill along with an e-invoice or can separately generate only e-way bill as it suits your need.
Flexibility to generate e-way bill for a single invoice or in bulk from a report
TallyPrime’s connected e-way bill solution comes with the flexibility to generate e-way bill for a single invoice or in bulk. You can generate an e-way bill for a single invoice in the flow of recording the transaction or you can choose to generate e-way bills in bulk (for more than one invoice) from the report. Generating e-way bills, be it a single invoice or bulk is amazingly simpler and faster.
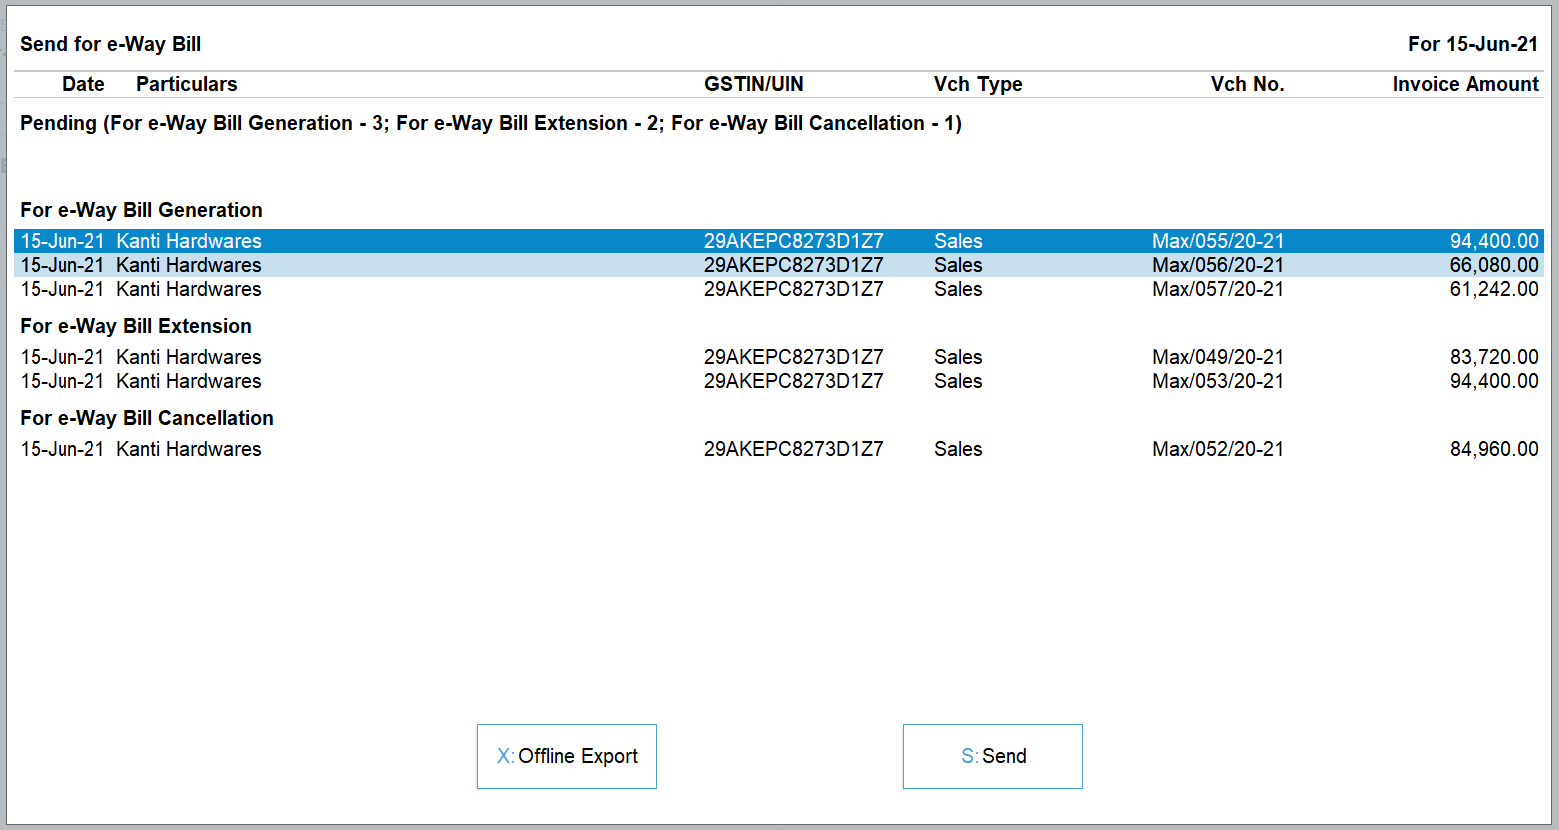
Enhanced e-way bill reports
TallyPrime’s connected e-way bill solution comes with exclusive reports for e-way bill giving you a complete view of the e-way bill transactions and their status. With the help of the report, you will stay on top of the e-way bill status (Pending/cancelled/generated) and perform various other actions such as cancel, extend, etc. as per your needs.
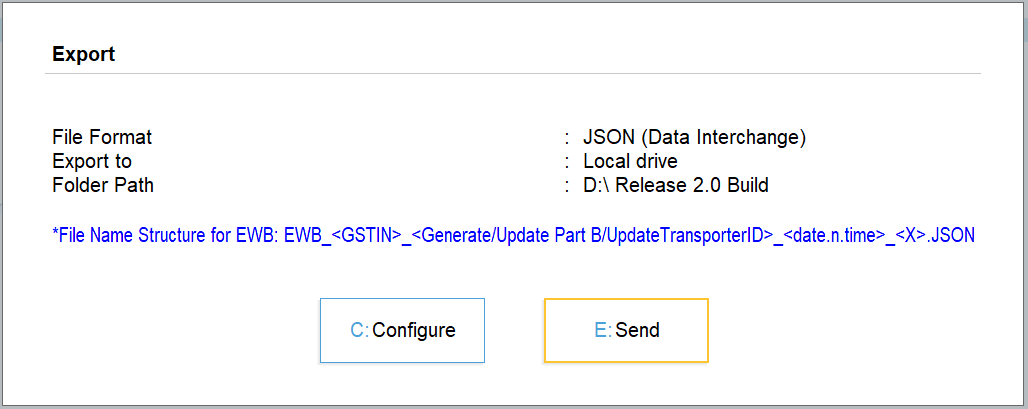
Supports other modes for e-way bill generation.
In case of exigency cases like unavailability of internet services on a system or due to any other reason, if you wish to use other modes of e-way bill generation such as using offline utility, a direct entry on the portal etc. TallyPrime fully supports these situations. Â Not only it supports these circumstances, but also auto-fetches details and updates the e-way bill number on the invoice. Thus, keeping your books up to date.
What’s more? The online connected e-way bill solution of TallyPrime comes with an inbuilt alert system to prevent redundancy and ensure that the latest data is shared with the portal, especially in a multi-user environment. Furthermore, the renowned and trusted ‘Prevention, Detection and correction’ capability ensure that the transactions are validated and only the correct and complete details are sent for e-way generation. This way you can prevent errors and work error-free.
Tally Prime Shortcut Keys
Shortcuts That Work Across Tally Prime
| Shortcut Key | Description |
| Alt+G | To primarily open a report, and create masters and vouchers in the flow of work. |
| Ctrl+G | To switch to a different report, and create masters and vouchers in the flow of work. |
| Alt + E | To open the export menu for exporting masters, transactions, or reports. |
| Alt+K | To open Company top menu. |
| Alt + K | To open the company menu with the list of actions related to managing your company. |
| Alt + M | To open the e-mail menu for sending transactions or reports. |
| Alt + O | To open the import menu for importing masters, transaction, and bank statements. |
| Alt + P | To open the print menu for printing transactions or reports. |
| Alt + Y | To open the list of actions applicable to managing the company data. |
| Alt + Z | To open the list of actions applicable to sharing or exchanging your company data. |
| Alt + F3 | To select and open another company located in the same folder or other data paths. |
| Ctrl + F1 | To open Tally Help topic based on the context of the screen that is open. |
| Ctrl + F3 | To shut the currently loaded companies. |
| Ctrl + K | To select the display language that is applicable across all screens. |
| Ctrl + W | To select the data entry language that is applicable to all screens. |
| Ctrl + Left / Ctrl + Right |
To move to the left-most/right-most drop-down top menu. |
| Ctrl + Up / Ctrl + Down |
To move to the first/last menu in a section. |
| Home | To from any point in a field to the beginning of the text in that field. |
| Home &PgUp | To move from any line to the first line in a list. |
| End | To move from any point in a field to the end of the text in that field. |
| End &PgDn | To move from any line to the last line in a list. |
| Esc | To go back to the previous screen by closing the currently open screen. |
| Esc | To remove inputs that is provided/selected for a field. |
| F1 | To open the Help menu. |
| F11 | To open Company Features screen. |
| F12 | To open the list of configurations applicable for the report/view. |
| F3 | To switch to another company from the list of open companies. |
| Left arrow | To move: One position left in a text field To the previous column on the left To the previous menu on the left |
| Right arrow | To move: One position right in a text field To the next column on the right To the next menu on the right |
| Up arrow | To move one line up in a list. To move to the previous field. |
| Down arrow | To move one line down in a list. To move to the next field. |
Shortcuts in Reports |Â Tally Prime Shortcut Keys
| Shortcut Key | Description |
| Alt + 2 | To create an entry in the report, by duplicating a voucher. |
| Alt + A | To add a voucher in a report. |
| Alt + A | To alter a column |
| Alt + C | To add a new column. |
| Alt + D | To delete an entry from a report. |
| Alt + D | To delete a column. |
| Alt + F1 Alt + F5 |
To view the report in detailed or condensed format. |
| Alt + F12 | To filter data in a report, with a selected range of conditions. |
| Alt + I | To insert a voucher in a report. |
| Alt + N | To auto repeat columns. |
| Alt + T | To hide or show the details in a table. |
| Alt + U | To display all hidden line entries, if they were removed. |
| Alt + V | To open the GST Portal. |
| Ctrl + Alt + I | To invert selection of line items in a report. |
| Ctrl + B | To view values in different ways in a report. |
| Ctrl + Enter | To alter a master during voucher entry or from drill-down of a report. |
| Ctrl + F12 | To calculate balances using vouchers that satisfy the selected conditions. |
| Ctrl + H | To change view – display report details in different views. To navigate to Voucher View from Summary reports. To navigate to post-dated cheque related transactions report. |
| Ctrl + J | To view the exceptions related to a report. |
| Ctrl + R | To remove an entry from a report. |
| Ctrl + Shift + End | To select or deselect lines till the end. |
| Ctrl + Shift + Home | To select or deselect lines till the top. |
| Ctrl + Space bar | To select or deselect all lines in a report. |
| Ctrl + U | To display the last hidden line (If multiple lines were hidden, pressing this shortcut repeatedly will restore the last hidden line first and follow the sequence). |
| Enter | To drill down from a line in a report. |
| Shift + Enter | To expand or collapse information in a report. |
| Shift + Sapce bar | To select or deselect a line in a report. |
| Shift + Up / Shift + Down |
To perform linear selection/de-selection multiple lines in a report. |
| Space bar | To select/deselect a line in a report. |
Shortcuts in Vouchers |Â Tally Prime Shortcut Keys
| Shortcut Key | Description |
| F4 | To open Contra voucher. |
| F5 | To open Payment voucher. |
| F6 | To open Receipt voucher. |
| F7 | To open Journal voucher. |
| F8 | To open Sales voucher. |
| F9 | To open Purchase voucher. |
| F10 | To view list of all vouchers. |
| Alt + F5 | To open Debit Note. |
| Alt + F6 | To open Credit Note. |
| Alt + F7 | To open Stock Journal voucher. |
| Alt + F8 | To open Delivery Note. |
| Alt + F9 | To open Receipt Note. |
| Alt + C | To open the calculator panel from Amount field. |
| Alt + D | To delete a voucher/transaction. |
| Alt + R | To retrieve Narration from the previous ledger. |
| Alt + S | To open the Stock Query report for the selected stock item. |
| Alt + V | To open a manufacturing journal from the Quantity field of a journal voucher. |
| Ctrl + F4 | To open Payroll voucher. |
| Ctrl + F5 | To open Rejection Out voucher. |
| Ctrl + F6 | To open Rejection In voucher. |
| Ctrl + F7 | To open Physical Stock. |
| Ctrl + F8 | To open Sales Order. |
| Ctrl + F9 | To open Purchase Order. |
| Ctrl + D | To remove item/ledger line in a voucher. |
| Ctrl + F | To auto fill details. |
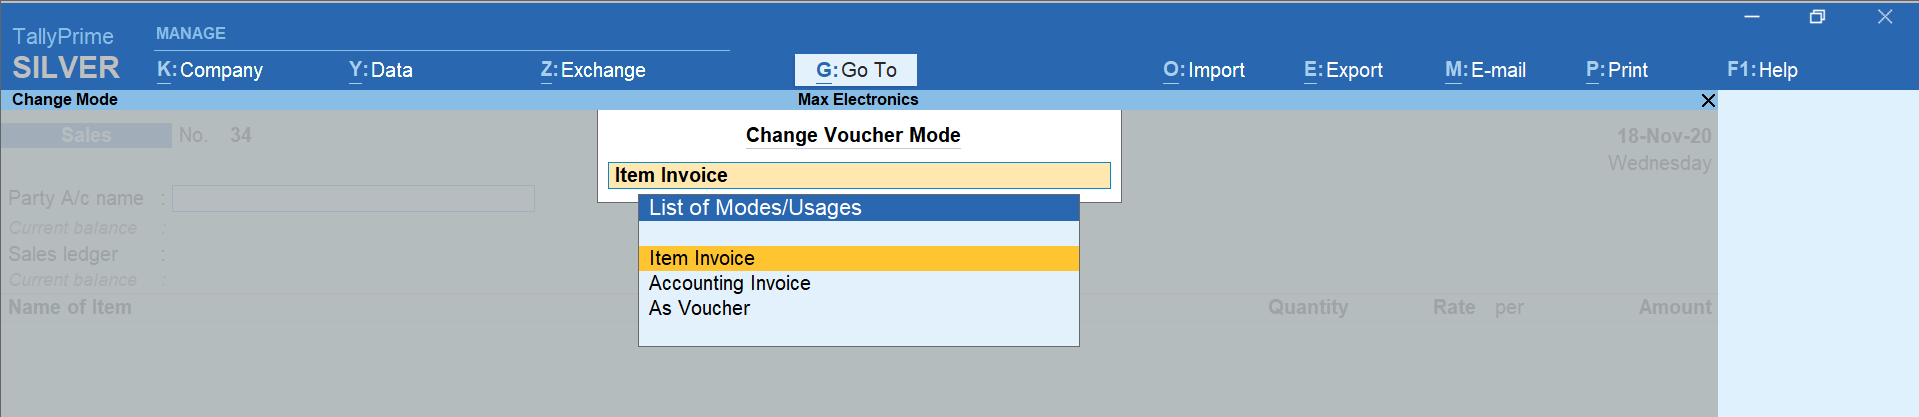
| Ctrl + H | To change mode: open vouchers in different modes. |
| Ctrl + L | To mark a voucher as Optional |
| Ctrl + R | To retrieve the Narration from the previous voucher, for the same voucher type. |
| Ctrl + T | To mark a voucher as Post-Dated. |
Shortcuts in Masters & Vouchers |Â Tally Prime Shortcut Keys
| Shortcut Key | Description |
| Tab | To go to the next input field. |
| Page Up | To open the previously saved master or voucher. To scroll up in reports. |
| Page Down | To open the next master or voucher. To scroll down in reports. |
| Backspace | To remove the value typed. |
| Shift + Tab | To go to the previous input field. |
| Alt + C | To create a master, on the fly. |
| Alt + C | To open the calculator panel. |
| Ctrl + I | To add more details to a master or voucher for the current instance. |
| Alt + 4 / Ctrl + 4 |
To insert the base currency symbol in an input field. |
| Ctrl + C | To copy text from an input field. |
| Ctrl + Alt + C | To copy text from an input field. |
| Ctrl + V | To paste input copied from a text field. |
| Ctrl + Alt + V | To paste input copied from a text field. |
Shortcuts for Vouchers & Reports |Â Tally Prime Shortcut Keys
| Shortcut Key | Description |
| Ctrl + E | To export the current voucher or report. |
| Ctrl + M | To e-mail the current voucher or report. |
| Ctrl + P | To print the current voucher or report. |
| Alt + J | To define stat adjustments. |
| Alt + X | To cancel a voucher. To cancel a voucher from a report. |
| Alt + Z | To zoom in while on print preview. |
Shortcuts for Reports, Vouchers & Masters |Â Tally Prime Shortcut Keys
| Shortcut Key | Description |
| + | To navigate to the next artifact in the context. To increment the Report date or next report in a sequence of reports displayed. |
| – | To navigate to the previous artifact in the context. To decrement Report date or previous report in a sequence of reports displayed. |
| F2 | To change the date of voucher entry or period for reports. |
| Alt + Enter | To expand or collapse a group in a table. |
| Alt + F2 | To change the date of voucher entry or period for reports. |
| Ctrl + End | To move to the last field or last line. |
| Ctrl + Home | To move to the first field or first line |
| Ctrl + A | To accept or save a screen. |
| Ctrl + N | To open or hide calculator panel. |
| Ctrl + Q | To exit a screen or the application. |
Shortcuts for Data Processing |Â Tally Prime Shortcut Keys
| Shortcut Key | Description |
| Ctrl + Alt + B | To view the build information. |
| Ctrl + Alt + R | To rewrite data. |
| Ctrl + Alt + T | To view TDL / Add-on details |
| Alt + Z | To synchronize data. |
| Alt + F4 | To quit the application. |
Get Familiar with TallyPrime
Interactions in TallyPrime follow patterns that help you accomplish tasks with minimal learning. Understand these patterns so that you can try any feature.
Once you install TallyPrime, activate the license, and create a Company, you can start recording your business transactions. To make use of the flexibility of TallyPrime, and enhance your productivity, take a quick look at the interaction experiences and understand the patterns.
Home screen that you see when opening TallyPrime includes the top menu, Go To/Switch To buttons, Gateway of Tally, and buttons on the right hand side. These options aid in finding and opening different ledgers, vouchers and reports that help you accomplish your business tasks. There are multiple ways in which you can reach the desired destination. You can choose the ways you prefer.
Navigation across TallyPrime widely uses Enter key and Escape key. While there are different ways in which you can reach a destination, pressing Enter will take you to the next level of information, and Escape will take you back to the previous level, until you reach Gateway of Tally. The same Escape key will also let you close TallyPrime, with a confirmation. Similarly, you can use different key combinations to achieve what you want. In fact, you can navigate and control TallyPrime completely using a keyboard.
Data entry for recording different types of transactions are made similar to enhance learning, and retention of knowledge. Master creation is made simple by using similar actions wherever possible, and multiple ways to reach the create options.
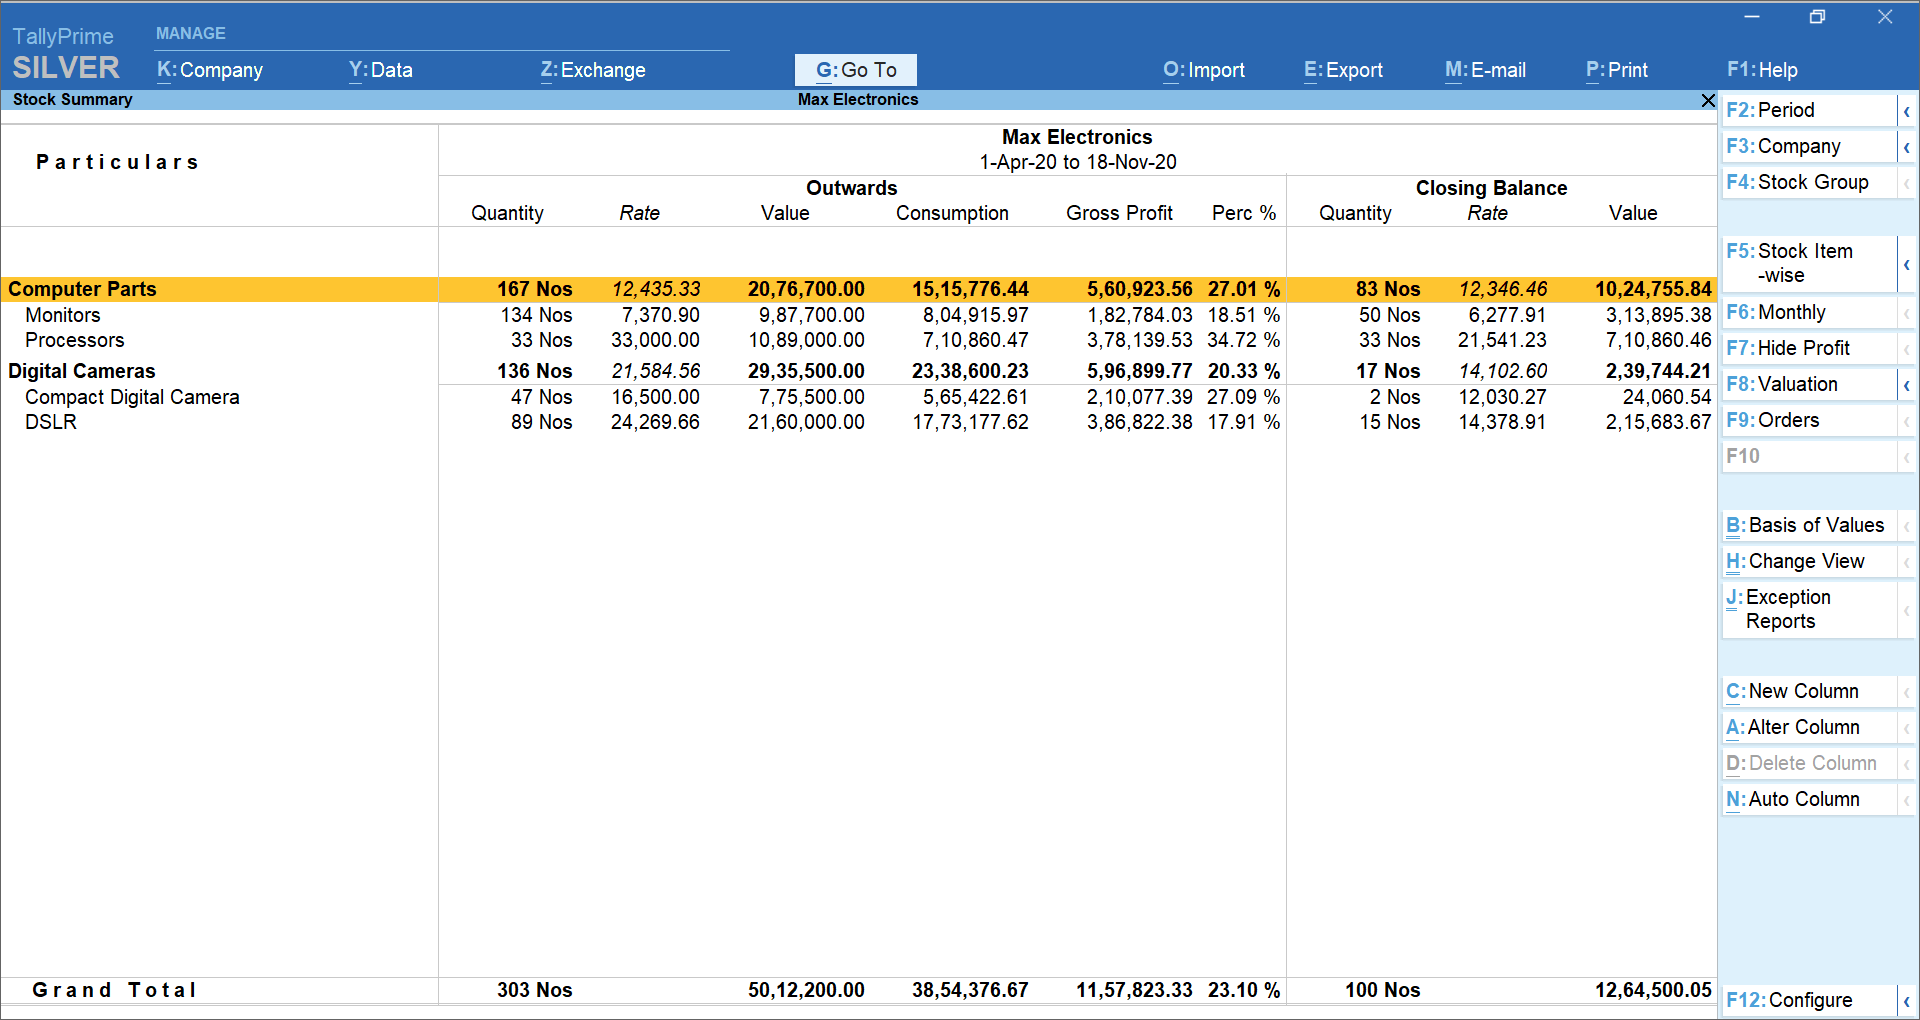
Reports are presented in a hierarchical manner for easy analysis. While TallyPrime provides a large number of reports, reading and understanding the reports are simplified with similar interactions. When you open a report, summary data is provided for the most relevant report period. From there you can change the report period, presentation format, and so on, up to the value that forms the basis of the report. Consistent interactions make it easier for you to navigate, and memorise the steps.
Sharing data in printed formats, or in electronic file formats through e-mail or export is another facility available by default. You can share individual vouchers, or reports, as well as in bulk, with just a few key presses. Sending payslips to your employees, or reminder letters to your parties are equally simple.
Easy setup enables you to start using TallyPrime for recording your business transactions in a couple of minutes. While there are many features available out-of-the-box, you can decide to start with the minimal set, right away. You can start using the other features as and when you come across a business need. You can explore and use many features as your business grows and diversifies. This facility helps you to start simple, and gradually add more features as needed. Many features can be switched on and switched off as you want. Alternatively, you can start using all the features in the beginning, if needed.
Set up for personal preferences is another flexibility that you get to in order to use the application comfortably. Such configurations can be done independently for every installation of TallyPrime using F12 Configurations. Different types of ledgers and vouchers can have different configurations. In a similar way you can set your preferences for reports, printing, and other data communication options.
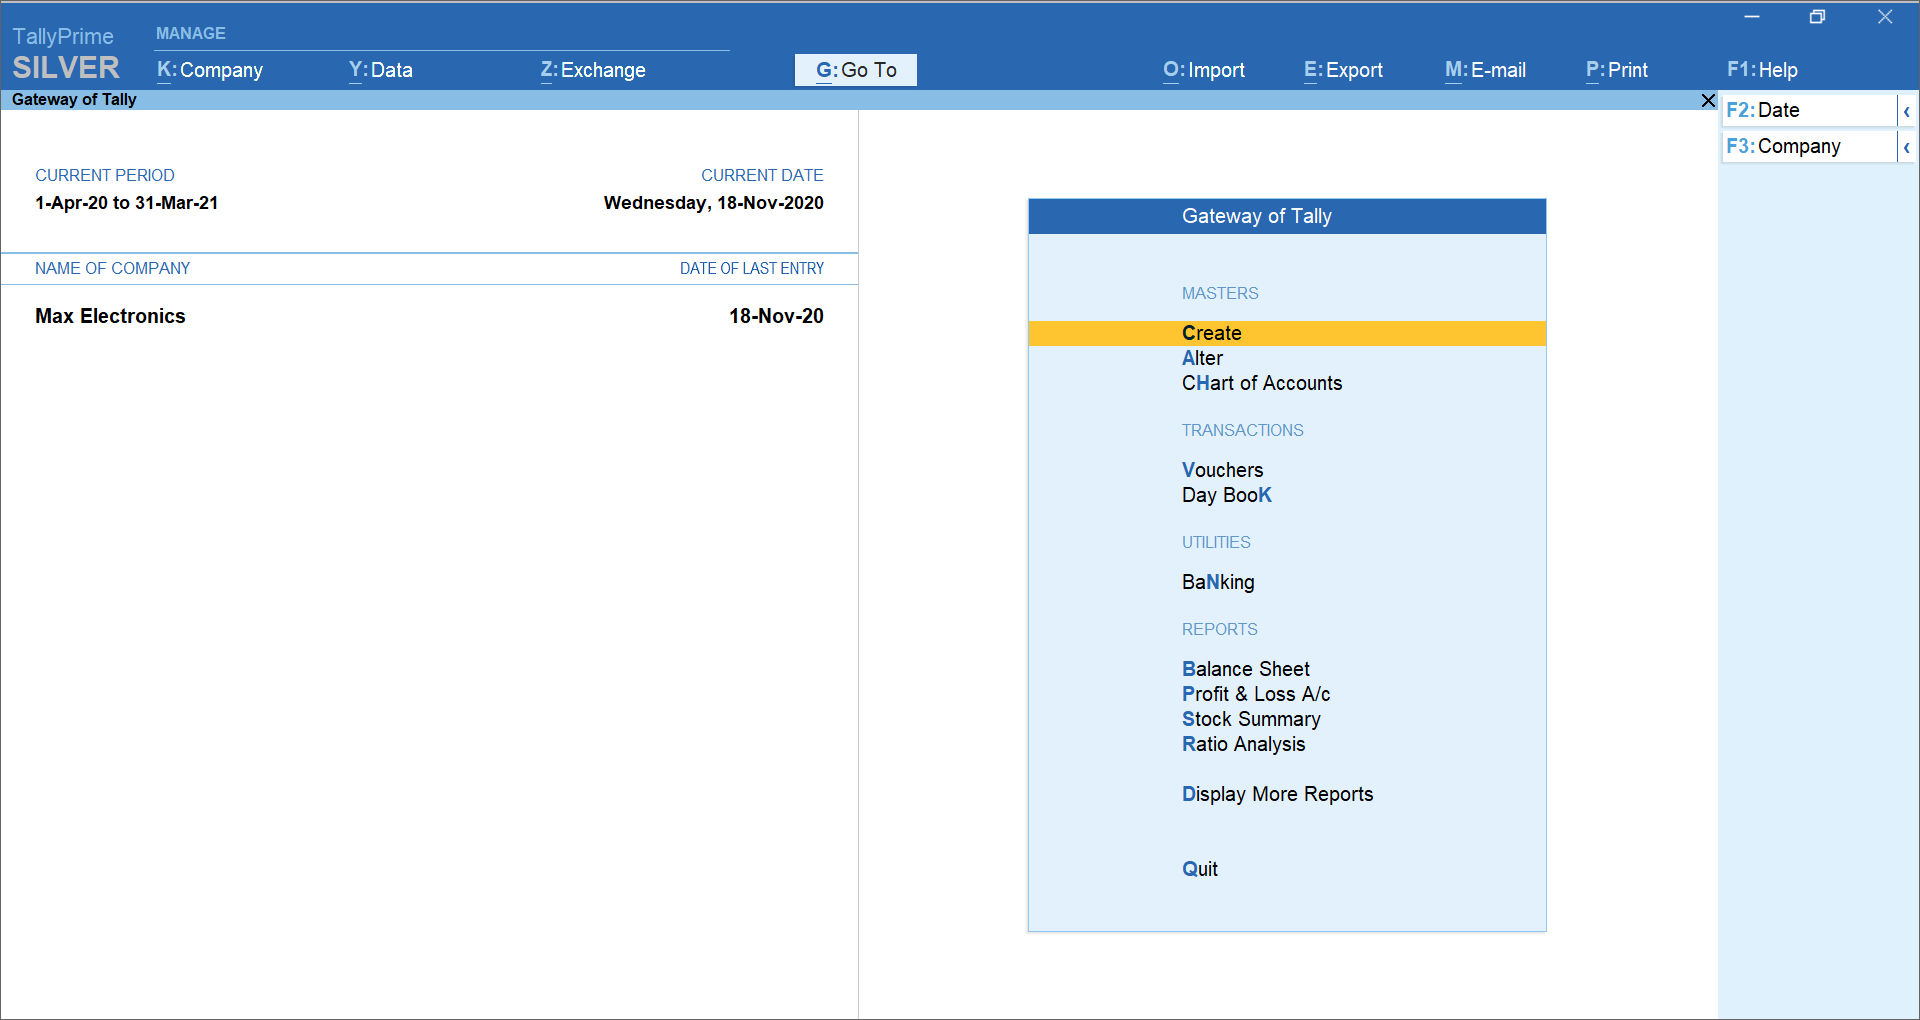
Home Screen
When you open TallyPrime, you can see a home screen with different items – a top menu bar with pull down options, the details of the Companies that are open, the Gateway of Tally menu, and a button bar on the right-hand side of the screen.
Top Menu has options to manage your Companies, TallyPrime application, users in your Companies, and your data storage & sharing. This menu and child items in the menu are accessible from any screen in TallyPrime. Help menu has options to launch TallyHelp and to upgrade your application to a newer release of the product. Availability of a newer release is indicated with a red dot notification on the menu name Help. Other options under the Help menu include What’s New,  TallyShop for buying add-ons, Troubleshooting to repair your application and data in case there are issues, Settings to configure your application, TDL & Add-On to manage your extensions/customisations, and an About report that shows the details of your TallyPrime installation and its environment.
Shortcuts form an easy way to interact with TallyPrime. Shortcut/hotkey to access each option in the top menu is shown in bold capital letter that is underlined, or F1. When the shortcut has a single underline, you can just press Alt and the letter key to access the corresponding option. Shortcuts without underline work with the single key press. When you access any of the menu items, a list of options grouped under the menu item opens, and you can access each using the corresponding shortcut or mouse. For example, Alt+K > C will open Company Creation screen.
Tip:Â You can use just the keyboard to interact with TallyPrime if you prefer so. You can also comfortably use mouse. This is possible on all screens in TallyPrime.
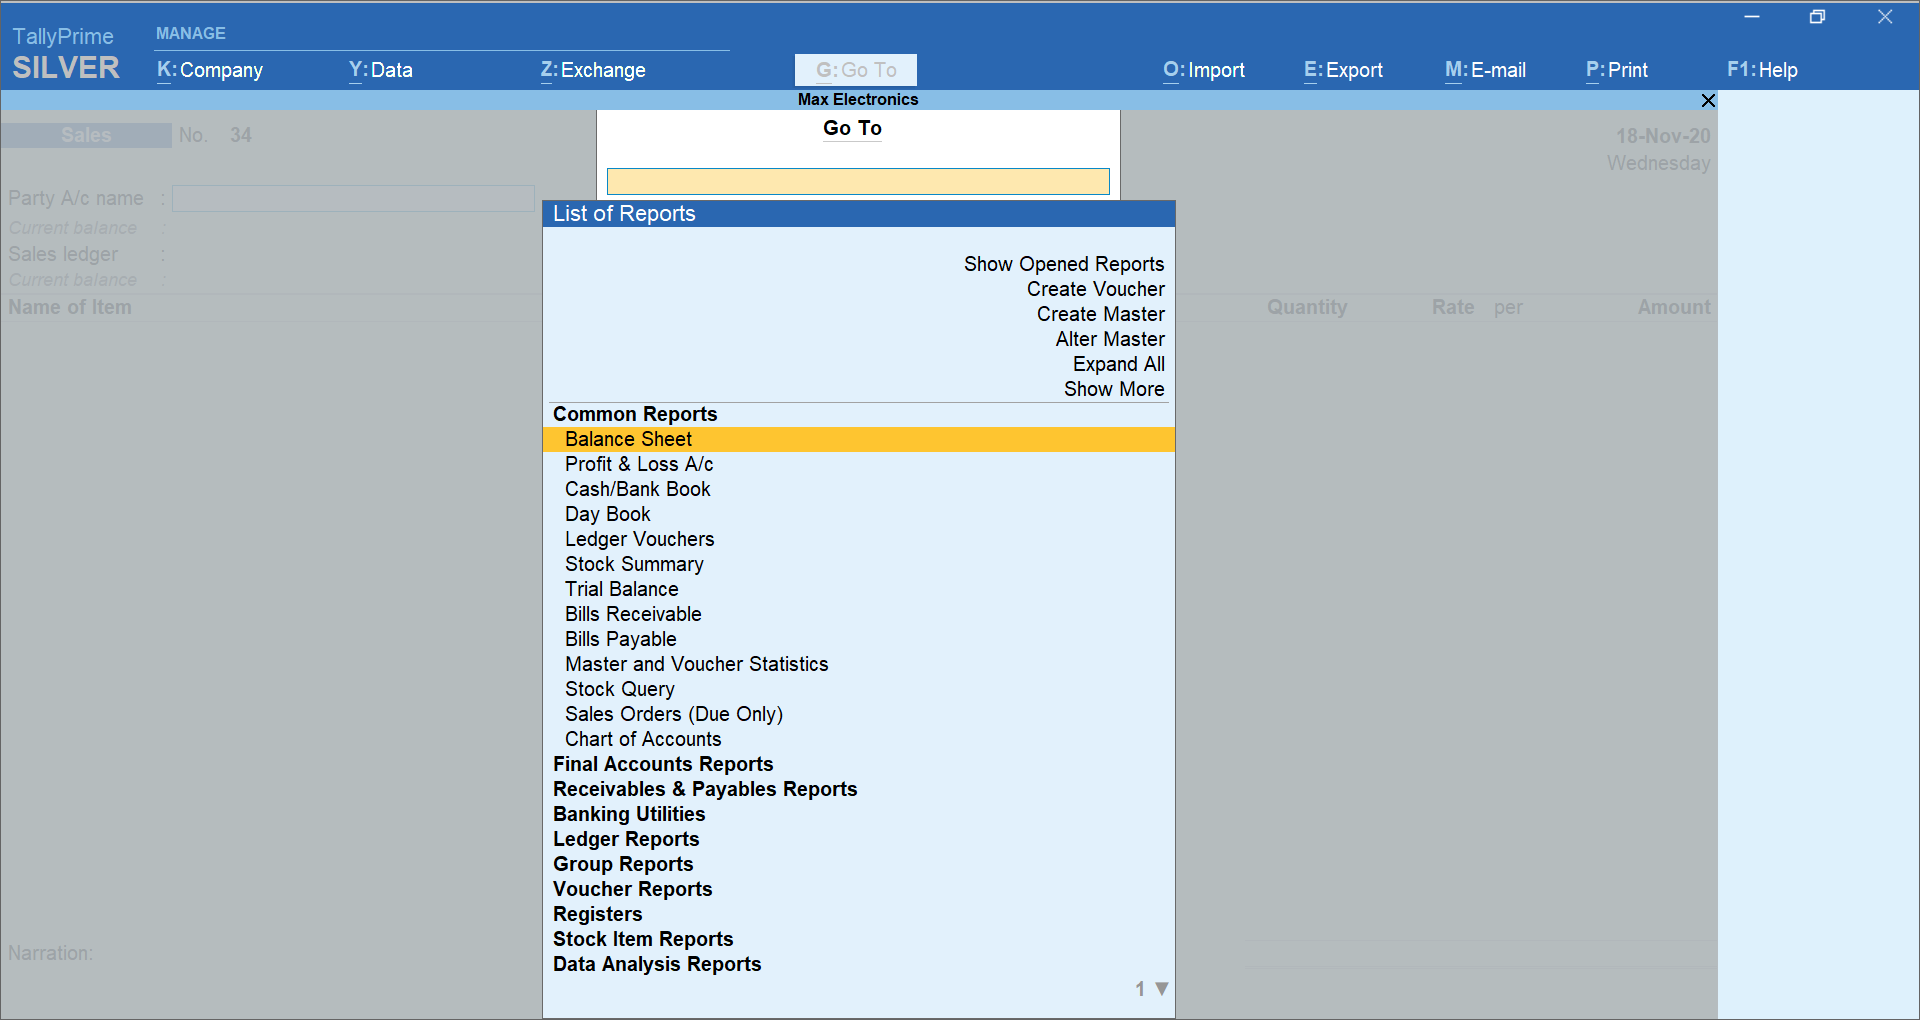
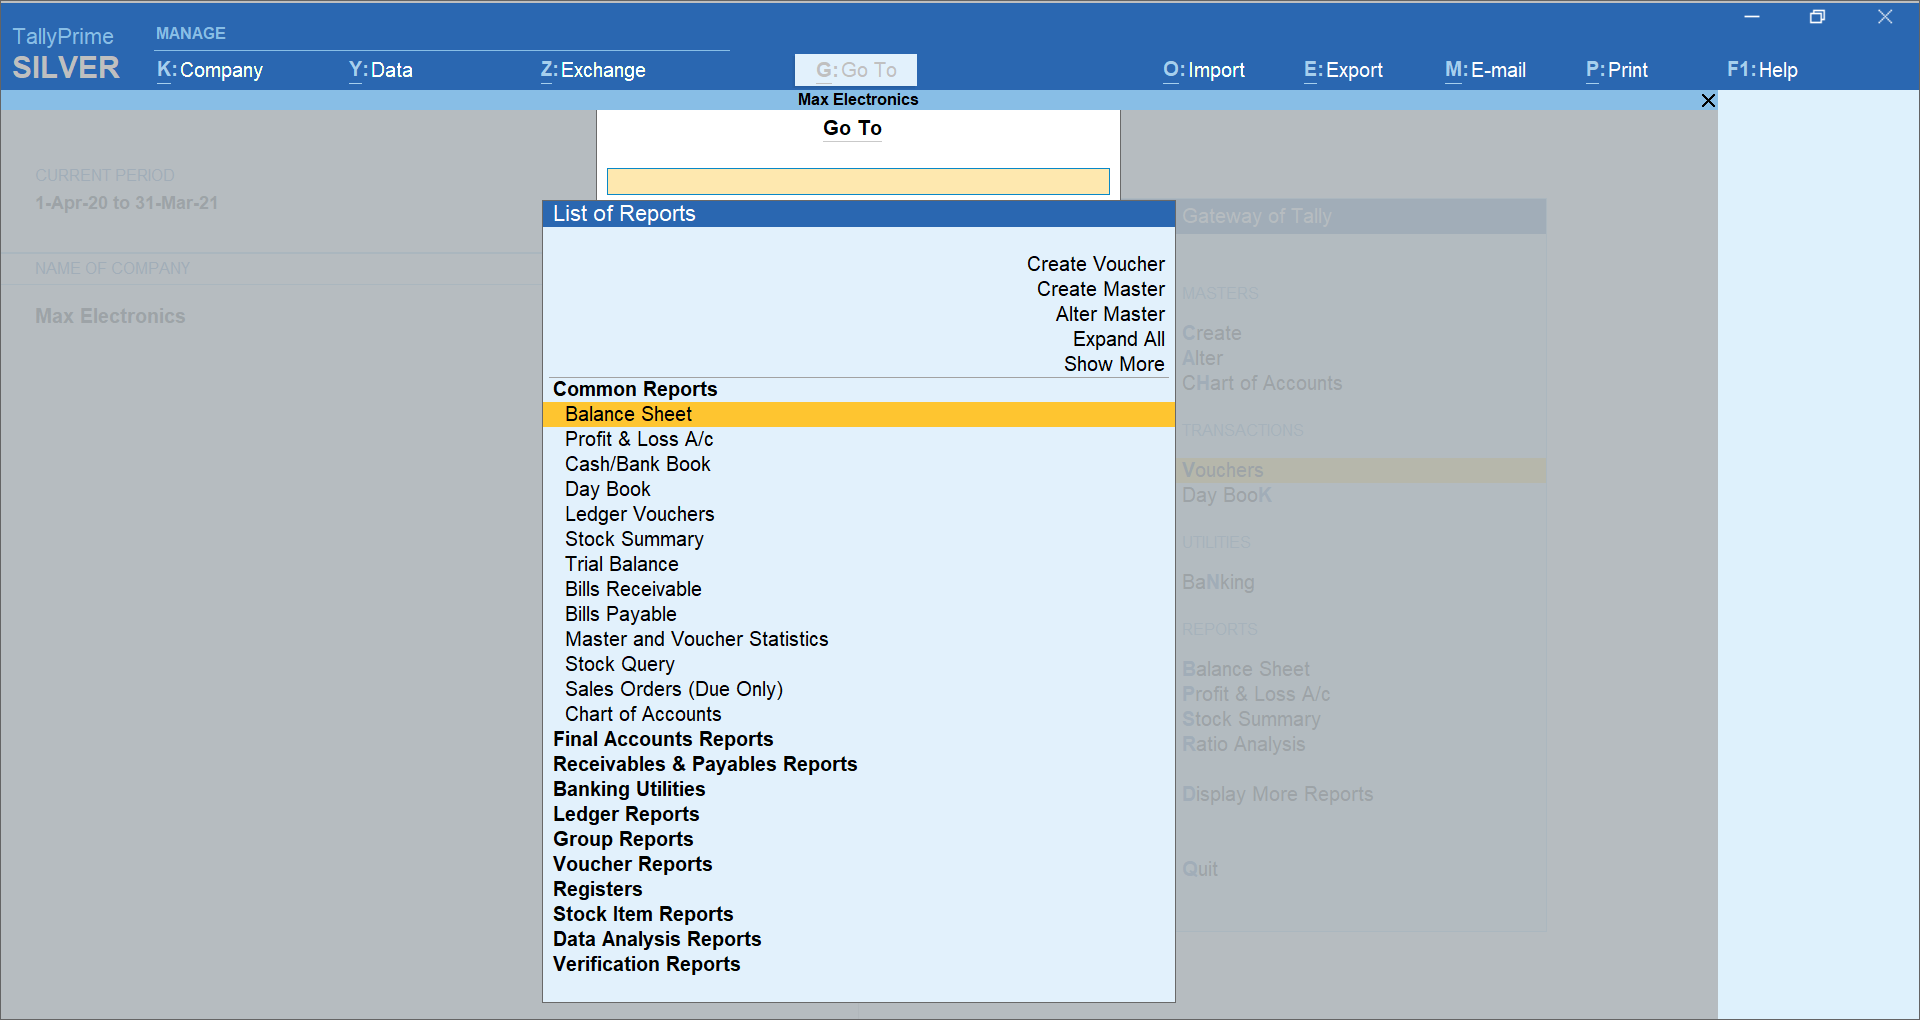
Go To option on the top menu helps you to quickly access any report or feature that you want to use. Any screen that you access using Go To will open on top of the current screen, and closing the screen will take you back to the screen that was open earlier. You can use Alt+G to access Go To. The option Switch To is placed with Go To as a toggle to help you move from the current screen to any other screen. You can use Ctrl+G to access Switch To.
TallyPrime

The all-new TallyPrime is a business management software that provides a complete business solution to manage the growing needs of small and medium businesses. Using TallyPrime, you can manage invoicing, accounting, inventories, banking, taxation, payroll and much more. The robust features understand your business needs and simplifies the lives of business owners through simple to use software, insightful reports, multi-task capability and much more.
With a wide range of features, the all-new TallyPrime can be your perfect business companion. Here is the list of TallyPrime’s features:
- Simplified Interface
- Insightful Business Reports
- Invoicing & Accounting
- GST / Taxation
- Inventory Management
- Cash Flow Management
- Multitasking Capabilities
- Go To feature
- Access business data Online
- Secured Data
Let’s explain some of the key features of TallyPrime.
Top 10 TallyPrime Features
-
Simplified Interface
Getting started with TallyPrime is extremely simple. You can set up the application in less than a minute and get started with invoicing in the even faster
-
Insightful Business Reports
TallyPrime comes with more than 400 business reports which are readily available with powerful insights that will allow you to make informed decisions for the growth of your business. TallyPrime’s amazing flexibility allows you to slice and dice your reports and look at them the way you want, the way it works for your business. At a click of a button, you can change the view, modify the parameters of reports and much more.
-
Invoicing & Accounting
TallyPrime makes it amazingly simple to create and record invoices. Optimized invoice components, host of configurations, multiple billing modes and so on.. makes TallyPrime really moulding to your business.  The wide variety of TallyPrime’s features such as multi-currency, price level, sales and purchase management etc. makes it a simple accounting system.
-
GST/ Taxation
With TallyPrime, you can generate GST compliant invoice in seconds. You can generate different types of GST invoices such as tax invoice, bill of supply etc. automatically. The renowned ‘Prevention – Detection – Correction’ technology of TallyPrime helps you generate and file accurate returns always. Using TallyPrime’s features, you can also manage TDS, TCS and payroll statutory such as PF, ESI and employee income tax.
-
Inventory Management
The features of TallyPrime’s make it one of the most flexible system for optimal inventory management.  With a wide variety of features in TallyPrime such as godown management, stock valuation, manufacturing, batch and expiry date, job costing etc., and the powerful inventory reports makes inventory management a cakewalk.
-
Multi-task capability
TallyPrime supports multi-tasking and helps you handle the day-to-day interruptions. You are in the middle of the sales invoice but want to record another new sale? Or in the middle of making a payment entry but want to refer to outstanding report before proceeding? Or want to print another report being in middle voucher entry? Using TallyPrime, you will be able to handle many such situations without the hassle of switching between multiple instances of Tally or the worry of losing your progress
-
Cash Flow Management
By increasing the efficiencies in accounts receivable, accounts payables, inventories, and several other areas of business, TallyPrime helps you optimise cash flows. Using TallyPrime’s features, you can automate and keep a complete track of accounts receivables and payables cycle.  With powerful inventory features such as re-order level and actionable insights such as fast/slow-moving goods, item-wise profitability etc. you can plan your investment and be on top of your cash flow.

-
Multi-task capabilities
TallyPrime supports multi-tasking and helps you handle the day-to-day interruptions. You are in the middle of the sales invoice but want to record another new sale? Or in the middle of making a payment entry but want to refer to outstanding report before proceeding? Or want to print another report being in middle voucher entry? Using TallyPrime, you will be able to handle many such situations without the hassle of switching between multiple instances of Tally or the worry of losing your progress.
-
Go To feature
With TallyPrime, discovering insights just got easier. This is made possible with TallyPrime’s new and powerful search bar called “Go Toâ€. Using Go To, you can search and find the things you didn’t know Tally could do for you and discover new insights to run your business better.
-
Access business data Online
TallyPrime gives you the ability to view business reports online from the comfort of a web browser, wherever you are with the promise that your data will always rest with you.
-
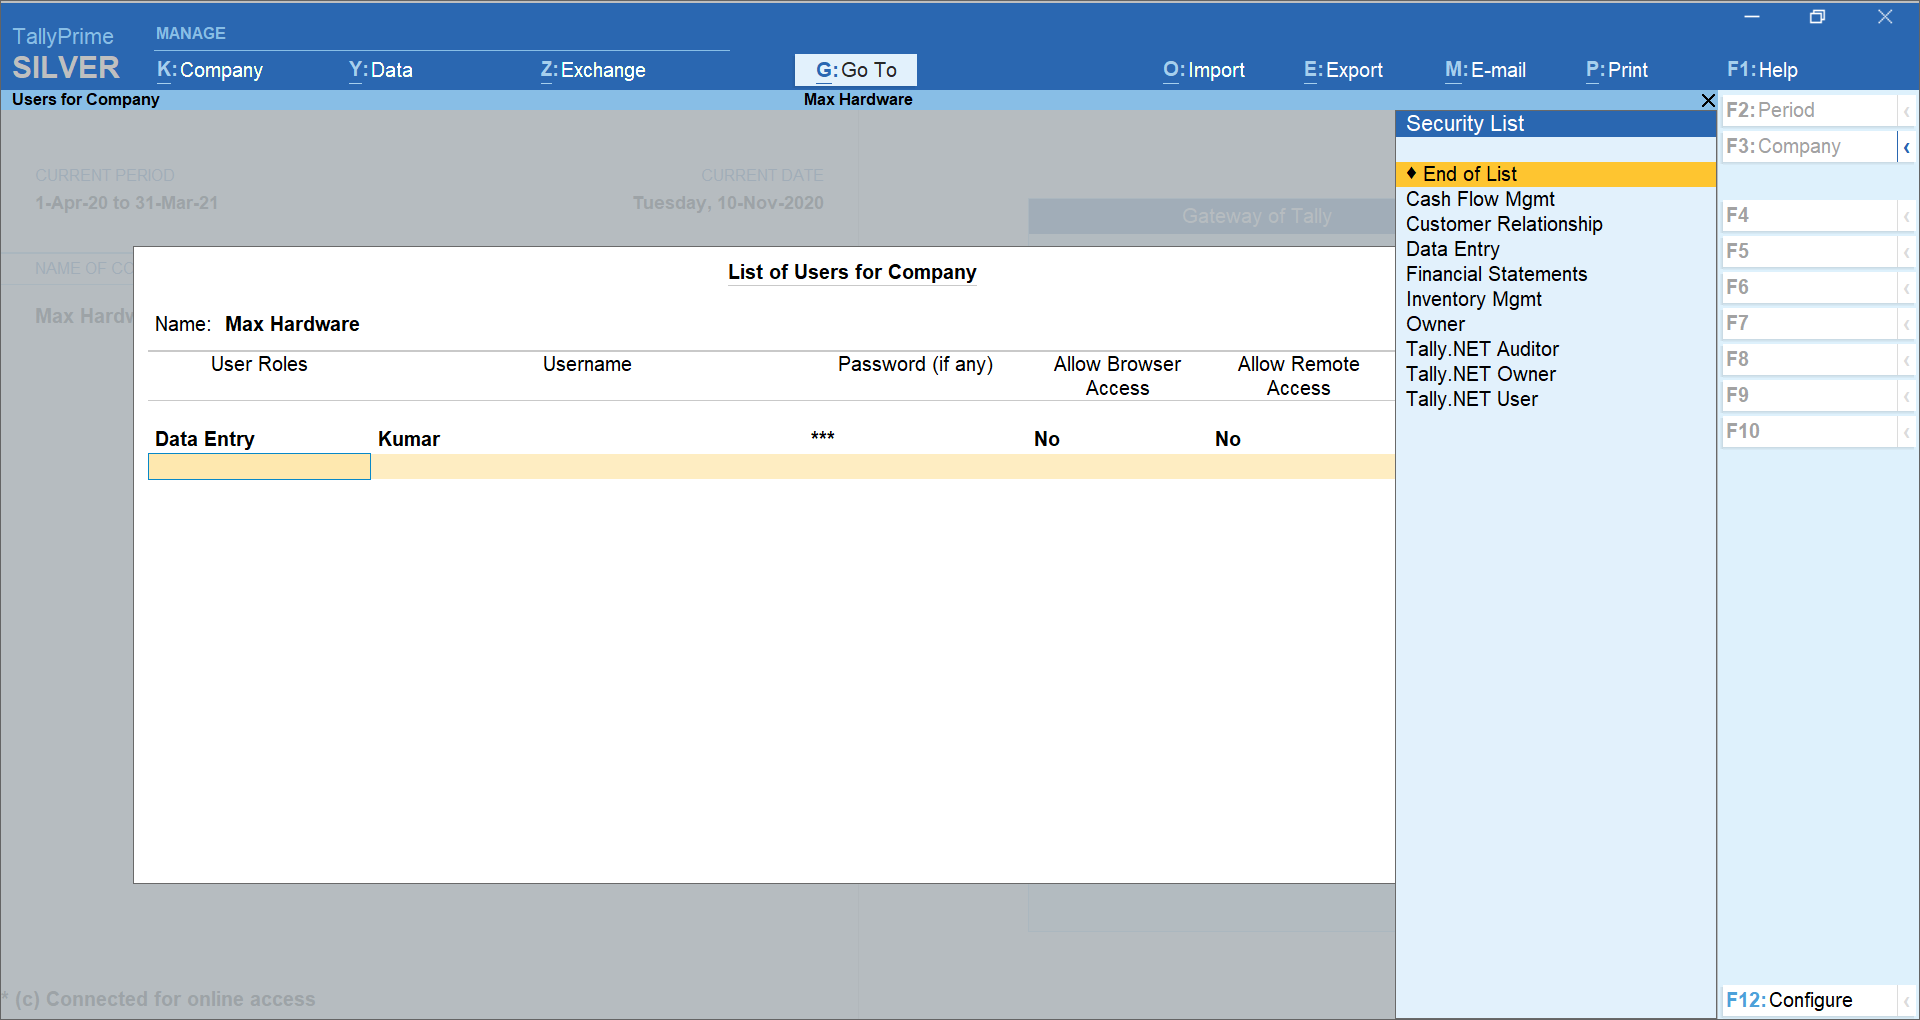
Secure data
We understand that your business data is sensitive and ensure that you will always remain in custody of it. With multiple user access control and feature-based security, levels ensure that access to your data is restricted based on your choice
To summarize, TallyPrime is a comprehensive business management software for small and medium business. By helping you meet your growing business needs, better control over cash flow, optimized inventory management, tax compliance etc. makes TallyPrime the perfect companion for your business. There are several features in TallyPrime which are sure to delight you, most of which would need to be experienced to truly feel their power.