How to record Sales Invoice under GST and Printing the Invoice

Once you activate GST in your company, you can record the sale of goods and services that attract GST using a sales voucher. Ensure that you provide unique voucher numbers for your sales vouchers, and use a new series of voucher numbering.

  • Local sales
  • Printed invoice format
  • Interstate sales

Local Sales

The sale of goods or services to customers in the same state attract central tax and state tax.

To record a local sales transaction

1.    Go to Gateway of Tally > Accounting Vouchers > F8: Sales.

2.    In Party A/c name, select the customer ledger or the cash ledger.

3.    Select the sales ledger.

4.    Select the required items, and specify the quantities and rates.

5.    Select the central and state tax ledgers.

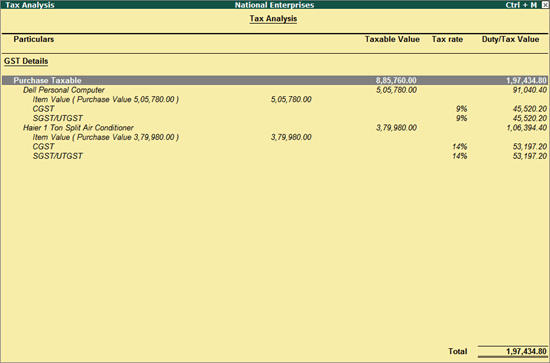
You can view the tax details by clicking A: Tax Analysis. Click F1: Detailed to view the tax break-up.
6.    In the sales invoice, press Alt+P to print the invoice in the required format.

For multiple copies: Press Alt+P and then Alt+C to select the number of copies.

Printed Invoice Format

As per GST guidelines, details such as the applicable taxes and tax rates, and the GSTIN/UIN of the company and the customer will be captured. Depending on your requirements, you can include additional details in your invoice by clicking F12: Configure.

Interstate Sales

Sale of goods or services to a customer in another state attract integrated tax.

To record an interstate sale

●     Follow the steps used for recording a local sales transaction. The only difference is that you have to select the integrated tax ledger instead of central tax and state tax.

Depending on the location of the party, you can record a local or interstate sales transaction with the applicable GST rates, and print the invoice.

How to enable GST for Income and Expense Ledgers

Supply of goods or rendering of services may involve additional expenses, which can either form part of stock items or service value, or can be charged separately. When such an expense is recovered from customers, it becomes an income.

While accounting for expenses and incomes, the ledgers have to be grouped under Direct Expenses, Indirect Expenses, Direct Incomes or Indirect Incomes.

To create an expense or income ledger

1.    Go to Gateway of Tally > Accounts Info. > Ledgers > Create.

2.    In the option Appropriate to select,

o     Goods, if the expense or income value has to be included in the stock item cost.

o     Services, if the expense or income value has to be included in the service value.

o     Both, if the expense or income value has to be included in stock item cost or service value.

3.    Select the Method of Calculation based on the selection made for the option Appropriate to.

If the option Appropriate to is set to Goods, select the Method of Calculation as:

o     Based on Quantity, if the expense or income amount has to be distributed based on the quantity entered for each stock item in the invoice.

o     Based on Value, if the expense or income amount has to be distributed based on the value of each stock item or service selected in the invoice.

Note: If the option Appropriate to is set to Services or Both, the field Method of Calculation is skipped and the calculation is made based on the value entered for each stock item or service in the invoice.

Similarly, you can create income ledgers to record direct and indirect incomes.

How to restart Voucher Numbering in Tally.ERP 9

You can restart voucher numbering for any voucher type.

To restart voucher numbering

1.    Go to Gateway of Tally > Accounts Info. > Voucher Types > Create.

2.    Method of Voucher Numbering? – Automatic (Manual Override).

Note: For GST transactions, it is recommended that you restart voucher numbering to ensure that unique voucher numbers are used for all your vouchers. If Automatic (Manual Override) is set as the method of voucher numbering, it ensures that unique voucher numbers are set for your vouchers.

3.    Set the option Use Advance Configuration? to Yes.

4.    Press Enter to save. The Voucher Type Alteration (Secondary) screen appears as shown below:

●     Enter the number of the voucher in the Starting Number field.

●     Enter the required value in the Width of Numerical Part field.

●     Set the option Prefill with zero? to Yes, to add zero to the voucher number. If this option is set to No, the voucher number is left blank.

For example, if the Width of Numerical Part is specified as 3, and if Pre-fill with zero? is set to Yes, then the voucher number appears as Sales Invoice No: 001.

●     Enter the Applicable From date in the Restart Numbering column. You can specify more than one restart dates.

●     Select the required interval from the Types of Periods list in the Particulars field.

●     Define the Prefix Details in the Particulars field. Examples of prefix details are: Month of the voucher, i.e.,  April/, company information like ABC/, and even fixed number series like 1000.

Note: The numeric section begins immediately after the prefix information. Therefore, a slash (/) or some other special character is used to highlight a separation; for example, April/. The slash would cause the voucher number to appear as April/001, otherwise it would appear as April001. This simplifies fixed number series appearing, for example, as 200100001 where 2001 is the prefix, and 00001 is the starting number with a width of 5, and with leading zeros.

You can choose different prefix information for different periods, or you can continue with one. The prefix continues from the date mentioned under Applicable from to the date mentioned under Applicable from.

●     Define the Suffix Details for the voucher number. The same rules apply as that for Prefix Details.

5.    Press Enter to save.

The Sales Invoice voucher number appears as shown below:

How to update Party GSTIN/UIN in Tally.ERP 9

Quickly update the GSTIN/UIN details for your parties group-wise from the Update Party GSTIN/UIN report. You can also provide this at the individual party ledger level. Use the Import Party GSTIN tool to import GSTINs for several parties in one shot.

  • Update Party GSTIN
  • Import Party GSTIN

To update party GSTIN or UIN

1.    Go to Gateway of Tally > Display > Statutory Reports > GST > Update Party GSTIN/UIN.

2.    Select the group and ledger for which you want to update the GSTIN/UIN.

3.    In the Update Party GSTIN/UIN screen, enter the GSTIN/UIN number for each party.

Click F5 to toggle between Show All and Show Pending.

Show All: Lists all the parties.

Show Pending: Lists the parties with missing details, such as country, state, registration type, or GSTIN/UIN.

Once you have updated the GSTIN/UIN for your parties, you can print the GSTIN details in your invoices for filing returns.

Import Party GSTIN

The Import Party GSTIN add-on helps you update GSTIN details of all parties at once from Microsoft Excel. It is very useful if you have the GSTIN information of all parties outside Tally.ERP 9 and want to import the information to update the party ledgers in Tally.ERP 9.

Note: You need to export existing party information to MS Excel using Update Party GSTIN, and use this MS Excel file to fill in the GSTINs that you want to import.

To install the Import Party GSTIN add-on

1.    Download the Import Party GSTIN add-on from the Add-ons section here.

2.    In Tally.ERP 9, click F12: Configure > Product & Features > F4: Manage Local TDLs.

3.    In the TDL Configuration screen, set the option Load TDL files on startup to Yes.

4.    Specify the name of the add-on with the folder path containing the add-on in the field List of TDL files to preload on startup.

5.    Press Enter to save.

Import Party GSTIN appears under GST Reports.

To import party GSTIN details

1.    Go to Display > Statutory Reports > GST > Update Party GSTIN.

2.    Select All Items in the Name of Group and Name of Ledger fields in Select Group screen and press Enter. The Update Party GSTIN/UIN screen lists all parties without a GSTIN.

3.    Click Export to export the information in excel format.

4.    Open the exported file, specify GSTIN details for the parties, and save the file.

5.    In Tally.ERP 9, go to Display > Statutory Reports > GST > Import Party GSTIN.

6.    Specify the name of the MS Excel file to be imported with the path in the field Name of the file to be imported (Excel).

7.    Specify the name of the sheet containing information in MS Excel file in the field Sheet name.

8.    Press Enter to import.

When the import is completed, the MS Excel file opens and displays the message Data imported successfully.

Note: Ensure the party names are not altered in the MS Excel file exported from Tally.ERP 9. Also, the name of Country, State and Registration Type specified in the MS Excel file must match the spellings given in Tally.ERP 9.

To correct errors in the imported data

1.    Open the MS Excel file and check for a sheet called Errors. If this sheet is there, it means that some data was incorrect for some parties and has not been imported into Tally.ERP 9.

2.    Check and make necessary corrections in the Errors sheet. Save the file.

3.    Import the file again, and specify the sheet name as Errors. The corrected information is imported this time.

How to create GST Ledgers in Tally.ERP 9

To account for the different taxes to be paid under GST (central tax, state tax, union territory tax, integrated tax, and cess), you have to create a tax ledger for each tax type.

To create central tax ledger

1.    Go to Gateway of Tally > Accounts Info. > Ledgers > Create.

2.    In Under, select Duties & Taxes.

3.    Select GST as the Type of duty/tax.

4.    Select Central Tax as the Tax type.

Similarly, you can create ledgers for state tax, integrated tax, and cess by selecting the relevant Tax type under GST.

Updating Sales and Purchase Ledgers for GST Compliance

If many items you sell have the same tax rate, specify the tax rate and other GST details in your sales ledger. Similarly, if the items you purchase have the same tax rates, update your purchase ledger.

If you sell items with multiple tax rates, you can still maintain a single sales ledger, and record all GST details at the stock item or stock item or stock group level. You can create a single purchase ledger similarly.

  • Updating a Sales Ledger
  • Updating a Purchase Ledger

Updating a Sales Ledger

To update a sales ledger

1.    Go to Gateway of Tally > Accounts Info. > Ledgers > Alter > select the sales ledger.

2.    Is GST Applicable – Applicable.

3.    Set/alter GST Details – Yes, specify the details in the GST Details screen, and save. Alternatively, you can use a classification to use the tax details defined in the classification.

To view the history of tax rate changes, press Alt + L.

To specify further GST-related details, click F12: Configure.

4.    Select the Type of supply. By default the type of supply is set to Goods.

5.    Press Ctrl + A to save.

Updating a Purchase Ledger

To create a purchase ledger

●     Follow the steps used for updating the sales ledger, with the nature of transaction and rates for purchase.

While recording a sale or purchase transaction, you can select the respective ledger.

Updating Stock Items and Stock Groups for GST Compliance

If the items you sell have different tax rates, update your stock item masters or stock groups with the applicable GST rates, and select the type of supply, as applicable.

  • Updating a stock item
  • Updating a stock group

Updating a stock item

In case you need different tax rates for different items, modify the stock items to include the applicable tax rates.

To update a stock item

1.    Go to Gateway of Tally > Inventory Info. > Stock Items > Alter > select the item.

2.    Set/alter GST Details: Yes to specify the details in the GST Details screen, and save.

Integrated Tax: When you enter the integrated tax, state tax and central tax are calculated as half of the integrated tax specified. You can change state tax or central tax by using F12 configuration.

Note: If you have modified the tax rates before, press Alt + L to view the history of tax rate changes.

3.    Select the Type of supply.

4.    Press Ctrl + A to save.

Updating a stock group

In case you need the same tax rates for the items in a stock group, modify the group to include tax applicability and rates.

To update a stock group

1.    Go to Gateway of Tally > Inventory Info. > Stock Groups > Alter > select the group.

2.    Set/alter GST Details: Yes to specify the details in the GST Details screen, and save.

Integrated Tax: When you enter the integrated tax, state tax and central tax are calculated as half of the integrated tax specified. You can change state tax or central tax by using F12 configuration.

3.    Press Ctrl + A to save.

Setting Up GST Rates in Tally.ERP 9

Quickly set up GST rates for your company, stock item-wise or stock group-wise, using the GST Rate Setup option. You must enable GST in your company to provide GST rates. You can set up GST rates at the company level, stock group level, stock item level, ledger group level, and ledger level.

To set GST rates for stock groups and stock items

1.    Go to Gateway of Tally > Display > Statutory Reports > GST > GST Rate Setup.

Note: Brackets indicate that tax rates are captured from the company or stock group level.

2.    Select the stock group or stock item, and press Alt+S to provide the applicable tax rates. You can press Spacebarto select multiple stock groups or stock items. Set the tax rates and save.

The rate entered for integrated tax will be equally divided between central tax and state tax.

To view the history of tax rate changes, press Alt + L.

To specify further GST-related details, click F12: Configure.

Activating GST for Your Company

To use Tally.ERP 9 for GST compliance, you need to activate the GST feature. Once activated, GST-related features are available in ledgers, stock items, and transactions, and GST returns can be generated.

To activate GST

1.    Open the company for which you need to activate GST.

2.    Press F11 > F3.

3.    Enable Goods and Services Tax (GST) – Yes.

4.    Set/alter GST details – Yes.

State: Displays the state you have selected for your company. Helps in identifying local and interstate transactions. If you change the state, it will be updated in the company details.

5.    Specify the GSTIN/UIN for the business. This can be printed in the invoices as required. You can specify this later.

6.    Specify Applicable from date. GST will be applicable for your transactions from this date onwards.

You can record transactions using the ledgers with GST details, and print invoices with GSTIN.

If required, deactivate other taxes like VAT, as applicable. For this, open the corresponding tax details screen and specify the Deactivate from date