Author: Tally Academy
TallyPrime Release 4.0
TallyPrime and TallyPrime Edit Log Release 4.0 bring great delight and joy to you with the following:
- The facility to share your business articles such as vouchers and reports through WhatsApp in a jiffy
- A simple way to import the masters and transactions maintained in the MS Excel format
- The state-of-art Dashboard that gives you a quick glimpse of your business health
Furthermore, the product improvements in the modules such as GST and Payment Request coupled with the facility to print previous and current balances in the Invoice and other enhancements make your experience with TallyPrime all the fruitful.
Highlights – TallyPrime and TallyPrime Edit Log Release 4.0
TallyPrime Release 4.0 comes with new and exciting features that will make your experience even more delightful.
- TallyPrime with WhatsApp for Business
- Import Data from MS Excel
- Graphical Dashboard
Instant Sharing of Business Details | TallyPrime with WhatsApp for Business
Considering the importance of seamless and efficient communication between businesses and their stakeholders, TallyPrime Release 4.0 brings to you the power of instant communication via WhatsApp for Business. This helps you take advantage of the technology advancements and experience enhancements in communication that rule the market.
Businesses can send documents directly from TallyPrime to one or more parties or stakeholders in a single click. Consider that you just closed your books for the quarter. You can send digitally signed financial statements to your investors and key stakeholders on WhatsApp. Similarly, you can send invoices and reminder letters to your parties via WhatsApp and get responses from them via WhatsApp. This will help in managing the cash flow better as the communications are instant.
If your business is in India, your domestic parties also get the flexibility to click the payment URLs in invoices and reminder letters sent via WhatsApp to make instant payments.
WhatsApp is now seamlessly integrated with TallyPrime. You can sign up with WhatsApp for Business from TallyPrime, and send documents to one or many parties or stakeholders at one go. While TallyPrime retains the facility to send documents through e-mail, no more worries about when the receiver would see any mail and act on it.
Easy Migration from Any Software to TallyPrime | Import Data from MS Excel
Manual data entry for high volume data is a nightmare for any business. Manual entry is time-consuming and error-prone. To address this, TallyPrime Release 4.0 provides seamless import from MS Excel. This is in addition to the existing option to import XML files.
As you might have experienced, many software products allow export of data to Excel. This enables you to get data in Excel workbooks, and import to TallyPrime.
What’s in store:
- Effortlessly import masters and transactions from Excel.
- Use any of the default templates/sample Excel files.
- Take data curated in any Excel workbook and map it to fields in TallyPrime, regardless of the format or order.
- Identify errors that occurred during import from the logs created while importing.
Visual Tool to Form Financial Insights | Graphical Dashboard
You can use Dashboards in TallyPrime for analysing business information using intuitive formats. Apart from the Sales and Purchase dashboards provided by default, you can create different dashboards. Based on your needs, you can include different reports as separate tiles, configure each tile as needed to cater to diverse requirements, and interact with each tile. Whether you’re a business owner, finance manager, or consultant, Dashboard empowers you to make data-driven decisions that fuel growth and success. You can use the graphs/charts in different tiles to monitor your cash flow, track revenue trends, analyse expense patterns, and gain a comprehensive view of your financial position and ledger balances for periods of your choice.
Dashboard in TallyPrime offers flexibility to:
- Add tiles or hide tiles, configure each tile independently, include or exclude data points, and so on.
- Restrict access to dashboards, based on user rights. If specific users have restricted access to certain tiles, such tiles will not form part of a dashboard for those users.
- Create different dashboards for different purposes, organise tiles as per your preferences, and save the views.
- Load a dashboard as the home screen when you open a Company.
- Print, export, and share with stakeholders by e-mail or WhatsApp.
Click here for release notes
Click here for download
TallyPrime Release 2.0
Release Notes – What’s New in TallyPrime
You can count on us for a delightful journey with TallyPrime as we work to enhance the product with new features and fix issues, which will make your experience even simpler and more seamless.
Highlights – TallyPrime Release 2.0
Connected experience for e-Way Bill
With the connected experience for e-Way Bill, TallyPrime enables you to –
- Generate e-Way Bill online at the time of voucher creation.
- Generate multiple e-Way Bills online at one shot.
- Cancel e-Way Bill, update Part B & Transporter ID, and extend validity for transactions in bulk.
- Print e-Way Bill for invoices with e-Way Bill number and QR Code as per the government’s requirements.
- Track the status of e-Way Bills using the e-Way Bill report and e-Way Bill Register.
- Get the latest e-Way Bill information and status from the e-Way Bill system to a transaction using e-Way Bill report and e-Way Bill Register.
As a result, you need not juggle between TallyPrime and the e-Way Bill system for various e-Way Bill activities, as everything can be done from within the product.
Save View for reports
The Save View feature will delight you with a personalized experience for viewing reports in TallyPrime.
You can now:
- Save a preferred view for a report with your desired configurations.
- Save a view for a report for a specific period.
- Save a view for a report opened for a particular master such as Party ledger, Stock Item, and others.
- Save views, as per your requirement, for:
- All companies on a particular computer
- A specific company
- Set a saved view as the default view.
Henceforth, the report will always open as per the configurations applied in the saved view. - Change the default view, whenever needed.
- Delete a saved view or all the views from all companies or a specific company, as needed.
- Restrict users from saving views for reports or deleting views saved in a specific company.
Saving your preferred views saves a great deal of time as you need not apply the configurations time and again.
Online GSTIN/UIN and HSN/SAC validation
TallyPrime is here with a quick and simple process to validate:
- GSTIN/UIN information for single and multiple Parties.
- HSN/SAC information for single and multiple Stock Items.
As a result, you get to know if the information entered in your books is authentic and update it, if needed.
TallyPrime Reports in browsers
Mobile-responsive design
The all-new mobile-responsive design provides you with an intuitive experience right from company selection to downloading a voucher.
Additionally, you can now enjoy the benefits of the following features:
Quick access to change date in Day Book
You can now view Day Book for the previous and next dates by tapping on the left and right arrow keys, respectively.
Scale Factor in selected reports
You can now apply Scale Factor in a report to view the values in hundreds, lakhs, and so on.
Introduction of Show Details
You can now view additional information in selected reports by tapping on Show Details.
Simpler way to change period
You now have a better experience in changing the period of reports in browsers.
File Name of Report downloaded from browser
The file name of the report downloaded from the browser will now have an underscore, which will separate the date and timestamp for easy identification of the date and time of the download.
e-Payments in TallyPrime
TallyPrime’s easy-to-use e-payment feature is now extended to RazorpayX Bank and Axis Bank.
Product Improvements – TallyPrime Release 2.0
File your GSTR-1 returns with HSN Summary as per the latest change
As per the latest amendments, in Table 12 of GSTR-1 (HSN Summary) the column Total Value is replaced with the column Rate of Tax. This release of TallyPrime enables you to file your returns with this change.
Party details in exported Ledger Group Outstandings
When you exported the Ledger Group Outstandings report to an MS Excel file, the details of some Parties were missing.
This issue is resolved.
Voucher Register with Verification Status
In the Voucher Register under Verification of Vouchers, the transactions did not appear for the selected Verification Status.
This issue is resolved.
e-Mailing Ledger and Group Outstandings
When you sent Ledger and Group Outstandings to parties via e-mail, the parties that did not have any outstanding amount received a blank report.
This issue is resolved.
GST calculation in sales transactions
When you recorded a sales transaction using Voucher Class, TallyPrime rounded off the tax value with three decimals to two decimals. Consequently, the calculated tax amount was lesser by 1 paisa.
This issue is resolved.
Terms of Delivery in Sales Invoice
Only the first line was visible in Terms of Delivery when you altered a Sales Invoice and provided the Order No.
This issue is resolved.
Performance enhancements in navigation
The performance enhancements in navigation will make your experience with TallyPrime all the more delightful. It will take fewer seconds to:
- Navigate to Credit Note voucher from Gateway of Tally
- Switch between Voucher Types
- Display the List of Ledgers
- Change Buyer Name
- Accept the Supplier Details screen
TCS transactions and reports
The TDL storage error appeared in the TCS transactions and reports, when Use TCS Allocations was enabled in the sales transaction.
This issue is resolved.
Error while uploading Delivery Note on the e-Way Bill system
An error appeared while uploading a Delivery Note on the e-Way Bill system. This happened when you had selected Others as Sub Type while recording the Delivery Note.
This issue is resolved.
Change of ledger in a columnar report
The report details were not getting refreshed when you changed the ledger in a columnar report.
This issue is resolved.
e-Way Bill Number in Multi-Voucher Printing
In multi-voucher printing, the last e-Way Bill number was printed in all the invoices.
This issue is fixed.
TCS Debit Note not linked to TCS Receipt voucher
TCS Debit Notes were not getting linked to TCS Receipt vouchers.
This issue is resolved.
TRN in Sales invoice printed in Arabic
The TRN did not appear when you printed a sales invoice in Arabic.
This issue is resolved.
e-Way Bill number in altered invoice
The e-Way Bill number did not appear in the print when the invoice was altered.
Click here for release notes
Click here for download
Banking in TallyPrime
One of the most crucial and useful features that TallyPrime offers businesses, is its banking capability. Bank-related activities are performed almost on a daily basis by business owners. And so the need to automate and facilitate smooth maintenance of records and processes that are fundamental to effective recording of accounting transactions for timely payments, is extremely significant.
How does TallyPrime help business owners manage their banking activities?
The banking feature in TallyPrime, enables business owners to perform a host of bank-related activities, including payments to parties, bank reconciliation, and cheque management. Usage of this feature enhances and simplifies the banking experience significantly by saving time, reducing errors, improving productivity, and scaling up traceability.
It provides amazing banking capabilities for running your company. You can use its e-payments capability to make timely payments to your parties, manage cheques, reconcile bank statements, and others. TallyPrime’s banking feature supports the following major areas of your business operations.
Banking utilities in TallyPrime
As a business owner, if you use a specific bank to manage your transactions wrt receiving and making payments, TallyPrime offers you a host of utilities including:
- Auto bank reconciliation
- Cheque management
- E-payments
- Deposit Slip
How to create bank ledger in TallyPrime?
Bank ledgers contain crucial information about a bank that you use to make or receive payments. You can provide information such as Bank name, Account no., IFS code, and address while creating bank ledgers.
Simply go to Gateway of Tally > Create > type or select Ledger and press Enter.
OR
Alt+G (Go To) > Create Master > type or select Ledger and press Enter.
Fill in the required details such as;
- Name of the bank
- Bank Accounts (Saving Account (Bank Account), Over Draft account ( Bank OD), Cash Credit account (Bank OCC))
- Account details – Account holder’s name, A/C number, IFSC, Branch, etc.

Once you have configured all the details, you can seamlessly perform the required actions based on the preset details you’ve entered for that bank’s ledger.
Auto Bank reconciliation
Reconciling company’s bank books with the banker’s statement is a regular task of accounting. Thus, TallyPrime offers you bank reconciliation capability, which explains the difference between the bank balance shown in an organization’s bank statement, as supplied by the bank, and the corresponding amount shown in the organization’s own [accounting] records at a particular point of time. With TallyPrime, you can:
- Check correctness of reconciliation
- Recover reconciliation of any date
- Auto Bank Reconciliation
- Reconcile manually
TallyPrime’s auto bank reconciliation enables users to reconcile bank statements with a long list of transactions, in the most simplified manner. All you got to do is simply import the bank statements, and the reconciliation will happen, automatically. Yes, it is that simple!
You need to enable the option provided for auto bank reconciliation in the bank ledger to reconcile the transactions made with that bank.
Learn how to do auto bank reconciliation in TallyPrime:
Cheque management
With TallyPrime, you can manage a host of pre-defined cheque formats, multiple cheque books and powerful cheque register, manage your banking needs effortlessly. You can maintain record of all payment made using cheques or if you have received payments through cheques from your parties. In TallyPrime, you can configure the cheques based on the type of cheque book you use in your business. Configure the cheques as your need and get them printed to suit your business needs.
In order to print a self cheque in TallyPrime, cheque printing has to be configured. Then you have to pass a contra entry by entering Self as the Favouring Name in the Bank Allocation screen.
- Gateway of Tally > Vouchers > press F4 (Contra). Credit the bank account
- Enter the amount in the Credit column
- Press Enter to go to the Bank Allocations screen
- Press F12(Configure) > set Show favouring name as Yes, to enter Self as the Favouring name.
The Bank Allocations screen appears as shown below:

- Press Ctrl+A to accept and return to the Accounting Voucher Creation screen
- Debit the cash account. The Accounting Voucher Creation screen appears as shown below:

- Press Enter to go to the Cheque Printing screen and Press P (Print) to print the self-cheque.
Post-dated cheque management
Post-dated cheque as the name suggests is the one that the recipient enchases on a future date. Accounting books usually enter such transactions only once the payment is made.
TallyPrime facilitates smooth management of post-dated cheques and the underlying transactions:
- You can mark an entry as post-dated and specify the date on which the cheque was received/issued
- The transaction will automatically affect the accounting books on the date of the post-dated cheque
- You can obtain a comprehensive summary of all transactions involving post-dated cheques, using the Post-dated Summary report
- You can include post-dated transactions in other accounting reports such as Ledger Vouchers, Group Summary, Outstanding reports, and so on.
Check how to handle cheque management:
Cheque Printing in TallyPrime
This option provided in the Banking menu enables you to print the pending, already printed or the required cheques continuously from a single screen. You can also update the cheque details and have track of cheques to be printed, of a selected or all banks.
In order to print a self cheque in TallyPrime, cheque printing has to be configured. Then you have to pass a contra entry by entering Self as the Favouring Name in the Bank Allocation screen.
- Gateway of Tally > Vouchers > press F4 (Contra)
OR
Alt+G (Go To) > Create Voucher > press F4 (Contra).
- Credit the bank account
- Enter the amount in the Credit column
- Press Enter to go to the Bank Allocations screen
- Press F12 (Configure) > set Show favouring name as Yes, to enter Self as the Favouring name

- Press Ctrl+A to accept and return to the Accounting Voucher Creation screen
- Debit the cash account. The Accounting Voucher Creation screen appears as shown below:

E-payments
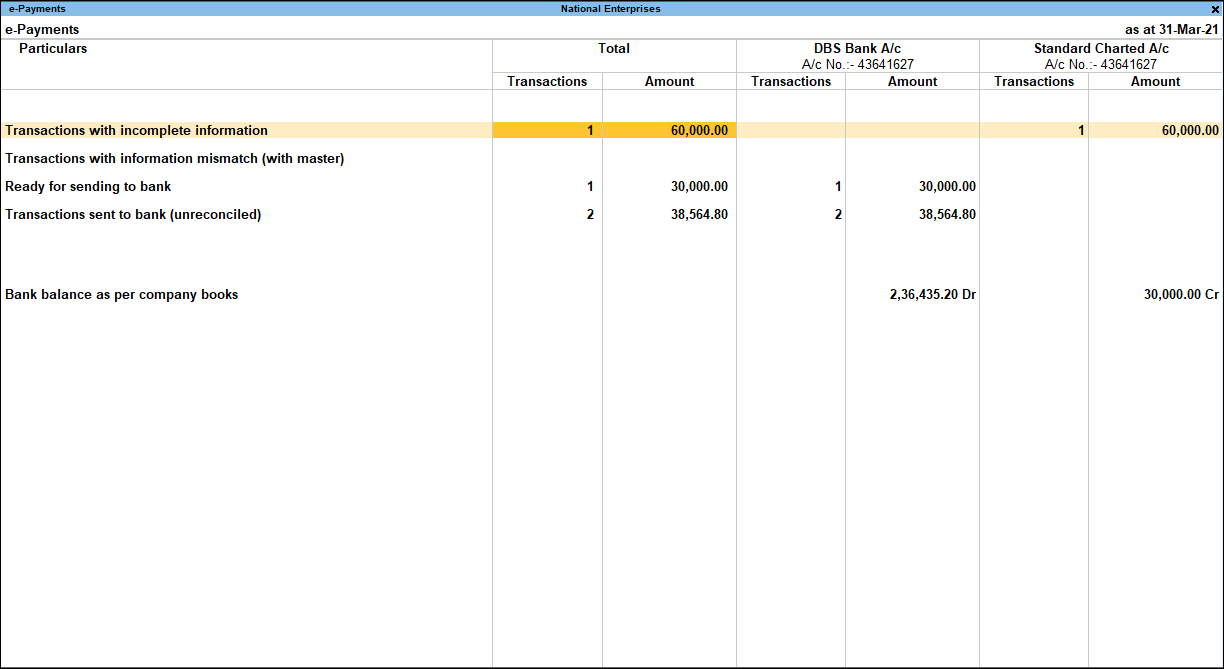
This feature is a unique capability that syncs your bank master, party master and voucher entry into a common platform intimating the payment transaction to the bank. With e-payments, you can
- Easily record transactions using the electronic mode of fund transfer, including e-Fund Transfer, e-Cheque, and e-Demand Draft/PO
- Identify any incomplete information or mismatch in beneficiary details
- You can send completed payment transactions to the bank, with accurate bank details, either during voucher creation or from an intuitive e-Payments report under Banking
- You can also export either single or multiple transactions at a time, so you will not have to repeat the process of export. In case of DBS (India), you can also open the bank portal directly from the e-Payments report and authorise any pending transactions
- View and track the status of your e-payment transactions using the e-Payments report
Getting started with e-payments is easy! All you have to do is, contact your bank to enable bulk upload and then enable e-payments in TallyPrime. In fact, recording an e-payment transaction in TallyPrime is also as easy as recording any other transaction. Simply open a payment voucher, select the party and the bank ledgers, and complete the payment transaction. What’s more, you can make e-payments to your parties or the employees on your company’s payroll using the same simple steps.

Once your e-payment transactions are recorded, the payment instructions are ready to be uploaded to the bank portal. Before uploading, the e-Payments report in TallyPrime will help you in checking the transactions to ensure that the details are complete and error-free. If there are any errors, then you can drill down to the relevant section and update the details.

You can view and track the status of your e-payment transactions and identify any incomplete information or mismatch in beneficiary details. You can view the e-payments that are sent (or ready to be sent) to the bank. You can also view the bank balance as per the company’s books and compare it with the balance as per the bank.
Gateway of Tally > Banking > e-Payments > press Enter
Deposit Slip
Any cash which is received by your business, must be deposited in the bank with relevant Cash Deposit Slip attached. You can generate as well as print the cash deposit slip for depositing cash into a bank on any particular date and period.
The Cash Deposit Slip option in the Banking menu is used to generate cash deposit slips, bank-wise. It has all the relevant information which once configured, need not be re-entered:
- Account Number
- Account Holder Name
- Bank Name
- Branch Name (information is fetched automatically from Bank ledger)
- Company’s Telephone Number
- Cash Denomination
To view cash deposit slip report:
- Gateway of Tally > Banking > Deposit Slip
OR
Alt+G (Go To) > type or select Cash Deposit Slip and press Enter.
- Select the required Bank account from the list for whose transaction you want to print Cash Deposit Slip and press Enter

Similarly, you can also generate and print cheque deposit slips for payments received through cheque or demand draft which need to be deposited into the bank.
To View Cheque Deposit Slip
- Gateway of Tally > Banking > Deposit Slip
OR
Alternatively, Alt+G (Go To) > type or select Cheque Deposit Slip and press Enter.
- Select the required Bank account from the list for whose transaction you want to print Cheque Deposit Slip and press Enter

How to Process Payroll | Payroll Process in Easy Steps
The payroll process is an essential activity in an organization with employees. Depending on the structure of the salaries and the prevailing laws and regulations, the calculation of payroll can be either simple or more complex. It is vital to process payroll in a timely and accurate manner. Any discrepancies in the calculations have a direct impact on employee morale and productivity.
The payroll process also involves compliance with the regional laws and regulations. If there are mistakes that are not in compliance with the rules, it could put the organization into legal and financial trouble. An accurate and effective payroll process is essential in any organization whether big or small. Using business management software with capabilities to manage payroll makes the entire process simpler and error-free.
The payroll is the amount of money that the employer pays out to employees for their services. Every organization has a list of add ons and deductions from the basic pay of the employee. These involve allowances, bonuses, taxes etc.What is payroll process?
To have a payroll process, every organization must:
- Define a pay policy with basic pay, benefits, leave policies, encashment of leave and other related items
- Define the components that appear on the payslip as per the company’s policy and in compliance with regulations
- Obtain and record the employee details accurately. This includes the bank account details, tax details etc.
- Validate the employee inputs
- Calculate the statutory as well as non-statutory deductions and deduct them to arrive at the gross pay amount
- Pay the salary amount to the employees through the mode that the company employs. Most often this is done by intimating the bank of the salary amount to be disbursed to each employee account
- Record the payroll transactions in the accounting system
- Pay the dues to the appropriate authorities and file returns accurately and before the due dates
- Physically or digitally (PDF) distribute payslips and other relevant tax documents to the employees.
How to process payroll in easy steps?
The payroll process steps are categorized into the following
- Pre-payroll process,
- Payroll calculation process
- Post-payroll process
Let’s discuss each of these in detail.
Pre-Payroll Process
Defining the payroll policy
Different organizations have their own unique payroll policies. These should be very clearly and unambiguously defined. The first step is to define the basic pay for the different designations in the organization. Leaves and benefits are monetized differently in each organization. There may be deductions for leave taken beyond the given quota. Unused leave may be convertible to money. Some organizations pay for overtime while others do not. Certain companies have the practice of an annual bonus payout. If the bonus is performance-based, the policy should be well defined. The accurate computation of this amount is essential. The payroll policy should be approved by the management of the organization.
Data gathering
The details of an employee are usually collected and recorded at the time of onboarding a new employee. This may include their PAN number, other ID numbers and details.
Attendance and performance data
Payroll also requires the attendance data of the employee. If any bonuses or benefits are due, the relevant department would have to provide the data to payroll. If the employee has earned a performance bonus or a raise, it should be recorded by payroll. In a smaller organization, this data would be easy to gather and compute. In a larger organization, this flow of data to payroll is more challenging. Business management software with an integrated payroll system makes the data flow easier and more accurate.
 Validation
All the data received would have to be validated for accuracy and compliance with the organization’s policies as well as the law. Payroll would have to ensure that no employee who has left employment continues to feature as an active employee for payroll calculation. All the current employees should be included for salary calculation without missing anyone.
Payroll calculation process
This is the payroll process that takes place based on the data input.Payroll is calculated manually or through the use of software to calculate the net pay after factoring in gross income and gross deductions.
Gross income/salary = regular income + allowances if any + one time payment or bonus if any
Gross deduction = regular deductions + statutory deductions + one-time deductions if any
Net pay = Gross income – gross deduction
If the payroll is calculated manually, these values are checked for accuracy and errors if any are corrected.
Post-payroll process
Payroll accounting
The amount of salary disbursed as well as the different components of additions and deductions have to be accounted for. The relevant transactions have to be recorded and entered as per the accounting practices of the organization. If the company uses a standalone payroll software or HR software the data would have to be reentered into the accounting software.
Salary payout
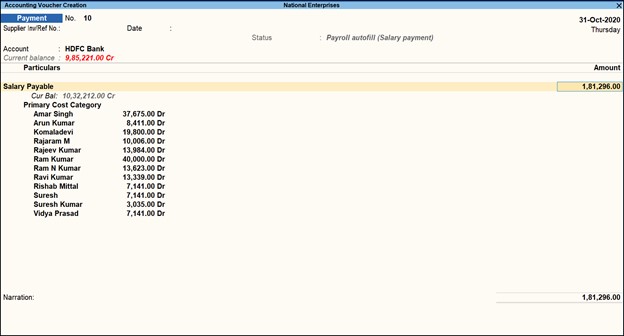
The actual payment of salary to the employees is most often through bank accounts. The organization’s bank account should be sufficiently funded before initiating the salary disbursal payroll process. A salary bank advice statement is generated based on the net pay for each employee along with their account number.
Reporting
Payslips and tax details are generated and given to the employees physically or digitally. Payroll reports that are required by the management have to be generated and submitted.
Compliance
The statutory deductions that are made from the employees’ salaries have to be paid to the relevant government agencies. The amounts have to be paid and the returns filed well within the due dates.
Process payroll accurately and on time every time
When there are gaps in the payroll data flow, the chance of computational or data entry errors is higher. It is essential that payroll should be error-free and in compliance with the laws and regulations. TallyPrime makes the payroll process quick and easy.
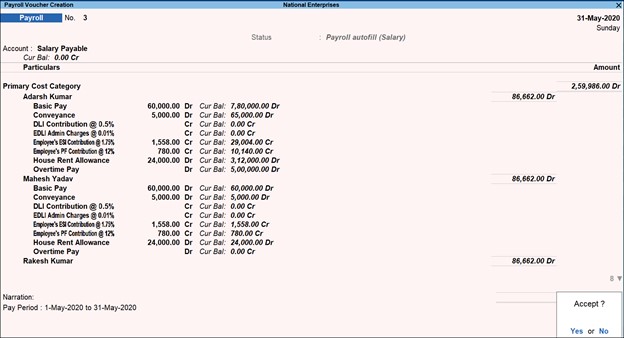
The benefits of payroll accounting with TallyPrime are:
- Integration with financial accounting. Tally seamlessly integrates the payroll amounts to the accounting process. There is no necessity for reentering all the payroll data into the accounting software
- Generates payslips for employees
- Enables payroll processing with compliance
- Also tracks the loan details of employees
- Allows flexibility in user-defined classifications, departments, groups, subgroups and other criteria. It also allows the user to define all the components of payroll such as attendance/time/production units, earning and deduction pay heads.
Accrual Basis of Accounting and Accrued Expenses
One of the fundamental accounting assumptions associated with the preparation and presentation of financial statements is the accrual basis of accounting. The following are three accounting foundations that are used by the business.
- Accrual Basis of Accounting
- Cash Basis of Accounting
- Hybrid Accounting
What is Accrual Basis of Accounting
The word “Accrual†can be explained as revenue and cost are accrued i.e., they are recognized as earned or incurred (irrespective of whether money is received or paid) and entered in the books of accounts for the period to which they relate.
The procedure of recording transactions by which revenue, cost, assets and liabilities are reflected in the accounts for the period to which they accrue. This includes considerations relating to deferrals, allocations, depreciation and amortization. This basis of accounting is also referred to as ‘Mercantile Basis of Accounting’.
How Does Accrual Basis of Accounting Works?
Accrual basis of accounting tries to record the financial effects of the transactions, events, and circumstances of an enterprise in the period in which they occur rather than recording them in the time period in which cash is received or paid by the enterprise.
The accrual basis of accounting recognizes that buying, producing, selling and other economic events that affect the enterprise’s performance often do not coincide with the cash receipts and payments for the given period. The motive behind following the accrual basis of accounting is to relate the accomplishments (measured in the form of revenue ) and the efforts (measured in terms of cost ) so that reported income ( net of expenses ) measures an enterprise’s performance during a period instead of merely listing its cash receipts and payments.
It also recognizes the assets, liabilities, revenue and accrued expenses for the amounts received or paid in cash in the past, and amounts expected to be paid or received in cash in the future.
Features of Accrual Basis of Accounting
The essential features of the accrual basis of accounting are:
- Revenue is recognized as it is earned.
- Expenses or costs are matched either against revenues so recognized or against the relevant time period to determine periodic income.
- Expenses that are not loaded to the income statement or profit and loss statement are carried forward and are kept under continuous review. So any cost thereafter which appears to have lost its utility or its power to generate future revenue is written-off as a loss.
What is Accrued Expenses
Accrued expenses refer to an expense related to the business operation which is recognized in the books of the accounts before it is paid, and these expenses are recorded in the books for the period they are actually incurred.
Accrued Expenses Recognition Rules
Under accounting by the accrual basis, the costs are matched either against revenues or against the relevant time period in order to determine the net income. All those costs which are not charged against the income of the period are carried forward. If any accrued expense has lost its utility or its power to generate revenue in the future, it is written off as an expense or a loss.
Under the accrual basis of accounting, the expenses are recognized by following the approaches explained below:
Identification with Revenue Transactions
Costs which are directly linked with the revenue recognized during the relevant period (in respect of which the money has been paid or not) are considered as expenses and are charged to income for the period.
Identification with a Time Period
Unlike some costs which have a direct connection with the revenue for the period, in most cases, the relationship is so indirect that it is impractical to attempt to establish its revenue relationship. These costs are regarded as ‘period costs’ and are considered as an expense in the relevant accounting period. salaries, telephone, travelling charges, depreciation on office building etc. are some of the examples which are identified using this approach.
Following are the treatment of accrued expenses by applying the above approach.
- The benefit of costs which do not clearly extend beyond the accounting period is charged as expenses.
- The benefit of expenses which could be traced to a future period is accounted as prepaid expenses even though they are paid in the current accounting period.
- Expenses of the current year, for which payment has not yet been made (outstanding expenses) are recognized and charged to the profit and loss account for the current accounting period.
- Contingent losses should be provided by a charge in the profit and loss statement only if it is confirmed that an asset has been declared not of use, impaired etc. and a rationale estimate of the resulting loss can be made.
Examples of Accrual Basis of Accounting and Accrued Expenses
Example -1
| Examples | Explanation |
| Mr Rehman, an accounting professional from Bangladesh provided accounting services of 10,000 Tk. to Marsh Hardware on 10th December with a credit period of 15 Days. Marsh Hardware paid 10,000 Tk in January. | Using the accrual basis of accounting, Mr Rehman will report the 10,000 Tk as revenue in the income statement and this will also be reported as accounts receivable in the balance sheet as on 31 December. |
| The rule used for the above example is related to revenue recognition: Here, revenue is recognized as when it is earned provided:
·      Revenue is measurable or the consideration receivable from the sale of goods, the rendering of services or use of resources of the enterprise is reasonably determinable. ·      Revenue in respect of which there is no uncertainty of collection is immediately recognized. |
|
Example -2
| Max Enterprises located in Indonesia paid office rent of Rp 1,500 on 31st December. They also incurred Rp 300 for electricity, gas, and sewer/water during December.
Max Enterprises was billed for utilities used on 10th January with a due date to pay the bill by 1st February. |
Using the accrual basis of accounting, Max Enterprises will report the rent expense in December. This is because the rent benefit was consumed, incurred and paid in December,
Max Enterprises will also report estimated utility expenses of Rp 300 so that the income statement provides a better measure of December’s profitability. In Balance sheet as on 31st December, a liability of Rp 300 towards utilities payable will be reported. This will show the accurate obligation of the company as on 31st December, |
Example -3
| Max Ltd has prepaid wages of Rs. 100,000. | As per the accrual basis of accounting, this will be recorded as an expense in the income statement. In the balance sheet, this will be shown as pre-paid expenses under the current assets. |
Rules used for example 2 and 3 are of matching costs with revenue and relevancy of time period. Here, costs are matched either against revenues so recognized or against the relevant time period to determine periodic income. This is explained in detail in the accrued expenses recognition rules section.
Differences Between Accrual Basis of Accounting and Cash Accounting
The difference between accrual accounting and cash-based accounting is in the timing of recognition of revenues, expenses, gains and losses.
Receipts of cash in a period may largely reflect the effects of enterprise activity in the earlier periods, while many of the cash outlays may relate to activities and efforts expected in future periods. Thus, an account showing cash receipts and cash outlay of an enterprise cannot indicate cash received vs the investment and also to what extent an enterprise is successful. On the other hand, the accrual basis of accounting gives you the complete and accurate view of expenses, income, liabilities etc. and help you measure the business in terms of profitability and financial position.
What is Cost Estimation: Definition and Example
Definition
Cost Estimation is a statement that gives the value of the cost incurred in the manufacturing of finished goods. Cost estimation helps in fixing the selling price of the final product after charging appropriate overheads and allowing a certain margin for profits. It also helps in Inventory Reports drawing conclusions regarding the cost of production and in determining the necessity to introduce cost reduction techniques in order to improve the manufacturing process.
Cost estimation takes into consideration all expenditure involved in the design and manufacturing along with all related service facilities such as machines setting; tool making as well as a portion of sales marketing and administrative expenses or what we call overhead costs.
Example and Methods
Isn’t it absolutely annoying to pay expenses each month, without knowing the amount that you’re going to write the cheque for? Being able to estimate business costs accurately can help you plan for the future and see trouble on the horizon. There are many ways to estimate costs, and each one is a different blend of difficulty and accuracy. Knowing some of these basic methods may help you choose the right one for your firm.
Least Squares Regression
A perfect amalgamation of accuracy and ease of use, least squares regression, analyses past data using mathematical estimation, to determine the variable and fixed components of a cost and provides an equation that can be used to predict future expenses. While this sounds complicated, the mathematics are built into most commercial spreadsheet programs, so adoption is as simple as entering your bill history and clicking a few buttons.
High-Low Method
This is a quick and an easy way to estimate costs that still hold accuracy. This method takes into consideration the highest and lowest levels of activity to calculate the fixed and variable components of the cist, but also ignore all the data that isn’t on the extremes. If the highest and lowest levels of expense are representative of the costs you are estimating, then you’re in good shape. If not, this method can overestimate or underestimate costs.
Scattergraph
Another quick and easy method to estimate costs is the Scattergraph method. While it might be the quickest and the easiest method to get your expenses estimates, the values derived post calculations might not be that accurate. To use the scattergraph method, you simply plot the cost vs. the level of activity on a graph and draw what you think is the best-fit line through the points. Once you’ve determined the best-fit line, the slope of the line is the variable cost per unit, and the fixed cost is the point where the line crosses the y-axis. The problem with the scattergraph method is that each person has a different idea of how to draw the best-fit line, giving each person a somewhat different estimate of the cost.
Statistical Modelling
For the largest of small businesses, statistical modelling can be a very accurate method of cost estimation. Industry-specific models are able to predict such complex variables in cost computations as hotel vacancy, food costs, and stock-based compensation expense. While these methods can be very accurate, the cost of implementation can be high, which puts them out of reach for many small firms.
While all these methods might cater to different models, with TallyPrime you need not worry about which method to use to calculate your cost estimates. Our cutting-edge technology and simple reports give you a consolidated estimation of each inventory at one go.
To view the cost estimation of a particular finished product, select the relevant Stock Group which will display the stock consumption details and cost thereof for each of the stock items falling under that Group. Cost estimation, however, is easier said than done. An accurate estimation method can be the difference between a successful plan and a failed one.
Revenue Expenditure: Definition, Types & Example
What is revenue expenditure?
Revenue expenditures are short-term expenses that are also known as revenue expenses and operational expenses (OPEX). Revenue expenditure is generally spoken to in relation to fixed assets as it records the expenses which have occurred in connection to a fixed asset. For example, if you have a piece of equipment that requires monthly maintenance then the expense will be termed under revenue expenditure. It involves all costs that are required for the successful running of a business such as salaries for employees and property taxes. Â Revenue expenditure is recorded during an accounting period or a single year.
Revenue expenditure types
Revenue expenditure can be divided into two categories; direct expenses and indirect expenses.
Direct expenses
Direct expenses are those costs that are incurred when goods and services are in the process of being produced. The costs that are incurred during the day-to-day operations that take place in the business are also direct expenses. For manufacturing companies, examples of direct expenses include the costs that are incurred for the conversion of raw materials to finished products or goods. Direct expenses also include costs such as electricity used during the production, wages paid to workers, legal expenses, rent, shipping-related costs, and freight charges.
Indirect expenses
Indirect expenses are the second type of revenue expenditure. These types of expenses are usually incurred when the finished goods and services are being sold and distributed. These expenses include taxes, salaries for employees, depreciation, and interest among others. Indirect expenses also include repairs and maintenance costs. Although these costs aren’t directly linked to the finished products, they are required to ensure the proper functioning of the asset which in turn supports the proper functioning of the business.
Example of revenue expenditure
A company called A&J spends 100000 BDT on a machine used for the production of goods. To ensure the proper functioning of the machine, a monthly fee of 1000 BDT is spent. In this example, the revenue expenditure is 1000 BDT which has been spent on the upkeep of the machine on a monthly basis. When the income statement will be prepared, the 1000 BDT will have an entry for that particular month where the upkeep expenditure was made. In case the machine has an issue and needs to be repaired, the cost of repair will also fall under revenue expenditure and will be reflected on the month during which the expenditure was done.
Revenue expenditure Vs. capital expenditure
Revenue expenditure and capital expenditure are often confused for one another which makes understanding their differences even more vital.
| Revenue expenditure | Capital expenditure |
| Functionality | |
| Revenue expenditure is the expense that is used to run your business on a daily basis. It includes the costs used to ensure the proper functioning of a fixed asset repair costs, maintenance costs, and costs that are incurred for current operations. It differs from the cost used to acquire or buy an asset. Examples of revenue expenditure include rent, utilities, and office supplies. | Capital expenditure, also known as a capital expense or Capex, is the expense that is used to acquire a capital asset. This asset is a long-term asset that is used to improve how the business functions by boosting efficiency. Examples of capital expenditures include vehicles, computer equipment, land, fixtures, software, office buildings, and so on. |
| Consumption | |
| Revenue expenditure is consumed within a short span of time. For example, the regular upkeep of equipment is done monthly or every quarter depending on the type of equipment used for the production of goods. Â Revenue expenditure is a recurring expense that your business needs to spend every month or every few months. It is not a one-time investment. | Capital expenditure is consumed over a long period of time until the asset is useful or until the asset has reached its end of life. For example, machinery is used for many years until it is able to function correctly. It is not a recurring expense as your business needs to pay for the cost of the machinery only once. |
| Reporting | |
| Revenue expenditure is reported in the income statement of your business whenever the expense was incurred. It is not stated in the balance sheet. When it comes to charging revenue expenditures, they are charged immediately in the current period during which you paid for it or after a short period of time. | Capital expenditure is reported in the cash flow statement of your business and in the balance sheet. When being reported in the balance sheet, it is stated under fixed assets. Capital expenditure isn’t immediately charged as an expense. Instead, it is charged over a long period of time until you will use it using depreciation. This is a gradual process. |
| Purpose | |
| The purpose of revenue expenditure is to ensure the assets such as machinery are functioning optimally at all times and so this expenditure comes into the picture after the business has started operating. These expenditures are used to sustain your business. Although these expenditures do not add more capability to the asset, they are used to ensure the asset works as it should. | The purpose of capital expenditure is to generate more revenue over time. It involves expanding the business and investing in machinery that is going to give ROI and long-term gain. For example, an expensive machine in a manufacturing plant can be acquired to improve current processes so that it can contribute to revenue generation. These expenditures come into the picture before your business starts to operate. |
| Cost | |
| When it comes to revenue expenditure, the cost associated with them is comparatively lower than that of capital expenditures. Revenue expenditure isn’t the expense related to investment so it is generally smaller. In certain cases, the expense related to revenue expenditures can be large as long as the cost is a period cost or it is an expense related to the revenue. | Your business will pay much more for anything that falls under capital expenditure. Firms usually have a threshold value that marks the distinction between revenue expenditure and capital expenditure. If the expenditure is more than the threshold value then it is considered a capital expenditure, else it might be a  revenue expenditure. |
Both revenue expenditure and capital expenditure are equally important
It is wrong to say that either is better than the other because both are required for your business to operate without issues and generate profits. Capital expenditure is critical because it can improve business efficiency. Revenue expenditure is vital as it ensures smooth business operations so there is nothing stopping your business from operating fully. Your business must manage and monitor both these expenditures to ensure you are not over-spending on each. If you do so regularly, you can effectively use strategies for regulating these expenses.
TallyPrime is an ERP accounting software that provides a powerful combination of ERP and accounting software. It can be of help when it comes to both revenue expenditure and capital expenditure. TallyPrime ensures you stay within your budget, know your spending history, and spend wisely. With the help of its robust reports, you get instant insights that can drive your business decisions in the right direction
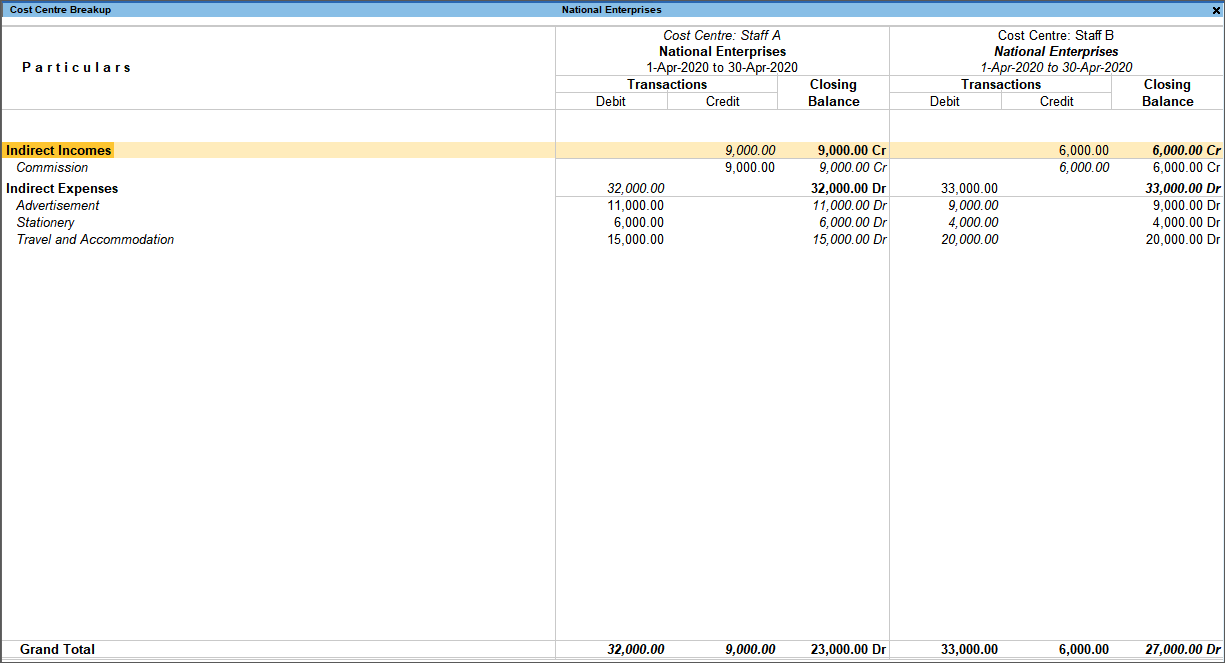
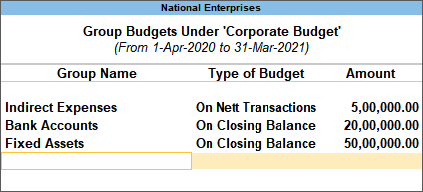
Using TallyPrime’s cost centre management will help you stay on top of all the spending’s even on little expenses and make confident decision. What’s more? You can set budget and track the variance.
How to Set GST Details in TallyPrime GST Software
Generate e-Way bill Instantly Using TallyPrime
Electronic waybill, popularly known as an e-Way bill is a document that needs to be generated for consignment involving the movement of goods beyond the notified value. Most states have a threshold value of 50,000 and a higher threshold value in a few states.
e-Way bill is not a new concept. It has been in place for a few years now and in fact, even before GST with different names. We all know it is a process that requires the supplier/transporter to generate an e-way bill from the portal before transporting or shipping the goods. Once the e-way bill is generated, a unique number is generated for a specific consignment along with an e-way bill document and the supplier can choose to capture it on the invoice.
Today, most businesses generate e-way bills by mentioning the invoice details on the portal either using offline tools (JSON) or direct entry on the portal. While it is a mandatory need, but the effort and time that goes into generating the e-way bills, make the entire process of invoicing to shipping a cumbersome one. Guess, this is a common difficulty that you must have already felt irrespective of how big or small is your business.
To alleviate the difficulty in the current way of generating the e-way bill and to make the entire process simple and seamless, the latest release of TallyPrime comes with an inbuilt connected e-way bill solution that generates e-way bill instantly.
Yes, you read it right! You just need to record an invoice and the e-way bill be generated automatically.
Using TallyPrime’s online connected e-way bill solution, you can instantly generate e-way bills. All you need to do is just record an invoice in your usual way, and TallyPrime will automatically generate an e-way bill and capture the e-way bill number on the invoice.
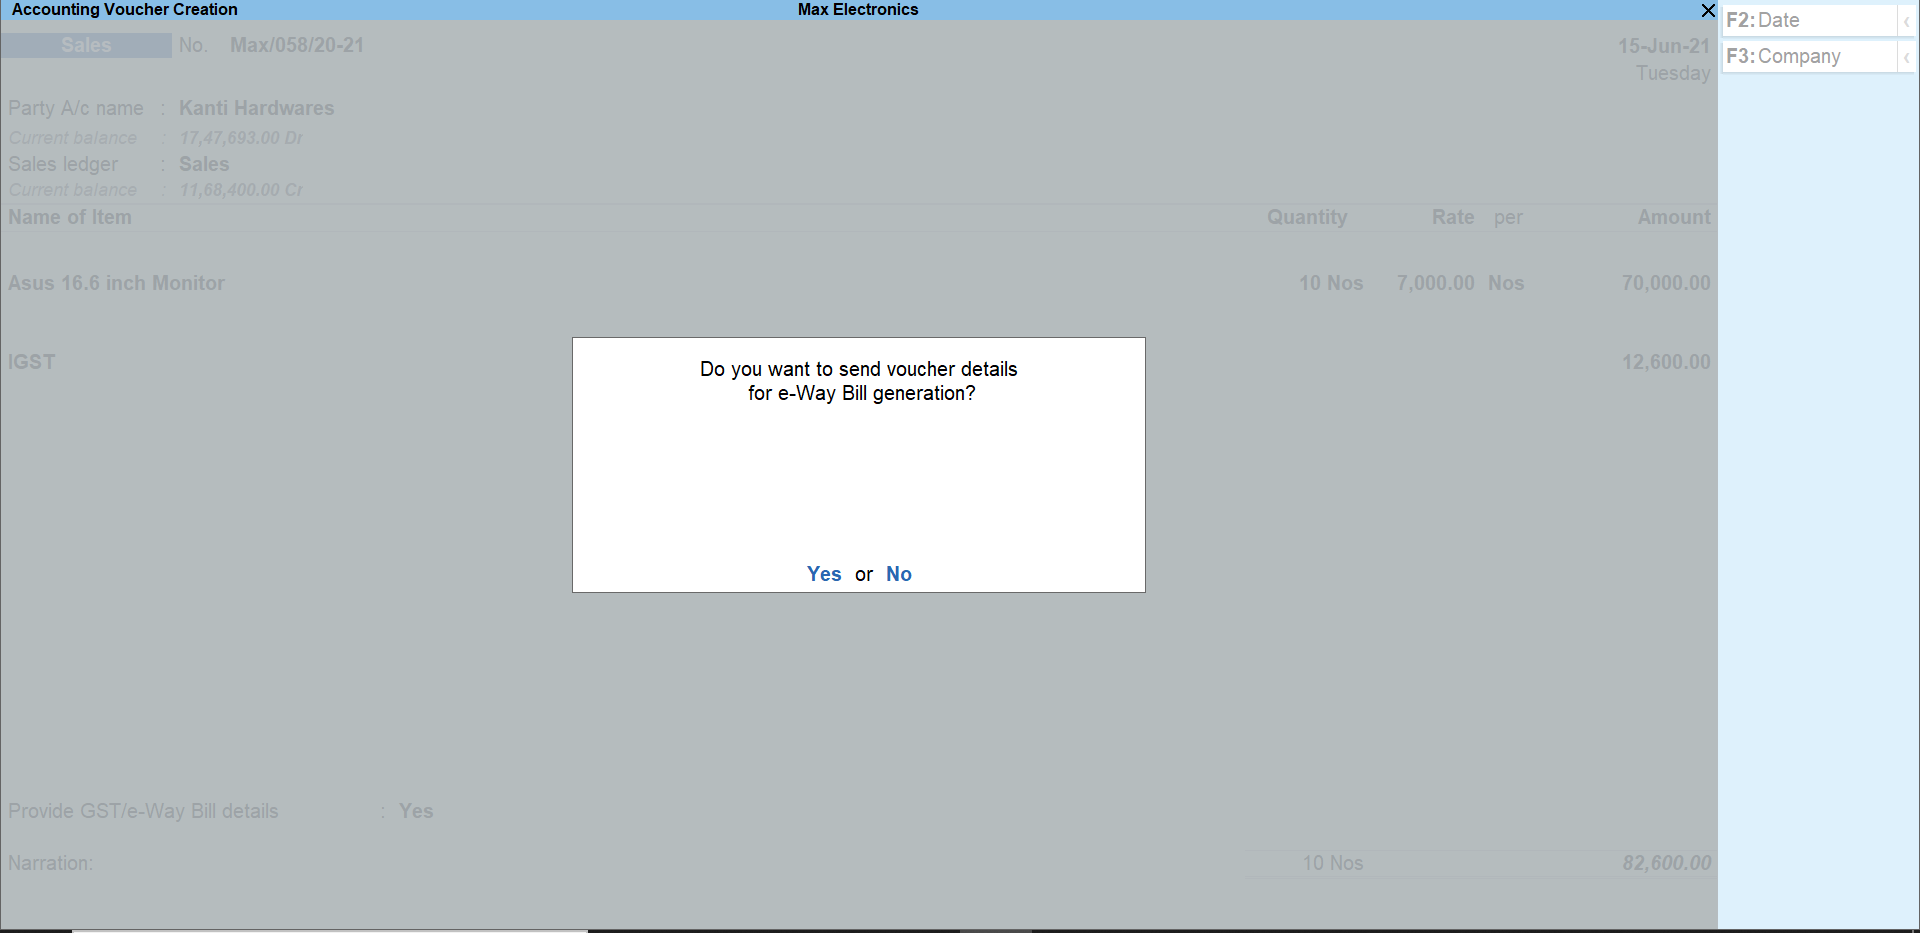
Tally being one of the recognised ISO certified GSP (GST Suvidha Provider), TallyPrime directly integrates with the e-way portal to seamlessly generate e-way bills for you. It is so simple that you will certainly feel that generating an e-way bill is just the same as invoicing.
Online connected e-way bill features in TallyPrime
Tally’s fully connected e-way bill solution is simple, seamless with zero manual work. Take a look at some of the key features of a connected e-way bill solution.
Generate e-way bill instantly.
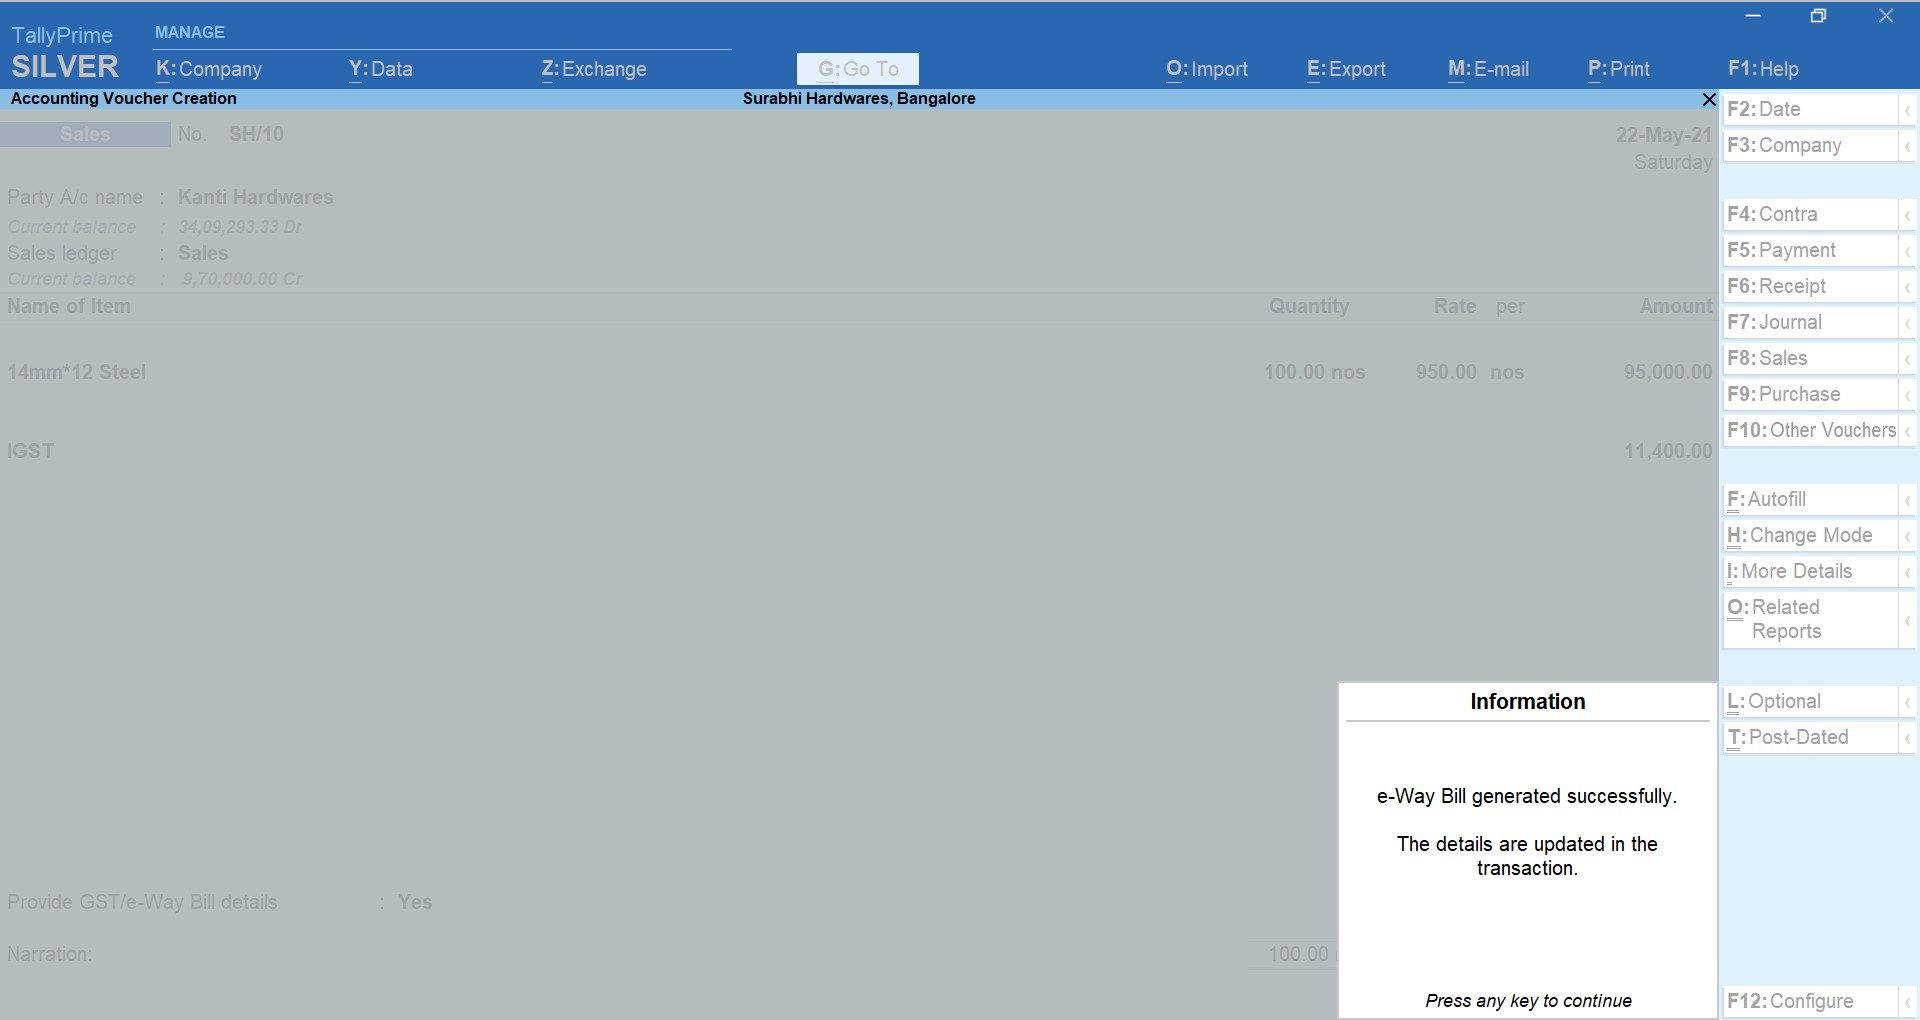
Given the compliance need of e-way bills in the process of invoicing and shipment, you no longer need to look at invoicing and e-way bill generation separately. Using TallyPrime, you seamlessly generate an e-way bill online by just recording the invoice. TallyPrime’s full connected solution absorbs the complexity by directly sending the details in prescribed format to the portal and fetches e-way bill details automatically.
Cancel, Extend and update e-way bill online
In some situations, the invoices for which e-way bill is already generated requires to be cancelled. It could be for various reasons such as data entry mistake/order cancelled etc. Also, in an exceptional circumstance like natural calamity, trans-shipment delay, accident, break-down etc. you may want to extend the validity of the e-way bill. No matter what situations you encounter, using TallyPrime, you can cancel, extend ad update e-way bills online without the need to manually perform these actions from the portal.
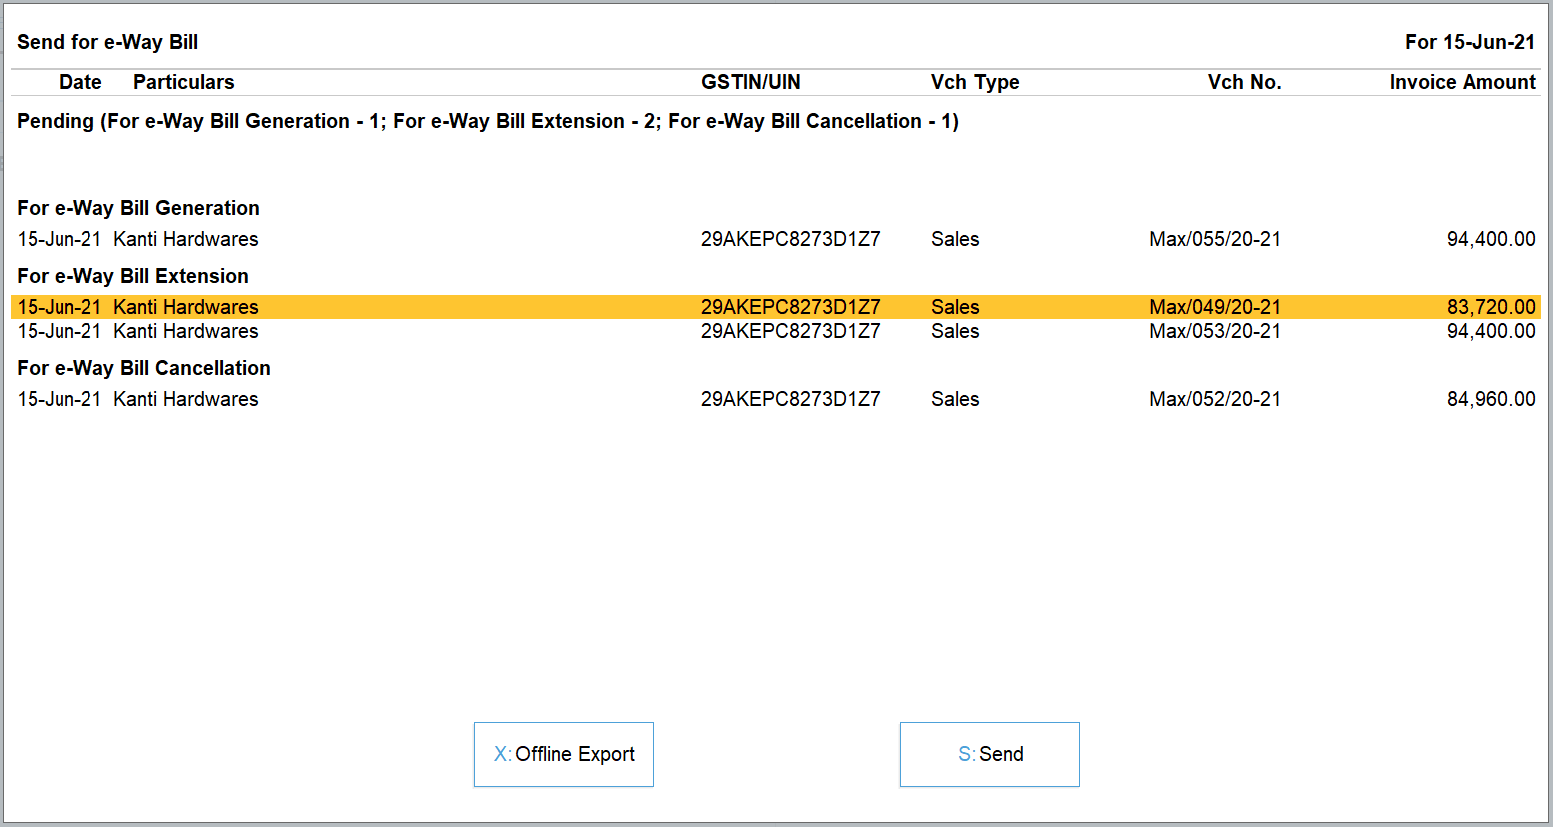
Also, for some reason, if you have generated an e-way bill either manually or using any of the available modes (outside TallyPrime), you can auto-fetch such details and capture the e-way bill number on the invoice. Thus, keeping your books up to date.
Flexibility to generate EWB online along with e-Invoice or separately.
By design, the e-invoice system (IRP) integrates with GSTN and e-way bill system. As a result, one can generate an e-invoice along with e-way bill as well. Using TallyPrime’s connected e-way bill solution, you get even more flexibility to do so. You can choose to generate an e-way bill along with an e-invoice or can separately generate only e-way bill as it suits your need.
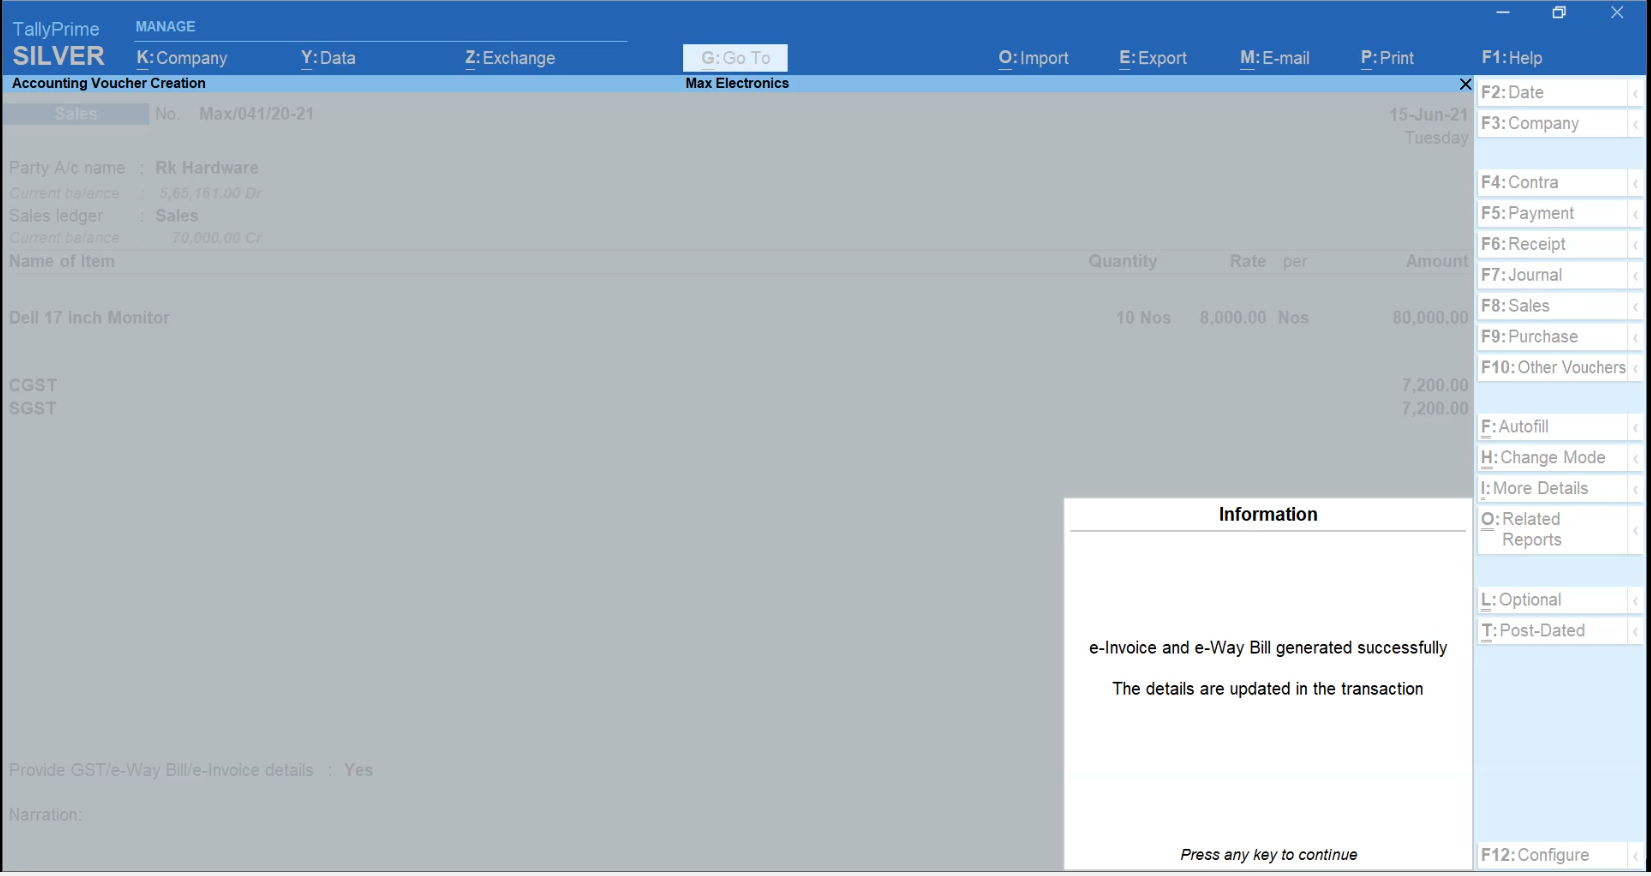
Flexibility to generate e-way bill for a single invoice or in bulk from a report
TallyPrime’s connected e-way bill solution comes with the flexibility to generate e-way bill for a single invoice or in bulk. You can generate an e-way bill for a single invoice in the flow of recording the transaction or you can choose to generate e-way bills in bulk (for more than one invoice) from the report. Generating e-way bills, be it a single invoice or bulk is amazingly simpler and faster.
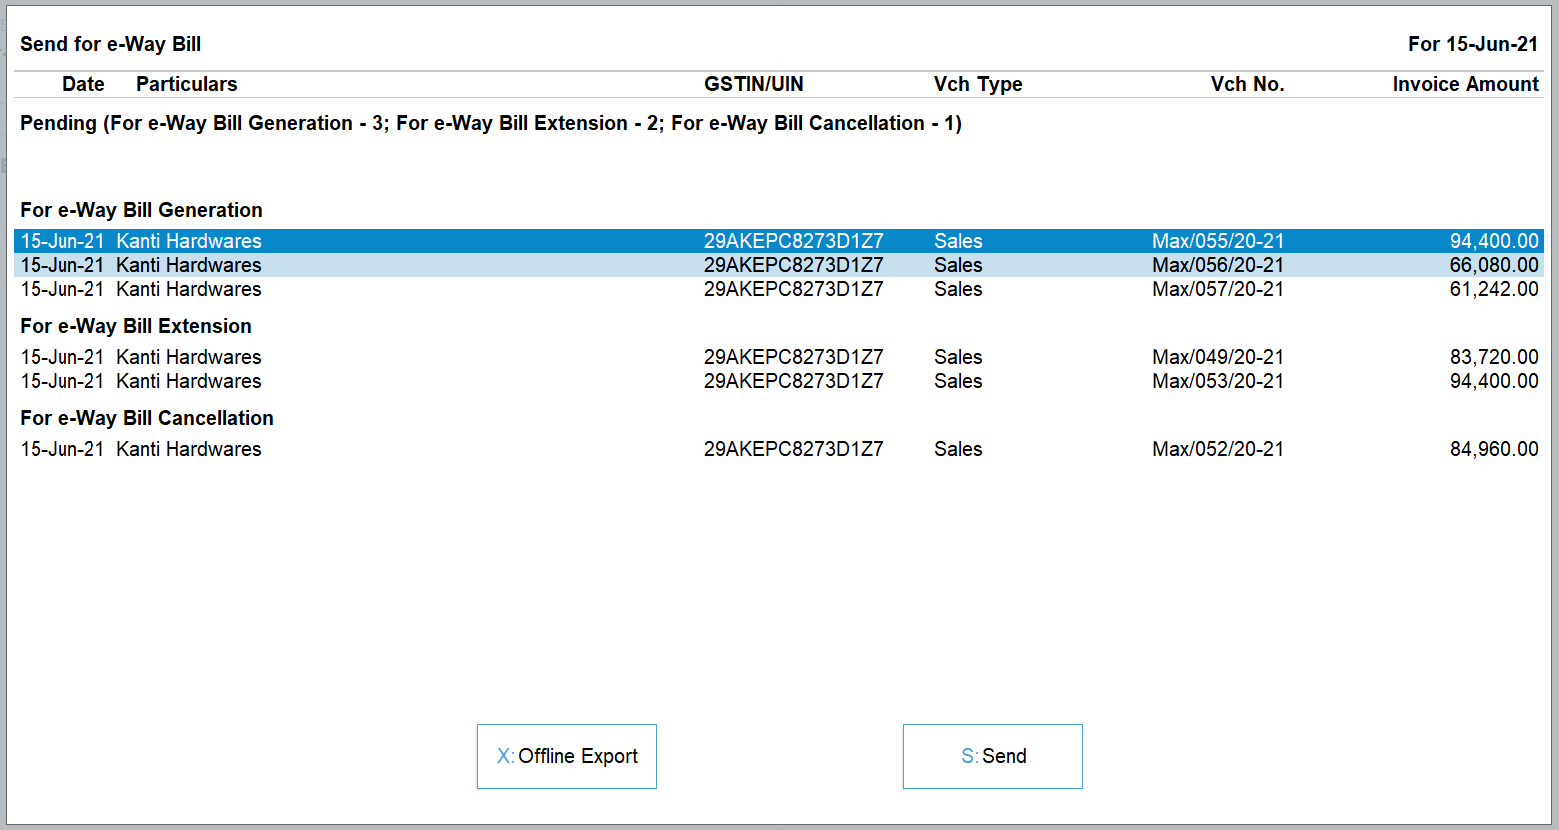
Enhanced e-way bill reports
TallyPrime’s connected e-way bill solution comes with exclusive reports for e-way bill giving you a complete view of the e-way bill transactions and their status. With the help of the report, you will stay on top of the e-way bill status (Pending/cancelled/generated) and perform various other actions such as cancel, extend, etc. as per your needs.
Supports other modes for e-way bill generation.
In case of exigency cases like unavailability of internet services on a system or due to any other reason, if you wish to use other modes of e-way bill generation such as using offline utility, a direct entry on the portal etc. TallyPrime fully supports these situations. Â Not only it supports these circumstances, but also auto-fetches details and updates the e-way bill number on the invoice. Thus, keeping your books up to date.
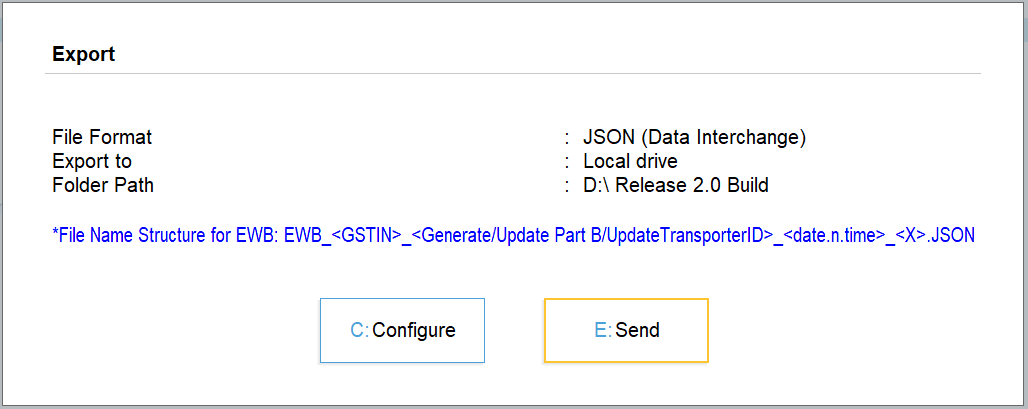
What’s more? The online connected e-way bill solution of TallyPrime comes with an inbuilt alert system to prevent redundancy and ensure that the latest data is shared with the portal, especially in a multi-user environment. Furthermore, the renowned and trusted ‘Prevention, Detection and correction’ capability ensure that the transactions are validated and only the correct and complete details are sent for e-way generation. This way you can prevent errors and work error-free.