To enable Cheque Printing in Tally.ERP 9,
- Go to Gateway of Tally > F11: Accounting Features
- Set Enable Cheque Printing to Yes
- Set/Alter Cheque Printing Configuration to Yes.
The screen appears as shown.

Once the option Set/Alter Cheque Printing Configuration is activated to Yes, you will get the Company Cheque Details screen.
Company Cheque Details screen Appears as shown

Company Name on Cheque:
To print the company name on the cheque for signature purposes, mention the name of the Company (for example, ABC Company). If you do not want Tally.ERP 9 to print the name, you can leave it blank. Many banks issue cheques with your company name printed.
Name of Banks
Select the Bank from the Bank accounts list.
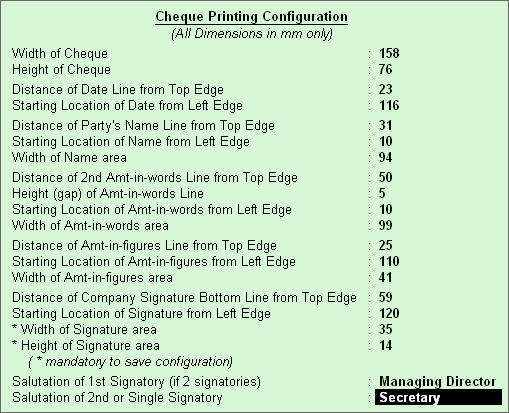
You will have to fill in the dimensions of the cheque. Tally.ERP 9 accepts user defined cheque dimensions. Take the banks cheque book and measure the dimensions of a cheque leaf carefully in millimeters and fill in the above form. You may need to correct it after trying out a couple of cheques so that the positioning is accurate. The placing of the cheque in the printer also determines the printing. To avoid mistakes trial could be made on photocopies of a cheque before using an actual cheque leaf.

82 comments on “Enabling Cheque Printing in Tally ERP 9”
Comment navigation
Please tell me how can i print date dd-mm-yyyy (22-04-2013) while printing cheque
Dear Shrikant,
Go to your bank ledger
GOT > Accounts Info > Ledgers > Alter > Bank > Set /Alter Banking Configuration : Enable Yes
In that Set/ Alter Cheque Printing Configuration : Enable Yes
and Select the necessary chq image withe dd-mm-yyyy and save it
Best Wishes
Admin
THERE IS NO OPTION IN TALLY 9 i.e dd-mm-yyyy and while we take print of cheque it become like 01-Apr-13. but i want it become 01-04-2013 so please how it becomes.
Good post! We are linking to this great article on our site.
Keep up the great writing.
I want to print A/C PAYEE in the middle of the cheque from tally ERP 9
WILL YOU PLEASE LET ME KNOW THE CHEQUE DIMENSIONS OF THE KARUR VYSYS BANK FOR CHEQUE PRINTING IN TALLY ERP 9.
i wanted to punjab national bank cheque diminsion
for printing the cheque in tally 9 the date comes as 01-Apr-13 but i want
it become as 01 04 2013 so please help me.
I Need the setting of cheque Printing of ORIENTAL BANK OF COMMERCE
Dear Durgesh,
Please update your Tally ERP 9 Release. Tally has put almost all banks chqs sample in built in his latest Release.
Please follow the link to download the latest Tally Release
http://www.tallysolutions.com/tallyweb/modules/operation/extranet/CXERPDownloadViewMgr.php
Best Wishes
Admin
Sir,
please give mearuments & dimensions for UNION BANK OF INDIA cheque and also i m using hp deskjet printer how do i feed the page to print the cheque
hello sir
can i want to parint my bank account no in my cheque if it possible then how
Dear,
Please send me axis bank cheque set up (dimensions)
I need to print a/c payee in middle of cheque .. is it possible?
sir
i need seeting of axis bank in tally erp9
am using tally erp,i want know how can print blank dated cheque for any companies
please send me axis bank cheque setup.
Please sir send me union bank of india cheque setup
I Want to know cheque measurement of punjab national bank. pleas give me right information.
thanks you
sir,
how can enable multiledger printout in tally erp9
how can enable multicheque printing in tally erp9
Dear Sooraj,
In your main screen i.e. Gate way of Tally > Multi Account Printing > Accounts books > Ledger > All Accounts
you can print multi ledger
Best Wishes
Admin
am using tally erp,9
I want know how can print blank dated cheque for any companies
Sir,
please give measurements & dimensions for UNION BANK OF INDIA Cheque and also i m using hp deskjet printer how do i feed the page to print the cheque.
Please tell me immediately.
Dear Pari,
Upgrade your Tally.ERP 9 Release, in upgraded release you will get by default measurement of all banks
Best Wishes
Admin
how can i configure place of issue under date in tally 9
Dear Lijo,
Can you explain in detail what exactly date problem your are facing in Tally.ERP 9
So we can help you for the same
Best Wishes
Admin
Error in TDL.
‘Part:PCSignatory’
Insufficiwnt height to allocate
if i maintain payroll of employee in tally then how i see Outstanding Balance.
if i maintain payroll of employee in tally then how i see Outstanding Balance of employee.
hiw can we print a cheque in takky what are the steps
dear sir how to print chaque in tally erp 9 and how back up company any risk without loose data
Comment navigation